Memory dumps of a developer
Articles and tutorials on .NET Core, ASP.NET MVC, Kendo UI, Windows 10, Windows Mobile, Orchard
Part 3 – Setting Widget Properties
So far in the series we have already seen how to incorporate Kendo UI in web pages and also how to initialize it. Please visit my last post to if you needs to recollect it. In this post I will be explaining how to set various options available for a widget.
First, let’s see how we can set values for options while initializing the widget itself. I am going to use the DatePicker widget itself and will set the values for the start and format options of the widget. The start option specifies the start view when we click on the calendar icon in the textbox for the first time. Available options for the same is given below.
Part 2 - Getting started with Kendo UI
In the last post I gave an introduction to Kendo UI about it’s features and advantages and also about the various bundles offered by them. In this post I will help you to get started with development using Kendo UI in your web applications.
As I said in my earlier post, Kendo UI is built on top of jQuery, so it’s a pre-requisite to have jQuery in your application. The latest version of Kendo UI requires jQuery version 1.9.1 or higher and you can download it from their site or can use any of the CDN’s which hosts jQuery. Please visit the link here to know more about the prerequisites.
I will be using Kendo UI Core bundle which is a free offering from Telerik and can be downloaded from their site. To download you need to register an account with them and will be able to download the archive once you signed in to their site. The downloaded archive will contain folders as shown below.

Pic Courtesy – Telerik
Part 1 - Introduction to Kendo UI
Kendo UI is a HTML 5 and JavaScript based framework from Telerik which helps you to create modern web applications for the web as well as for mobile devices. Built on top of jQuery, Kendo UI uses the power of HTML5 and CSS3 for rendering various types of widgets that can be used in our web pages as well as mobile applications for delivering rich, responsive content with minimum amount of development activity.
It includes a lot of UI widgets, data visualization framework, mobile framework and tools such as MVVM Framework, data source templates, drag and drop components, themes etc. It supports most of the browsers available today and there by providing cross platform/cross browser support for your application. Gone are the days when you put in browser specific codes in your pages to make it browser compatible, with Kendo UI you need to concentrate on your functionality of the application and all tricky situations like this will be handled automatically by Kendo itself.
Exposing Database using a WCF Restful Data Service
Last month I was preparing for a training session on Kendo UI using JavaScript which included some advanced topics using Kendo Grid. I was on the lookout for a sample service to show the CRUD operations in Kendo Grid and did find couple of services hosted by Telerik itself and by OData community. Since they were mainly read only services, I was unable to do any update or delete operations using the methods exposed by them. So I was thinking about creating a new service for my purpose and then I stumbled on this piece in MSDN which helped to save a lot of precious time that may be needed for creating a new one from the scratch.
I will be using the Northwind database for this purpose and if you don’t have a copy of the same with you, you can go here and download it. Once you are ready with database, we can proceed to create the service. Again I will be using the VS 2013 Community which is a subset of the Ultimate version and is offered free of cost by Microsoft.
Create New Project
Maintaining a blog powered by Orchard using WebMatrix
Orchard is one of the most powerful content management system developed on top the Microsoft stack and is widely used across the globe with the recent being the blogs hosted under weblogs.asp.net is now being powered by Orchard. You can read more about it in John Galloway’s blog here.
I have also migrated mine from DotNetNuke to Orchard at turn of the year and it’s been good journey so far when compared to DNN, eventhough faced some hiccups here and there. When compared to other CMS like WordPress or Blogger, Orchard is lacking some of the features and needs to do some workarounds for acheiving that. Couple of things I liked most in Orchard is the support for Bootstrap theme and the widgets, it’s really easy and fun playing with it.
So coming back to our topic, I am not a good fan of the inbuilt editors in the dashboard of many CMS for authoring the posts, so I normally use Windows Live Writer for writing and publish my posts. If you are a blogger and hearing it for the first time, go ahead to download page at Microsoft site to have try. If you are a developer, then certainly you will like to play around with the inner working of various components in Orchard. Even though there are variety of options like Visual Studio itself, I found WebMatrix as a great tool for doing most of the nitty gritty works. It’s free, small download size, light weight and easy to use. To know more about it, go through this link and also has the link for downloading it too.
The home page will have the options as shown in the image below.

Check out and Check in files hosted in VS online account using VS Community edition
In the previous post I showed you how to add a newly created file to the source control and in this post I will be discussing about the check out and check in process from the IDE.
Checking out files
To check out the file, you need to right click on the file in the Solution explorer to bring up the context menu where you will find the option for checking out the file.


When you click on the Check out for Edit menu item, you will be presented with a dialog box which will have two option, the first one will retain an exclusive lock after the check out and prevent others from check in. The second one will allow other users to check out the file but won’t be able to check in their changes until the the one who has the lock check in the file. I am going to select the first one which is also the recommended option.
Once the operation is completed you will be free to make any changes in the code and save the files locally. When you are done with the editing we can see how the files can be checked in to the source control.
How to add Read More link for your post in the summary page in Orchard Blog
Whenever you create a blog post in Orchard you don't need to show the full content in the home page or in the summary page for posts. By default Orchard will strip all the markups and show only the first 200 characters in the summary.
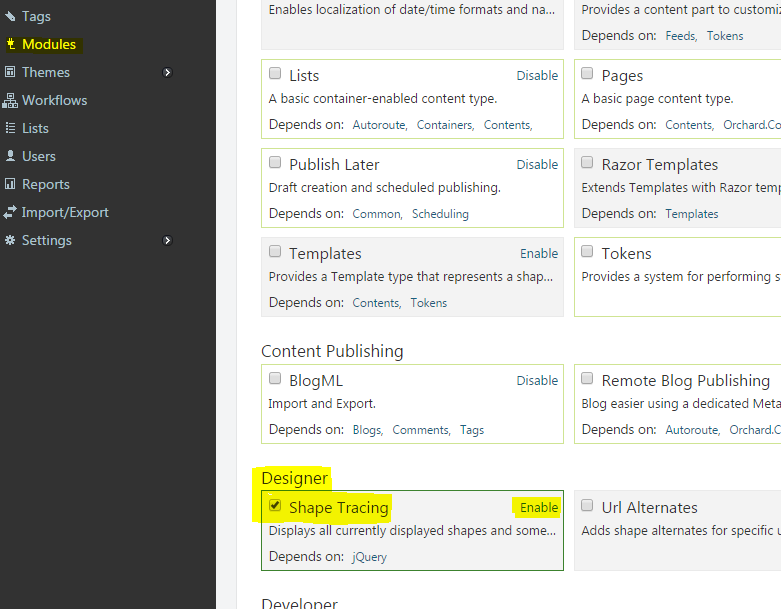
First, let's find out how Orchard handles this with the help of Designer Tools. If you are using Orchard 1.7 or higher then this module comes with default and don't try to install it because you may run into compatiblity issues. For those with older version you can install them from the Modules section. You need to enable Shape Tracing which will be disabled by default after installation and can be done from Modules as shown below
Adding files to Visual Studio Online using VS 2013 Community edition
In this post I will show you how to add the newly created files to the repository, in this case Visual Studio online account we had created in the earlier post which you can refer here.
In the blank solution we had created earlier and I have added one project and some files to it. The newly added files can be identified by the + plus appearing next to the filename in the solution explorer.
You may wonder that, why are you getting the red lines appearing under the solution/project/file name in your solution explorer. That’s because I have installed an extention know as the productivity tools for Visual Studio , which will show these lines if it contains any sort of build errors during the editing phase itself. One of the main reason that I shifted to the community edition from the express edition is that it supports most the features like these found in the paid versions. If you are interested in these type of tools, you can to the site here and download it.

To exclude commented code when using Find and Replace in Visual Studio
You can use regex along with the search term as given below
^(?![ \t]*((\/\/)|(\/\*))).*your_search_term
and don’t forget to check the Use Regular Expression option in the Find dialog box.

Hosting your first project in Visual Studio Online and Getting started with Visual Studio 2013 Communtiy edition
During last week’s Connect event, Microsoft surprised us with a lot announcements such as moving up more and more things to open source, plans to make ASP.NET cross-platform and a free edition of a Visual Studio named Visual Studio Community 2013. Unlike the express versions for all the flavours such as web, desktop we have till now, the Community edition is a full featured edition of Visual Studio with curbs on use for enterprise development. It supports features like extensions which was sorely missed in the express edition and is perfectly suitable for developers like me and small business houses. Till now we have to use different incarnation of express editions of Visual Studio if you are not using their paid tools, but in community edition we are able to develop application for Web, Windows, Phone, Cloud, iOS, etc. If you interested then you can go here to read more on this and click here to go to the download page.
Another great free service from Microsoft is Visual Studio Online, which leverages the capabilities of Team Foundation Server and can be used as the repository for all your development projects. If comes with support for five users in the free tier, supports various editors such as Eclipse, Xcode and of course Visual Studio. Please go through this link to know more about the service.
In this post I am going to show how can we host and mange a project created in VS 2013 Community edition in Visual Studio Online right from the IDE itself.
Step 1
Create an account with Microsoft account at https://app.vssps.visualstudio.com and follow the steps mentioned in the screenshots.


Step 2


Connecting Azure Blob Storage account using Managed Identity
Posted 12/9/2022Securing Azure KeyVault connections using Managed Identity
Posted 11/26/2022Manage application settings with Azure KeyVault
Posted 11/9/2022Adding Serilog to Azure Functions created using .NET 5
Posted 4/3/2021Learn how to split log data into different tables using Serilog in ASP.NET Core
Posted 4/23/2020