MVC
Bug : dotnet CLI Template Engine Produces Invalid Code if Name of the Directory is a Valid C# Keyword
With the release of .NET Core 1.0 tooling, dotnet new make use of the templating engine to generate various types of projects like Console App, Web App, WebAPI etc. If you are not aware of it, please read my earlier post on it here.
Executing a Task in the Background in ASP.NET MVC
In some cases we want to execute some long running task in the background without affecting the main thread. One classic example is sending mails when we are implementing a sign in module. Mostly people will either go for a scheduled job independent of the application or do it in the main thread itself.
.NET Framework 4.5.2 has got a new API called QueueBackgroundWorkItem which can execute short-lived resource intense tasks in an effective and reliable manner. As per the documentation
QBWI schedules a task which can run in the background, independent of any request. This differs from a normal ThreadPool work item in that ASP.NET automatically keeps track of how many work items registered through this API are currently running, and the ASP.NET runtime will try to delay AppDomain shutdown until these work items have finished executing.
One of the advantages of using the QBWI(QueueBackgroundWorkItem) is that it can keep track of the items that are registered through this API is currently running and the runtime will be able to delay the shutdown of the App Domain upto 90 seconds so that the running tasks can be completed.
Let's see an example of file upload in ASP.NET MVC. In this example, I will chose file from the local machine using the file upload control and when you click the Upload button, the file will be saved inside a folder in the server which will be handled by the QBWI.
View
@{ ViewBag.Title = "Index"; } @model List<string> <h2>Index</h2> @using (Html.BeginForm("UploadFile", "Home", FormMethod.Post, new { id = "frmImageGallery", enctype = "multipart/form-data" })) { <input type="file" name="file" /> <input type="submit" value="Upload" id="btnUpload" /> } <h2>Images</h2> @foreach (var item in Model) { <p><img src="@String.Concat("Images/Uploaded/",item)" style="height:200px" /></p><br /> } <script> $(function () { $(document).on("click", "#btnUpload", function (event) { event.preventDefault(); var fileOptions = { success: res, dataType: "json" } $("#frmImageGallery").ajaxSubmit(fileOptions); }); }); </script>Host ASP.NET MVC Application in a Windows Container in Docker
In an earlier post which I published a week go, went through the steps needed for setting up an IIS server in a Docker container running on a Windows Server 2016 machine. In this post, I will explain the steps needed to host an ASP.NET MVC application on a IIS server running inside a docker container based on Windows
Step 1 : Setup IIS with ASP.NET Support
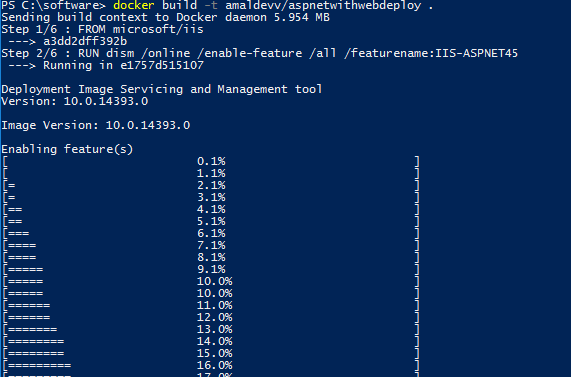
First, we will create a new image based on the official IIS image released by Microsoft. Because in that image features such as ASP.NET 4.5 and Microsoft Web Deploy are not installed by default and we need to have it for deloying our application. So download the installer package for Web Deploy from the Microsoft site and store it in a folder in your local machine. To create the image I have created a Dockerfile as given below
FROM microsoft/iis

RUN dism /online /enable-feature /all /featurename:IIS-ASPNET45

RUN mkdir c:\install

ADD WebDeploy_amd64_en-US.msi /install/WebDeploy_amd64_en-US.msi

WORKDIR /install
RUN powershell start-Process msiexec.exe -ArgumentList '/i c:\install\WebDeploy_amd64_en-US.msi /qn' -Wait
Let's create the image by executing the following command
docker build -t amaldevv/aspnetwithwebdeploy .
When the command is executed, it will first check whether image for IIS is available in locally in docker and if it's not found then will download it from Microsoft repository in Docker Hub. The second statement in the file is for installing the ASP.NET 4.5 feature and once that is finished it will create a folder named install in the container and then copies the installer package for Web Deploy which we downloaded earlier into it. After that msiexec process is called using Powershell to install Web Deploy inside the container
You can verify the images is successfully built or not by executing the docker images command as shown below

elmah.io - Logging Exceptions to the Cloud
Elmah stands for Error Logging Modules and Handlers is a great open source application logging utility for ASP.NET which is available for some time now. Some of the features provided by Elmah are given below.
- Logging Unhandled exceptions
- Provides a web page to view the logged exceptions
- Also provides a web page to view all the details of a logged exception
- Option to send an email notification when an error occurs
- RSS feed for the last 15 errors from the log
- Options for backing store for the log includes in-memory, SQL Server, flat file, Oracle, SQL Lite etc
Normally when we log exceptions we will keep the info in a flat file or in the database, but Elmah got another option which is to directly store all the logs in the cloud via elmah.io without much change to your existing framework.
Set Up elmah.io
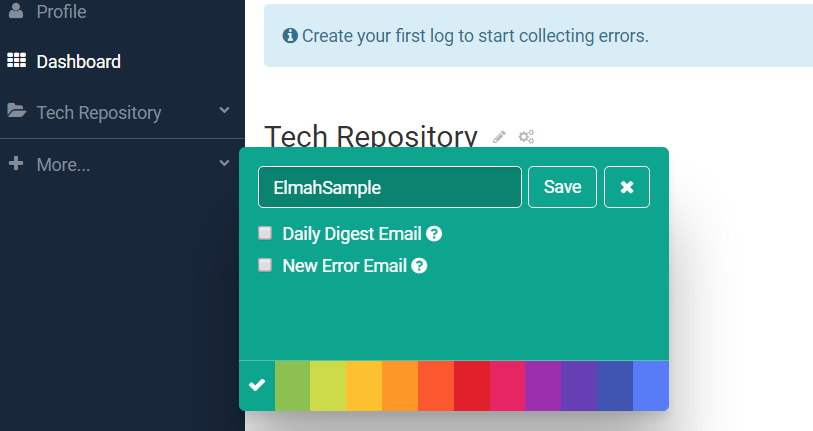
First you need to create an account in elmah.io, it's pretty simple and even you can use any of social logins provided by Twitter, Facebook, Outlook or Google. Once you create the login, just create a log for your application from the dashboard. Just give a name for the log and click save. We will leave the other options for the time being. Also whenever a log is created, Elmah will create a unique id for the log, keep a note of it as we need it later when we configure it in our project.
Setup your project to use elmah.io
Now, in our project we need to add a Elmah logger by installing the following command in the Nuget Package Manager Console.
Install-Package elmah.io

RemoteValidation Attribute in ASP.NET MVC
One great feature we have in ASP.NET MVC is ability to do client side validations using Data Annotations and it definitely save a lot of time from writing mundane client side scripts for validations such as required, number formats, email formats etc. When we decorate properties with validation attributes, the runtime will inject JavaScript automatically when the page is rendered to do that validation. But in some scenarios we will need to do the validation in the server side say in cases such as we need to verify an user exists or not when the data is entered in the text box. Most of us will invoke an ajax call on the blur event to achieve this, but in MVC there is validation attribute that can do this for you with minimal amount of code.
Remote Validation Attribute
Remote Validation is the process in which we perform the validation in the server side for a specific control without posting the entire form information to the server. In ASP.NET MVC, we will use the Remote attribute in the System.Web.MVC namespace to the decorate the property. Let's take an example wherein we need to validate an username exists or not when he type it in the form field.
Step 1 : Decorate the property
Decorate the property with the Remote attribute with first param being the action name that needs to be executed, second one is the controller name and third is the message that needs to be shown when validation fails.
using System.ComponentModel.DataAnnotations;
using System.Web.Mvc;

public class User
{
    [Required]
    [Display(Name = "Enter Username")]
    [Remote("CheckExistingUser", "User", ErrorMessage = "Username already exists!")]
    public string UserName { get; set; }
}
Step 2 : Create the Action Method and Validation Logic
Now you need to create the action method in the controller which specified in the attribute. Here I have created a method for validating the username which will return a false if the text entered in the field is admin or administrator.
public ActionResult CheckExistingUser(string UserName)
{
     try
     {
          return Json(ValidateUser(UserName), JsonRequestBehavior.AllowGet);
     }
     catch (Exception ex)
     {
          return Json(false, JsonRequestBehavior.AllowGet);
     }
}
private bool ValidateUser(String UserName) { if (UserName.ToLower().Equals("admin") || UserName.ToLower().Equals("administrator")) return false; else return true; }Consolidate Model Validation Errors as a Single String in ASP.NET Web API
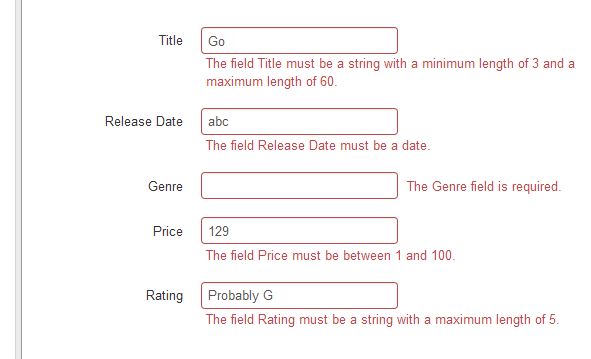
As we all know that we can do validation in ASP.NET MVC by decorating the model with validation attributes and when the page is generated by the framework it will automatically generate the client side validation scripts. You can read more about it in the Microsoft Documentation here. Normally the output will be like in the figure given below.
Let's see how we can use the same mechanism in ASP.NET WebAPI to do the validation. I have created a model class as shown below
public class Employee
    {
        [Required]
        [MaxLength(50, ErrorMessage="First name should not exceed 50 characters")]
        public string FirstName { get; set; }
        [Required]
        [MaxLength(50, ErrorMessage="Last name should not exceed 50 characters")]
        public string LastName { get; set; }
        [Required]
        [MaxLength(200, ErrorMessage="Address should not exceed 200 characters")]
        public string Address { get; set; }
        [Required]
        [EmailAddress(ErrorMessage="Email is invalid")]
        [MaxLength(50, ErrorMessage="EmailAddress should not exceed 50 characters")]
        public string EmailAddress { get; set; }
    }
And created a POST method as given below which basically validates the model and if any errors are found then returns an error as response.
public HttpResponseMessage Post([FromBody] Employee emp) { if (!ModelState.IsValid) return Request.CreateErrorResponse(HttpStatusCode.InternalServerError, ModelState); return Request.CreateResponse(HttpStatusCode.Created, emp); }Deploying an Optimized Image of your ASP.NET Core MVC Web App in Docker
In one of the posts I authored in the blog, I have shown you how to deploy an ASP.NET Core Web application in a Docker container, but the approach in the post has got a significant disadvantage. In that approach we always copied the entire contents of the directory which included all the static files, source code files etc, then restores all the packages inside the container and builds the application before it’s hosted in the container. This increases the boot up time of the container as well as the file size of the container.
In this post, I will show you how to publish a web application into the container rather than copying all the files into container and then build the application inside that. I am going to create an .NET Core MVC web application using the dotnet new command, you can read more about that my post here.
Step 1 : Create Project
dotnet new –t web
Step 2 : Restore Packages
dotnet restore //restores all the packages referenced in the project.json files
Step 3 : Publish Project
dotnet publish –c Release –o publish
Publishes the output of the project to the publish folder using the Release configuration. Before running the command make sure that node, bower and gulp is installed in your machine otherwise the publish command will fail
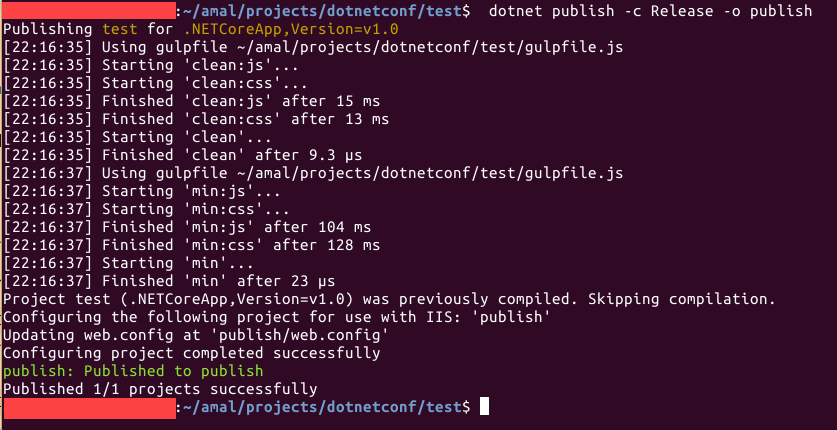
If you look inside the publish folder you will find that it has copied all our static files and resources along with the dlls of our application and the dependencies used in it
Consuming Rest API methods in .NET Core MVC application
Up until we need to rely on third party libraries for consuming a Web API in .NET Core applications. Even though Microsoft has got the Microsoft.AspNet.WebApi.Client library that can be used for consuming API methods, the support for .NET Core was not there until now. This library had a dependency on Microsoft.Net.Http library which was not supported in .NET Core. So with the release of the 5.2.3 version of Microsoft.AspNet.WebApi.Client they have fixed this issue and now it's available for you to use in .NET Core web applications too.
Step 1 : Add reference in project.json
You need to add following entries under dependencies section in the project.json file as given below.
The Microsoft.AspNet.WebApi.Client is dependent on System.Net.Http and System.Runtime.Serialization.Xml libraries and that's why we need to add the above ones in the json file
Step 2 : Use HttpClient to consume API
We will use an object of the HttpClient class in the System.Net.Http namespace which was rebuilt for supporting .NET Core in latest version to invoke a connection to the service and for consuming the method. Then we will the base address and request headers using the BaseAddress and DefaultRequestHeaders methods respectively. To consume the web method, we will use the GetAysnc method which returns a resposne stream object containing the response from the Web API and by using the ReadAsAsync to read the result from the stream
For other operations such as Post, Put and Delete we can use PostAsAsync, PutAsJsonAsync, DeleteAsync
For more please refer here: http://www.asp.net/web-api/overview/advanced/calling-a-web-api-from-a-net-client
ASP.MVC 6 - Using dnu restore command
Recently I was playing around with the new MVC 6 web application templates to create some sample websites for learning the new features in the latest version. And suddenly out of the blue got the following error while try to start a debugging session and won't allow you the run the application without resolving this issue.
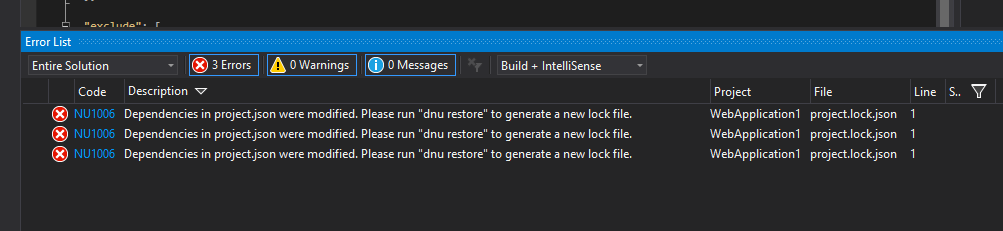
So I had no clue at first about, so I googled about the error and learned how this error came about and the ways to fix it too.
Visual Studio has got a project.json file as well as project.lock.json file inside the project. The project.json file can contain ranged versions or with specific versions like the one below
    "Microsoft.AspNet.Mvc": "6.0.0-beta6-*",
    "Newtonsoft.Json": "7.0.1"
The project.lock.json file will contain the specific version that is being used by the project. If we doesn't specified ranged versions in the project.json file, then both the files will be identical. The project.lock.json is used by dnx enviroment for loading the references for your project because using project.json file may cause to resolve the versions every time the application is run.
The lock file contians a key the very top called locked and when it's set to true then dnu or nuget will always restore and use the specific versions of every dependency specified in the lock file.
Setting up dnx environment in your machine
If you are not a die hard fan of Visual Studio and regularly uses command prompt and text editors like Notepad or Sublime text for doing coding in C# and compilation, then there is a good news for you. You can make of the DNVM(.NET Version Manager) from ASP.NET Core from now.
If you have Visual Studio in your machine, then you can skip the set up part and jump straight into the command sections. Becuase Visual Studion installs DNVM by default and no set up is needed.
Pre-requisites
- .NET version 4.5.2 or higher. If you don’t have it in your machine, install it from here. Need around 3 GB on your Windows drive, also admin access is needed for install. Don’t forget to reboot after the installation
- PowerShell version 4.0 or higher. Upgrade it here if you are running an older version. Admin access is needed for installation and also reboot is necessary once the installation is completed
- Install Visual C++ 2013 distributable package from here if it’s missing from your machine. Admin access is needed for this one also and you need to install both x86 and x64 versions
Let’s confirm now that we are having the required version of Powershell by using the command below
$PSVersionTable.PSVersion
It should show 4 if you have upgraded using the link above. Basically the version should be 4 or higher.
So we have everything needed for the dnx environment to be installed in your box, so let’s type in the following command in the Command Prompt window to install it
@powershell -NoProfile -ExecutionPolicy unrestricted -Command “&{$Branch=’dev';iex ((new-object net.webclient).DownloadString(‘https://raw.githubusercontent.com/aspnet/Home/dev/dnvminstall.ps1′))}”
This will install the DNVM(.NET Version Manager) in to your user folder
You can verify the installation is happened correctly by typing the command
dnvm
in PowerShell or Command Prompt. It will display a help information screen as shown below.
ASP.MVC 6 Features - wwwroot folder
Whenever we web develop applications in .NET framework the root directory of the website has always been the directory where our project is located. All our C# source files, html pages, js files, aspx pages, cshtml files all reside under this root. The file system based approach has got many disadvantages especially when it comes to protecting sensitive project resources. Normally people used black listing to lock out access to files such as Global.asax and web.config being served to the clients as response and this was being done at framework level. It is always advisable to use whitelisting technique rather than using a blacklisting method from a security perspective.
Also we will have different version of the same file say web.config for developement , testing, staging and production. And coming to scripts files we normally use the readable version of the files during development, but when it goes to the production we deploys only the minified version of it. Handling of these scenarios were getting difficult with each version and that's how the structure was devised for web projects in MVC 6
By default the wwwroot folder will act as the root for your website and all the static files such as images, scripts, styles will reside in this folder. And the sensitive files like project.json, appsettings.json etc are not under wwwroot folder and will never be accessible if our site is compromised. Thus instead of blacklisting, we are giving access only to those files which are accessible.

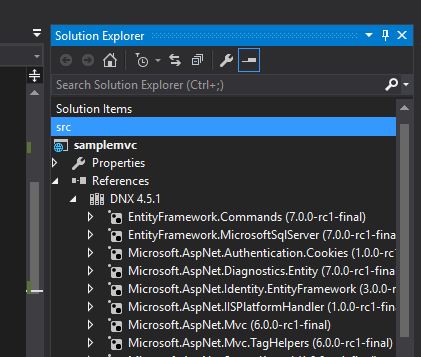
ASP.MVC 6 Features - Managing Packages
As developers, one of the thing we do frequently is adding references in the project. All these added dll's are listed under the References folder. Also listed are the libraries added by NuGet package manager used in C# code. These are called server side dependencies and is used in server side coding part.
Since it's now possible to target multiple frameworks, the refernces are now grouped under References folder based on the targeted environments.
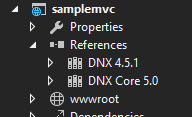
By default, it will list two items under References, DNX 4.5.1 is targeting .NET framework 4.5 and DNX Core 5.0 is targetting .NET Core framework. If you expand it, then all referenced dll's will be listed.
If you look closely the icons for the references, you can see that it's having the icon of Nuget. It indicates that these are all NuGet packages and if you manually added a dll, then it will have a different icon.
Apart from these we will making use of different types of client side libraries like jQuery, Kendo, Angular etc. In MVC 6 all of it are placed under the dependencies folder. Managing client side frameworks is more tedious when compared to the server side cousins and two of the great names in open source package management is now supported in MVC 6. Bower and npm packages will be listed under the Dependencies
ASP.MVC 6 Features - In Memory Execution
In one of the earlier post we have seen that in MVC 6 it's now possible to do edit-and-continue very much like what we do while developing a desktop application
Similarly, another important feature shipped with MVC 6 is the ability to do in memory compilation of the code. That means while building the application, output is generated in the bin folder and the web server load the files from there to run the application. But in MVC 6 this is turned of by default and the files are compiled and stored in memory. One advantage of doing this is that it reduces the start up time considerably since there is very little time spent on disk I/O operations.
Let's create a sample MVC 6 web project by selecting the Web Application template under ASP.NET 5 from Visual Studio.

Visual Studio will create MVC project with model, controllers and views out of the box and you will get a barebone site without writing a single line of code.
ASP.MVC 6 Features - Dependency Injection Modes
In the earlier post, I have shown how to make use of the built in Dependency Injection container in MVC 6. If you missed that you can go through it here. In that post I have explained about the Instance scope and here we will see the remaining modes.
To recap the AddInstance method will always return a new instance
services.AddInstance
(new SampleRepository()); Transient is another one for specifying the scope of our instance during the object creation by DI container. By specifying it, we are instructing the container for creating a new instance whenever there is a request. The main difference between Instance and Transient methods is that in former it's our responsibility to create the instance where as it's upto the container in the latter
services.AddTransient<ISampleRepository,SampleRepository>();
ASP.MVC 6 Features - Dependency Injection
In the version prior to MVC 6 it's possible to do Dependency Injection(DI) using third party libraries like AutoFac. But in MVC 6, DI is built into right into the framework. All the libraries like MVC, WebAPI, SignalR are making use of this minimalistic DI container. The core features of the container are exposed through the IServiceProvider interface and since it's available and same for all the components of the framework, a single dependency can be resolved from any part of the application.
Let's see an example of DI in action in MVC 6
First of all I'm going to create an interface and concrete class for a repository to deal with the domain entity.
Interface
namespace samplemvc.Repository
{
    public interface ISampleRepository
    {
        string GetMessage();

    }
}
Implementation
namespace samplemvc.Repository { public class SampleRepository : ISampleRepository { public string GetMessage() { return GetHashCode().ToString(); } } }ASP.MVC 6 Features - Managing Dependencies
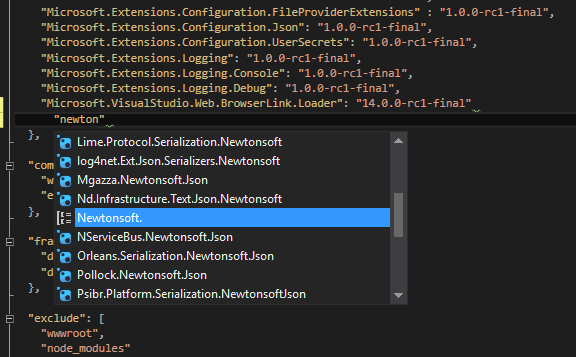
In MVC 6, Microsoft has completely revamped the logic for for adding and managing dependencies in the application. They have now introduced a file called Project.json for organizing dependencies. This new file is not only used for managing dependencies but also for other options such as compilation settings, managing runtime frameworks, adding postbuild/prebuild scripts etc.
As the name indicates the information is stored in JSON format as shown below
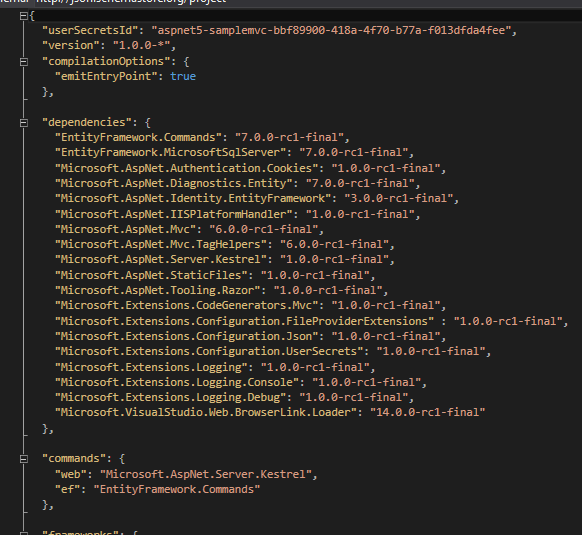
Intellisense is available inside the json file also which makes the task of adding new ones easier. It's not only limited to names but also for version numbers too. Here also note that the icon represents the type of the package that's going to added.

ASP.MVC 6 Features - Dynamic Compilation
Dynamic developement is a new feature supported by Visual Studio 2015 which comes in very handy while creating web apps using MVC 6. Whenever we made any change in the server side code, then we needed to stop debugging, compile the code again and runs it again to view the modified the code in action. This is very tedious job if we are try to debug a large application and wanted to make a slight change. The Edit-and-Continue is present while developing desktop apps since ages and with Visual Studio 2015 it's coming to web applications also.
With Visual Studio 2015, you can forget all these, just make the change in the C# code, save it, refresh the browser and voila the change is reflected in the page. This is achieved by make using of the dynamic compilation facility provided by Roslyn to compile the code automatically when we saves the file. One thing to note here is that you should start your session without debugging from Visual Studio by selecting Start Without Debugging from Debug menu or use the keyboard shortcut Ctrl + F5
Let's see an example, in this we have two fields in our page but doesn't have any header in the page or title.
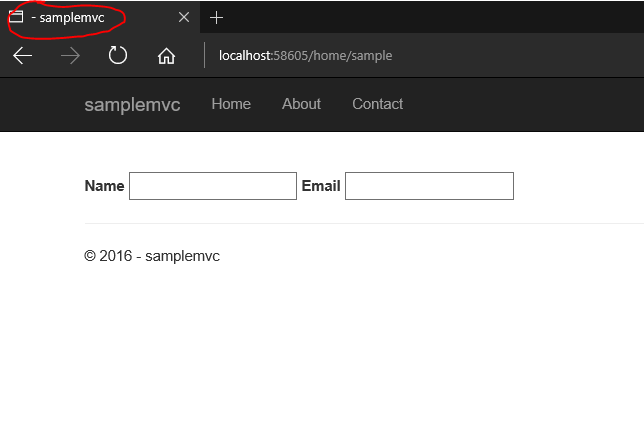
So let's make the change while running the application itself. Modified the controller to add a property in the ViewBag to store the title and save the changes. You can see that I have started the session without attaching the debugger and it's an important step if you want to try out this feature
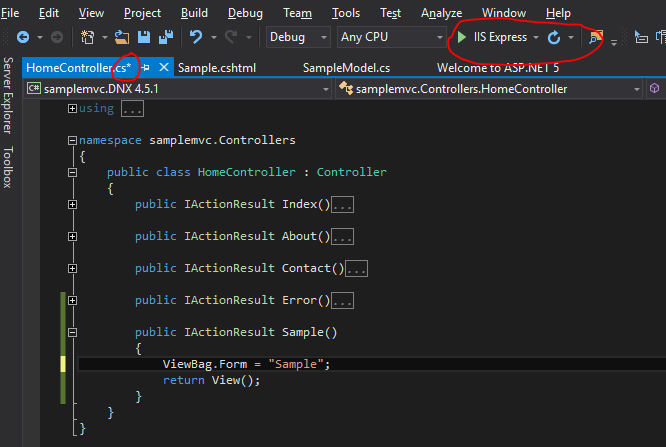
After saving the file go and modify your cshtml to add a new heading to show the title and also set the ViewBag.Title property which is used in your layout page to show the title.
ASP.MVC 6 Features - All New Tag Helpers
We are using HTML helpers in our view pages extensively while building apps in MVC untill now. The main disadavantage of this is that it follows server side syntax and it's mix and match with html code in the page. It makes the maintainablity a tedious one and also readablity is affected.
@Html.Label("Name","Name")In ASP.NET MVC 6 we have the tag helpers which helps you achieve the same thing but this time we are writing using the HTML markup. So the equivalent code for above statment in MVC 6 will be
<label asp-for="Name"></label>
will generate the following HTML when rendered in browser
<label for="Email">Email</label>
Here the asp-for attributes extracts the display name attribute from the specified model property and displays it as the label for the control.
Let's add a class to the above control and see the difference between HTML Helpers and Tag Helpers
HTML Helper
@Html.Label("Name","Name", new {@class="label-caption"})Tag Helper
<label class ="label-caption" asp-for="Email">Email</label>
Generated HTML
<input name="Name" class="label-caption" id="Name" type="text" value="">
What's new in ASP.NET MVC 6
ASP.NET MVC 6 is built on top of ASP.NET Core 1.0 and it's MVC and Web API combined into one single package.
ASP.NET Core 1.0 is the latest version of the web framework from Microsoft built on top of the new .Net Core framework. It was earlier known as ASP.NET 5 but was changed lately to ASP.NET core. The naming caused a lot of confusion among the developer community with existence of ASP.NET 4.6 version. Since ASP.NET 5 is completely new and built from scratch, giving the version as 5 was little bit off also. This version of the framework has undergone significant changes to the architecture and now it's open source also.
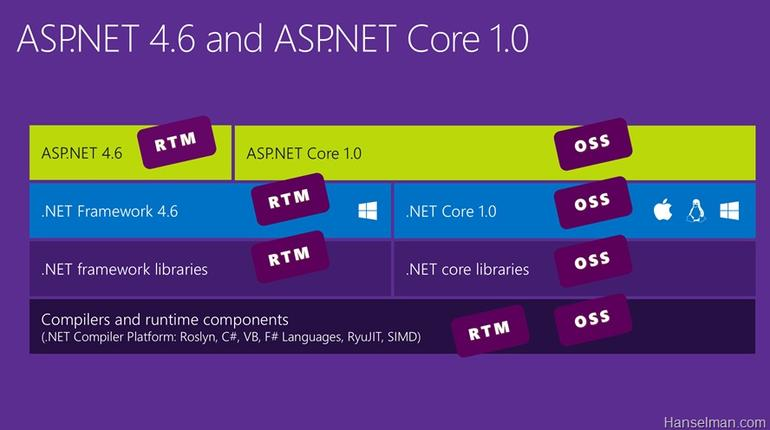
Pic Courteousy : Scot Hanselman's blog
Connecting Azure Blob Storage account using Managed Identity
Posted 12/9/2022Securing Azure KeyVault connections using Managed Identity
Posted 11/26/2022Manage application settings with Azure KeyVault
Posted 11/9/2022Adding Serilog to Azure Functions created using .NET 5
Posted 4/3/2021Learn how to split log data into different tables using Serilog in ASP.NET Core
Posted 4/23/2020