Memory dumps of a developer
Articles and tutorials on .NET Core, ASP.NET MVC, Kendo UI, Windows 10, Windows Mobile, Orchard
Spin up Docker Containers in a Kubernetes Cluster hosted in Azure Container Service
In one of the earlier posts, I have explained in details about the steps that need to be performed for running Docker containers in a Kubernetes cluster hosted in Azure. In that example, I used the default IIS image from Docker Hub for spinning up a new container in the cluster. In this post, I will show you how to containerize an ASP.NET Core MVC application using a private Docker registry and spin-off containers in a cluster hosted in Azure using Azure Container Service
Pre-Requisites
You need to install both the CLI tools for Azure and Kubernetes in your local machine for these commands to work and needs an Azure subscription for deploying the cluster in Azure Container Service.
Step 1: Create a Kubernetes Cluster using Azure Container Service
The first step is to create the create the cluster in Azure, for that we will use the az
acs create command available in Azure CLI. You need to provide a resource group and a name for the cluster. A resource group in Azure is like a virtual container that holds a collection of assets for easy monitoring, access control etc. The --generate-ssh-keys parameter will tell the command to create the public and private key files which can be used for connecting to the cluster.az acs create --orchestrator-type kubernetes --resource-group TrainingInstanceRG1 --name TrainingCluster1 --generate-ssh-keys
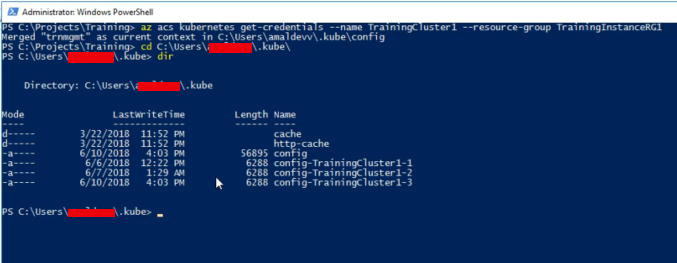
Step 2: Get the credentials for the Kubernetes Cluster
Now we need to download the credentials to our local machine for accessing the cluster.
az acs kubernetes get-credentials --name TrainingCluster1 --resource-group TrainingInstanceRG1
When the command is executed it will download the key files to your local machine and by default, it will reside in a folder under user folder.
Running Sql Server Linux on a Docker Container
One of the new features added to the SQL Server 2016 is the ability to run it on Linux. Along with that, they brought in support for Docker and released an official image which is available in Docker Hub. It has already got over 5 million + pulls from the repository and is gaining momentum day by day. Let's see the various steps for setting up a container based on this image.
Step 1
Search for the image in the Docker Hub and pull the official image from the Docker hub
docker search microsoft
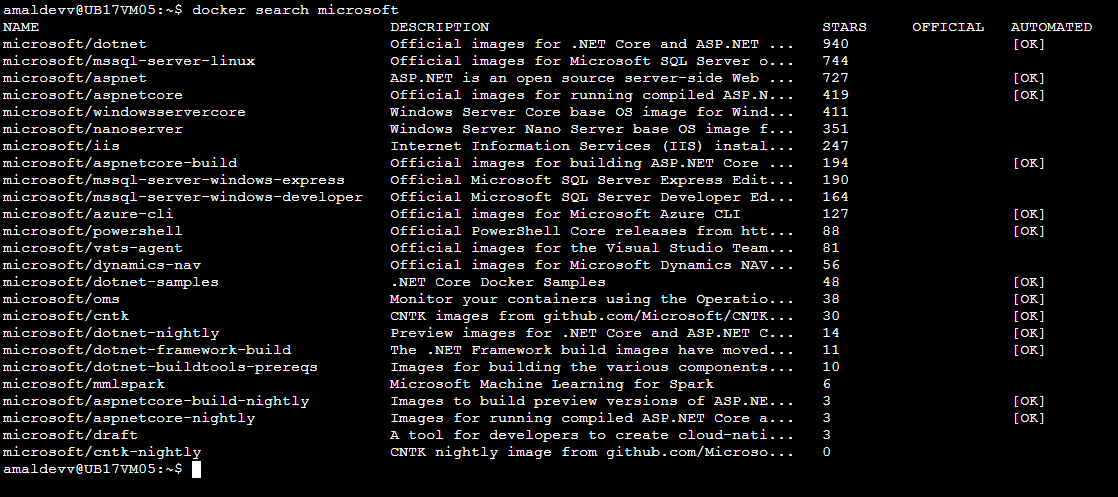
So the image we are looking for is mssql-server-linux
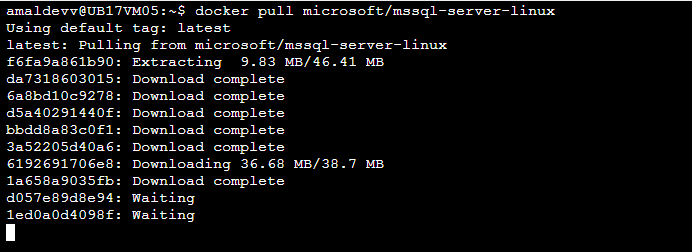
docker pull microsoft/mssql-server-linux
Implementing Functional Testing in MVC Application using ASP.NET Core 2.1.0-preview1
Functional Testing plays an important role in delivering software products with great quality and reliability. Even though the ability to write in-memory functional tests in ASP. NET Core MVC application is present in ASP.NET Core 2.0, it had some pitfalls
- Manual copying of the .deps files from application project into the bin folder of the test project
- Needed to manually set the content root of the application project so that static files and views can be found
Bootstrapping the app on the Test Server.
In ASP.NET Core 2.1, Microsoft has released a new package Microsoft.AspNetCore.Mvc.Testing which solves all the above mentioned problems and helps you to write and execute in-memory functional tests more efficiently. To check how it can be done, let's create two projects - one for the web application and another for our test project.
Step 1
Create an ASP.NET Core MVC project without any authentication. The following command will create one in the folder specified by the -o switch
dotnet new mvc -au none -o SampleWeb/src/WebApp
Step 2
Let's add a test project based on Xunit test framework using the below command. As in Step 1, the project will be created in the specified folder
dotnet new xunit -o SampleWeb/test/WebApp.Tests
Step 3
Now we will create a solution file and add these two projects into it.
cd SampleWeb

dotnet new sln

dotnet sln add src/WebApp/WebApp.csproj

dotnet sln add .\test\WebApp.Tests\WebApp.Tests.csprojMake Your HTML Pages Dynamic Using Handlebars Templating Engine
Technologies and methods for designing and developing web pages have come a long way and with a plethora of tools available at one's disposal, getting a minimal website is not a rocket science anymore. As web developers, we often face a dilemma to go for a static site using plain HTML or to go for a dynamic one with some server-side programming stack. Both of the approaches has got advantages as well as disadvantages.
If we go for a static one, the advantages are
- Time needed for development is less.
- Easy to create and less expertise is needed
- Site will be super fast
Disadvantages,
- Hard to maintain
- Lot of repetitive work
- Hard to scale
And for the dynamic approach, advantages are
- Easy to maintain
- Repetitive work can be avoided
- Scaling is easy and more features can be easily integrated
Disadvantages
- Dedicated personal is needed
- Cost factor increases
We can overcome some of the cons mentioned above by applying JavaScript Templating. JavaScript Templates helps to segregate HTML code and content which it is rendering in the browser. This separation of concerns helps to build a codebase which is easy to maintain in the future, modifications can be easily done with minimal disruption to the existing codebase.
Some of the most popular JavaScript templating engines are Mustache, Underscore, EJS, and Handlebars and in this post, I am going in detail to show how we can make of Handlebars to generate HTML content from the template.
Creating a Kubernetes cluster using Azure Container Serivce and Cloud Shell
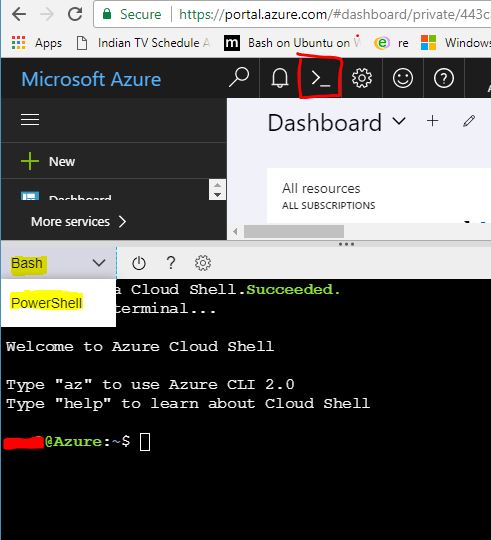
Azure Container Service(ACS) is a service offering from Microsoft in Azure which helps you to create, configure and manage a cluster of VM's for hosting your containerized applications. It has got support for orchestrators such as DC/OS, Docker Swarm, and Kubernetes. There are a lot of ways in which you can set up ACS in Azure like setting it up directly from the Portal itself or using Azure CLI from your local machine etc. But in this post, I will be using the Azure Cloud Shell to set up the service and the orchestrator will be Kubernetes.
All the steps shown in this post is executed from the Azure Cloud Shell, it's an online terminal available in the Azure portal itself and can be invoked by clicking on the icon in the top right corner in the portal. Since Azure CLI and Kuberbetes is installed in the shell by default we can straight away go and execute the commands used in the post
Step 1
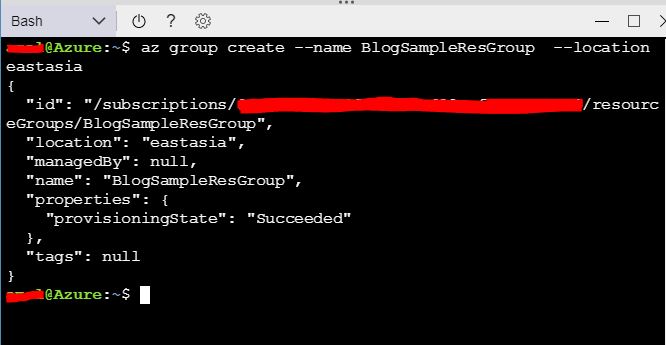
Whatever resource we creates in Azure like Web Apps, Virtual Machines, IP Addresses, Virtual Machines, Blob storage etc needs to be associated with a resource group. A resource group acts as a container that holds all the resources used by the solution in Azure and it is recommended to keep all the resources that are related to your solution in a single resource group.
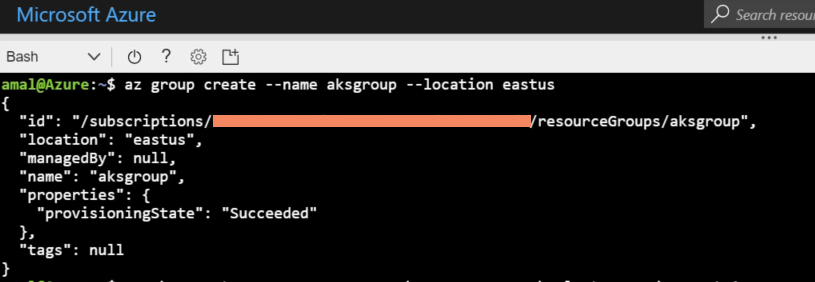
Let's create a resource group first in Azure using the following command
az group create --name aksgroup --location eastus
This command will create a new group with name aksgroup in the data center located in East US region
How to a create a private Docker registry in Azure
The containerization technology has been around for some years, but it only came to the forefront when a company called Docker released their toolset which is also called Docker. Just like what shipping containers did to the logistics industry, docker revolutionized the
way which we shipped software. Along with the tooling, they also created a public registry called Docker Hub to store the images created using the toolset. It's free and open to all, but in some case such as enterprises building their own proprietary software doesn't want to keep it in a public domain. So to avoid this Docker supports private registries also and it can reside in on-premises servers or in the cloud. In this post, I am going to show how can we create a private registry in Azure, Microsoft's cloud platform and then to use it for pushing and pulling images from it.Pre-Requisites
- An Azure Subscription
- Somewhat familiarity in Azure
- Beginner level knowledge in using Docker
I have already written an article about creating an image and a container based on it using Docker, please feel free to refer it if want to get a quick refresher.
Setup
In this post, I will be using the Azure Cloud Shell which is available on the portal to run all the commands. If you are hearing it for the first time, please refer the official documentation here. It basically gives a browser-based shell experience and supports both Bash and PowerShell. You can also the portal or Azure CLI for the same.
First of all, we will check what all subscriptions are available for you and will set one as default if you have more than one using the following commands
To list the available subscriptions,
az account list
and to set one as default
az account set --subscription <subscription id or name>
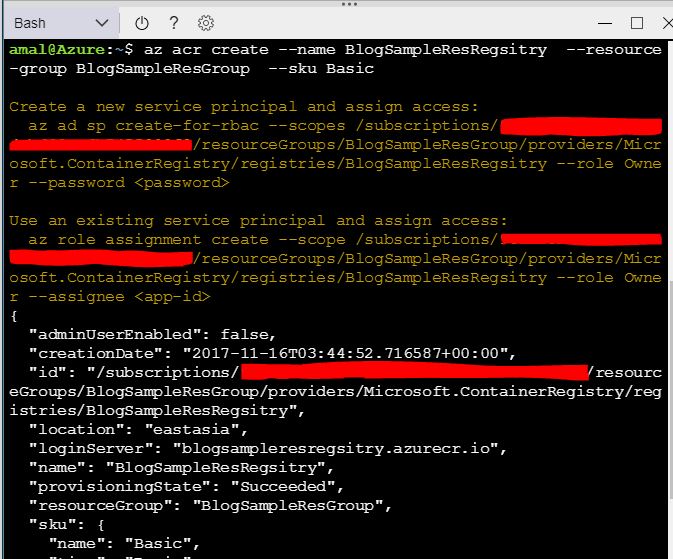
Creating Azure Container Registry
Whenever you provision anything in Azure, it will create a set of assets, for example in the case of a VM it will create storage, virtual networks, availability sets etc. It will hold all these assets in a container which is called the Resource Groups, which helps to monitor, control all the assets from a single location. So for our private registry, let's create a new resource group using the following command
az group create --name BlogSampleResGroup --location eastasia
This will create a resource group named BlogSamplesResGroup in East Asia region
To create the registry, we will use
az acr create --name BlogSampleResRegsitry --resource-group BlogSampleResGroup --sku Basic
The value in the name parameter will be the name of our registry and will be created in the BlogSamplesResGroup. Azure Container Registry have 3 tiers which provide different pricing and other options. Those are Basic, Standard, and Premium. Please refer the documentation for more details. That's all we need to do for setting up the registry and if you go to the portal now, you can see the newly created registry.

Pushing Image to the Repository.
So we have the private repository up and running, now we let's push an image to the repository. For
this I will be making use of the hello-world image available in the Docker Hub. I will pull that image down to my local machine using the docker pull command.docker pull hello-world
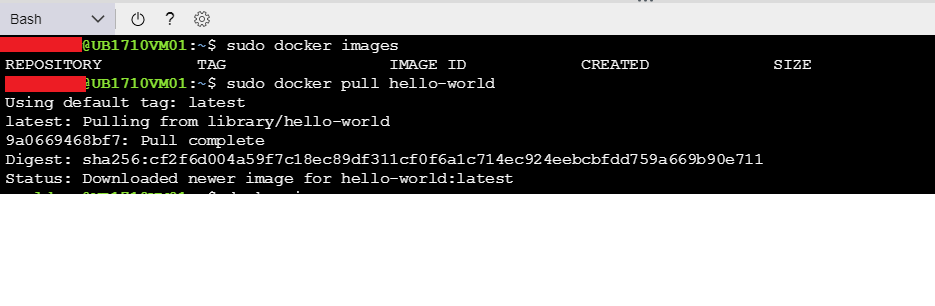
If you execute the docker images command. it will be shown on the list. To create a container in the local machine using this image, use the below command
docker run -it hello-world
The output of the command will be as shown in the image below.
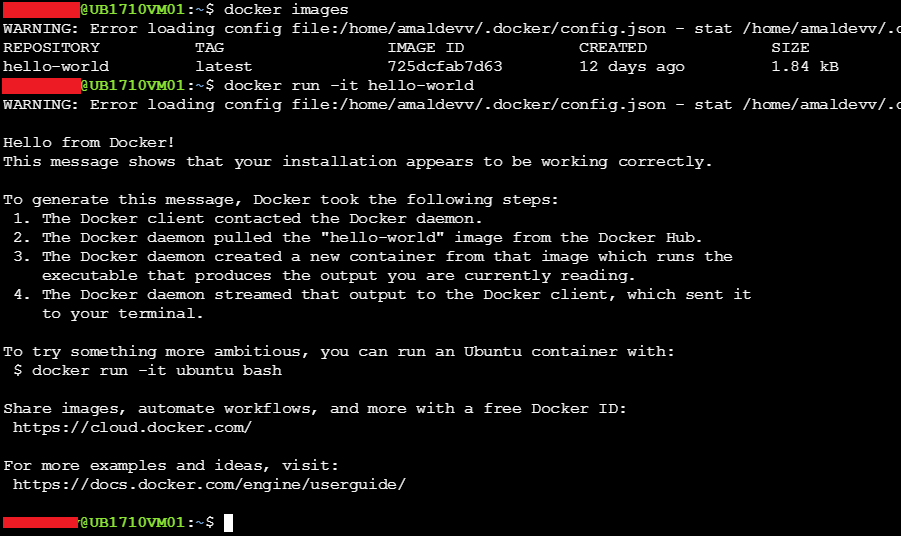
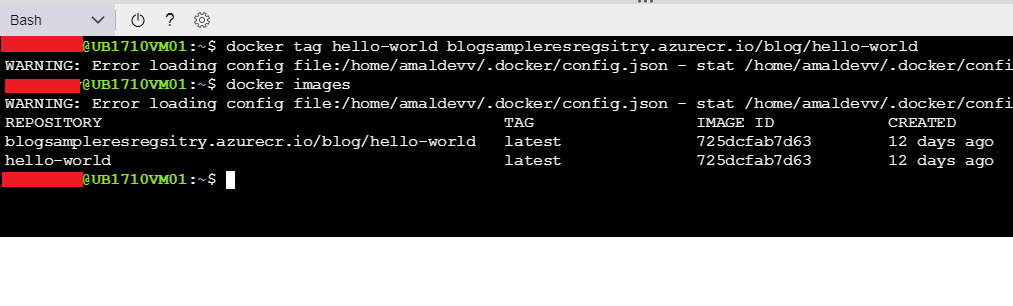
So, we have verified that the image is good and we can create a container using it. Now let's push that image to our private registry. Before that, I will use the docker tag command to tag the name of the repository that matches our registry name
docker tag hello-world blogsampleresregsitry.azurecr.io/blog/hello-world
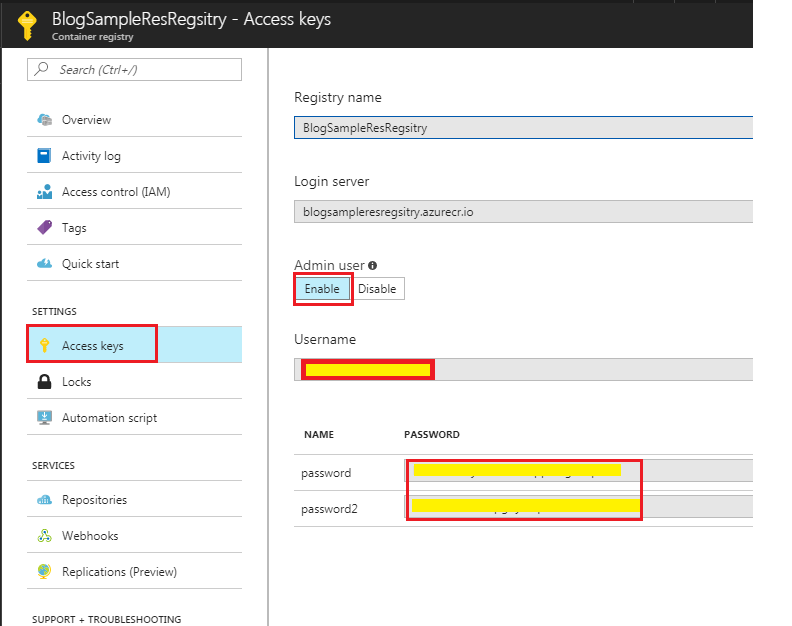
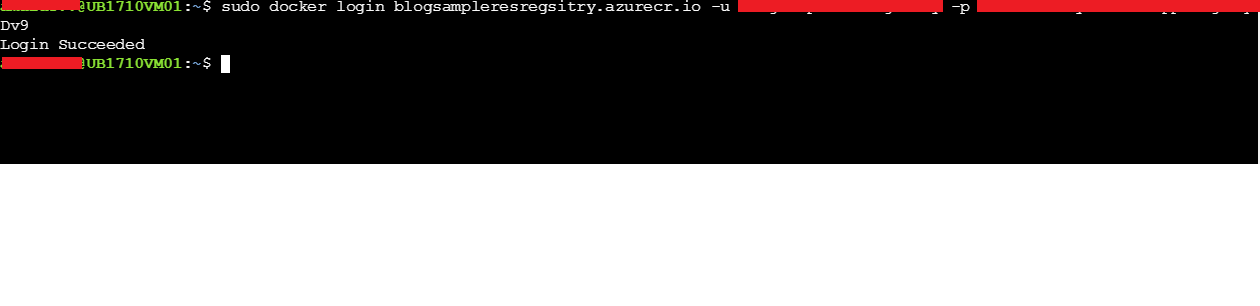
Before you push the image, the first thing you will need to do is to log in to our registry. For that, you will need to execute the docker login command and the parameters such as repository name, username and password are needed and you can get it from the Azure portal itself. You can find this information under Access Keys in Settings.
To upload the image to the repository, use the docker push command
docker push blogsampleresregsitry.azurecr.io/blog/hello-world
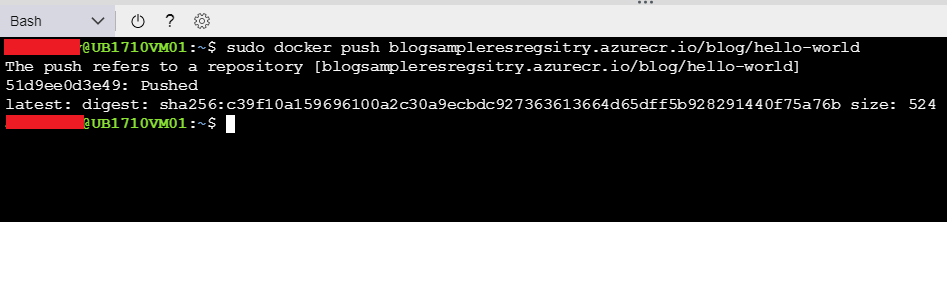
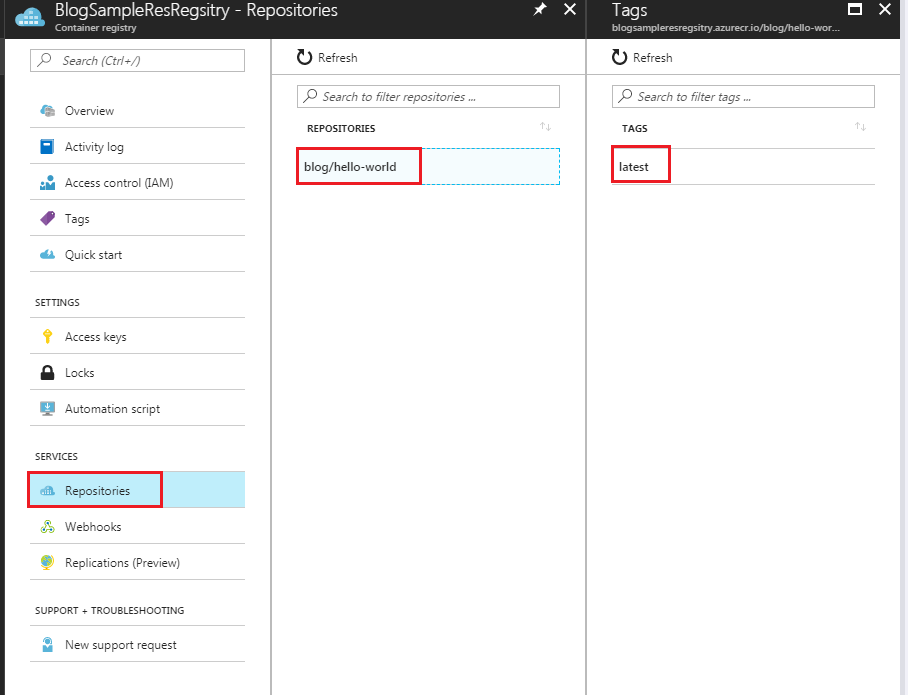
If you now go to the Repositories in the Registry, you will see our newly pushed image there.
Hosting a ASP.NET Core application in a Docker container using microsoft/aspnetcore image
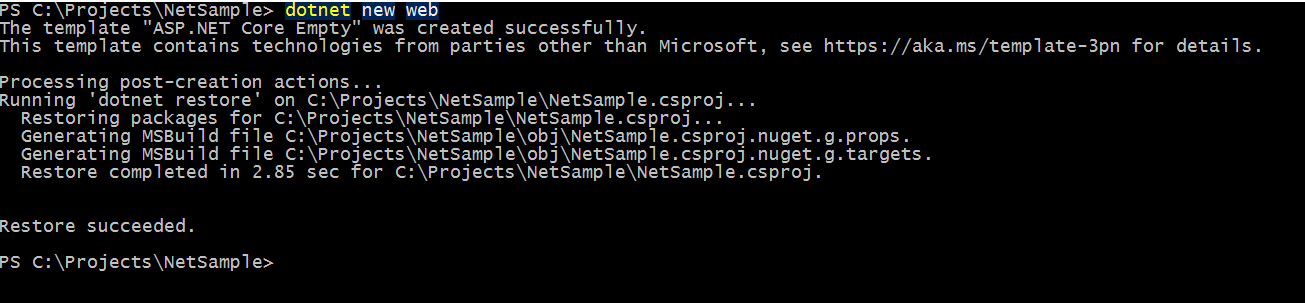
You all will be familiar with Docker by now given its popularity among developers and infra people and some of you may have already created containers using Docker images. One of the most widely used workflows among people using .NET Core will create a new web application by using the dotnet new command as shown below.
The below example uses ASP.NET Core 2.0 framework, in which the dotnet new command will create the project as well as restores the dependencies specified in the csproj file by default. I have already written a post about it and you can refer it for information about it.
Then you will do a build to see if there are any errors and use dotnet run command which will self-host the web application
What's changed with new command in .NET Core 2.0
Microsoft has released a major revision to the .NET Core framework around mid of August bumping the version to 2.0. This release includes not only the upgrade to the core framework but also include ASP.NET Core 2.0 and Entity Framework 2.0. Also along with this .NET Standard 2.0 is also released and it's now supporting around 32K + APIs and is a huge leap from what we had until now. You can read more about it by going to the announcement here.
One of the changes among these is that the
dotnet restore is now an implicit command which means that there is no need to execute the restore command explicitly for commands which needed to do a restore before executing it.For example in .NET Core 1.1 whenever we executed a
dotnet new command for creating a project we needed to execute the restore command before doing a build or execution. With .NET Core 2.0 when we execute the new command, the restore is now run automatically as part of the tooling. The following are the list of the commands which have got implicit support for restoration.newrun
build
publish
pack
testGetting Started with Angular Development Using Cloud9 Online IDE
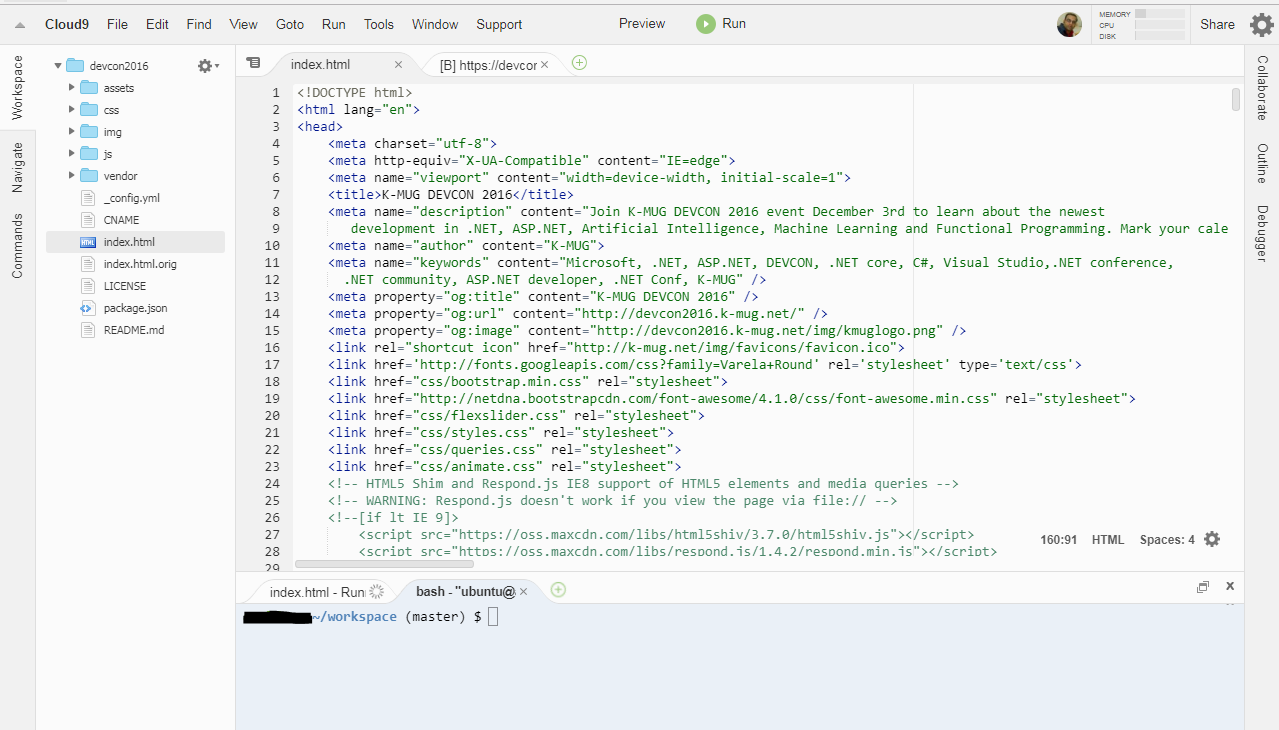
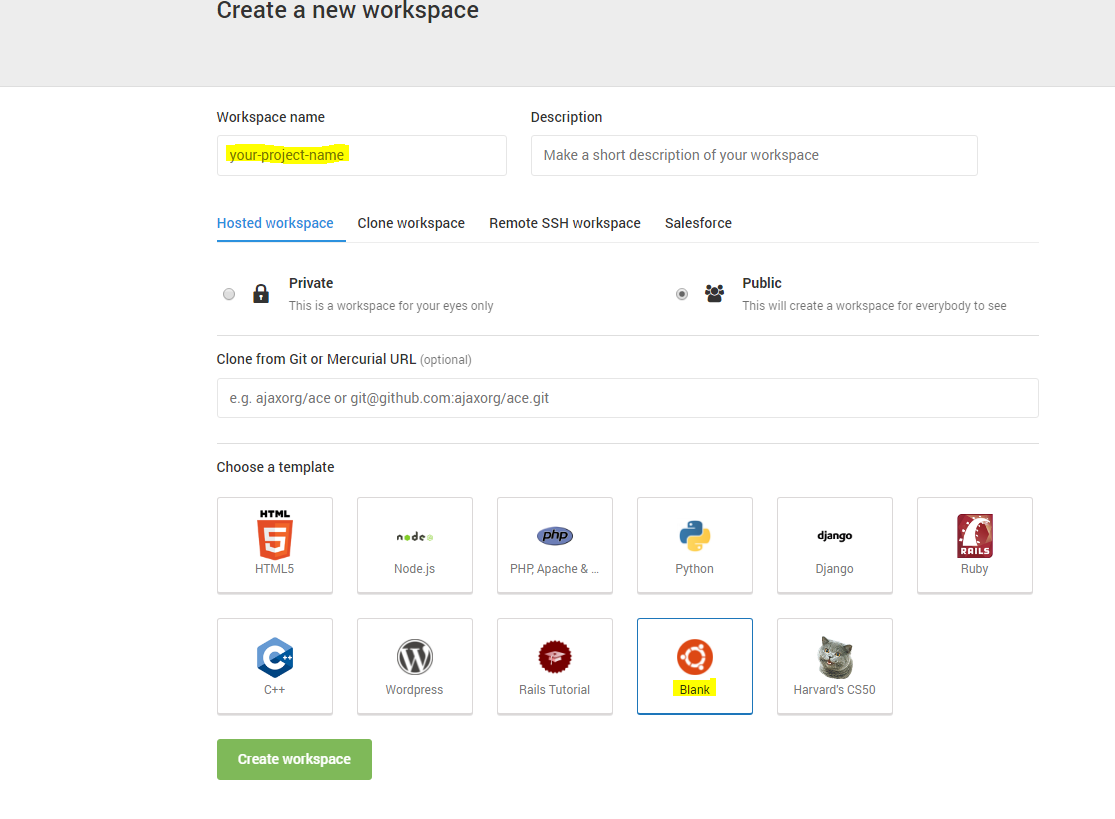
Cloud 9 is an online IDE hosted in the cloud and runs inside the browser. It's built on top of a Linux container and offers most of the features found in a standalone IDE. To start using it, one needs to create an account at Cloud 9 website. Once you created the account, you will be able to create workspaces as per your development needs. Given below is the screenshot of the IDE which I created for web development.
For using Cloud9 or c9 in short for all your development needs, you will need to create a workspace based on the Blank template as shown below
Generate C# Classes from a JSON String Easily Using Visual Studio
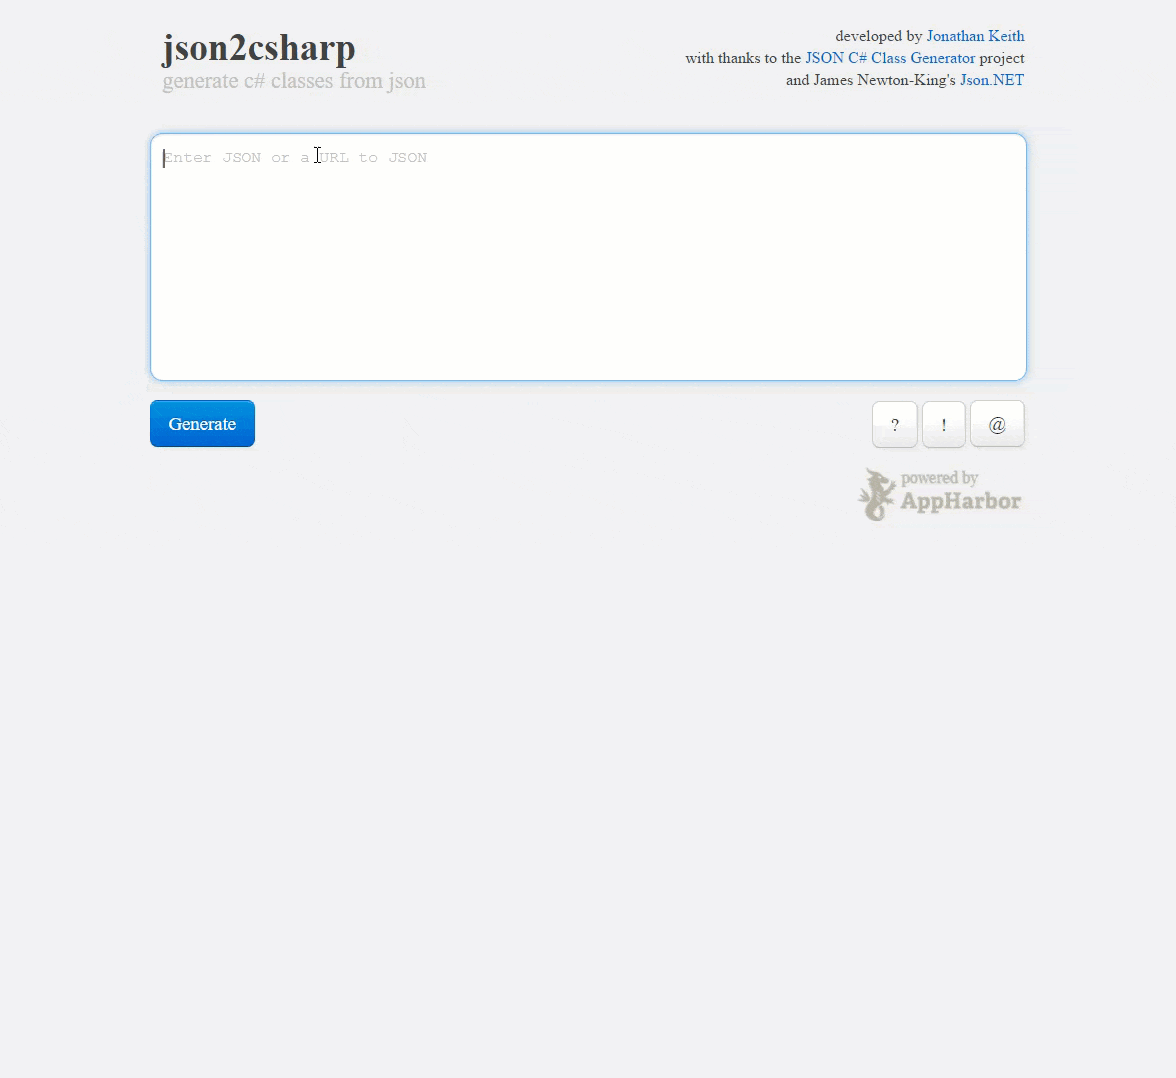
As developers, we are often faced with certain tasks that are very repetitive in nature, which can also be time consuming to solve it. For example, whenever we need to reserialize a complex JSON string to classes we may need to write a lot of code. Until recently, whenever I needed to do such task I invariably create the classes manually and if it's a complex string, I was spending way too much time on that.
When the instances like these began to happen every now and then, I decided to search for online options which can spit out classes from a JSON string. After some googling, I found out this site json2csharp.com which can do what I was looking for. You only need to paste the JSON in the input box and click on the Generate button to get the classes in C#.
Connecting Azure Blob Storage account using Managed Identity
Posted 12/9/2022Securing Azure KeyVault connections using Managed Identity
Posted 11/26/2022Manage application settings with Azure KeyVault
Posted 11/9/2022Adding Serilog to Azure Functions created using .NET 5
Posted 4/3/2021Learn how to split log data into different tables using Serilog in ASP.NET Core
Posted 4/23/2020