Templates Available for dotnet new command
Early this week Microsoft announced the release of updates to .NET Core Tooling included in the Visual Studio 2017 RC which brings some major changes in the toolset. You can refer this link to read about the official release of the update. One of the major change is in creating new projects using the dotnet new command which is widely used by novice and experienced hands in their day to day life as a developer. According to the release note, the updated dotnet command will be having the following characteristics.
- Powerful — expressive and scriptable command-line syntax.
- Helpful — an interactive mode helps users pick the templates they need (think Yeoman).
- Extensible — anyone can write templates for dotnet new!
- Updatable — templates can be updated outside of primary delivery vehicles (e.g. Visual Studio, .NET Core SDK).
- Platform — can be used by tools like Visual Studio and generator-aspnet (think yo aspnet).
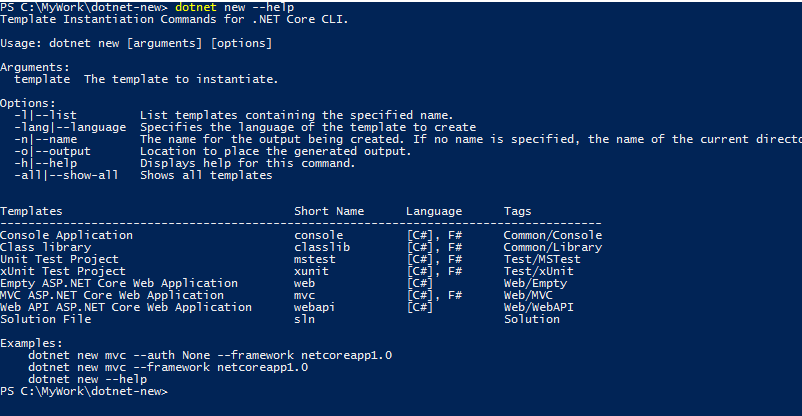
The major change in dotnet new is that it is based on a templating engine which will create the artifacts automatically depending upon the projects you chose to create. To view the options available in the command, just execute the following command in the prompt.
dotnet new --help
Creating Console Application
Earlier we were using just dotnet new command to create a new console project in .NET Core, but with this iterating the syntax is little bit changed.
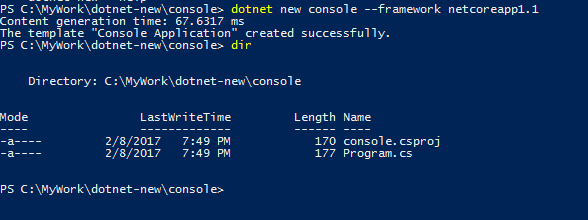
dotnet new console
Executing the above command will create two files for you, one is the file with source code and the other is a csproj file. By default .NET Core runtime will use C# as the language for creating the project, if you want to specify a different one use the -l option along with the new command. You may already know that .NET Core is now reverted back to xml based to project file from the json based one since RC3 and that's why you are seeing a csproj file in the folder. Again by default, the runtime creates the csproj file in the name of the current folder.
Let's examine the contents of both the files
csproj file
The project file is much leaner now which basically contains the output type, target framework in it. You can read more about the changes here.
<Project Sdk="Microsoft.NET.Sdk">

  <PropertyGroup>
    <OutputType>Exe</OutputType>
    <TargetFramework>netcoreapp1.0</TargetFramework>
  </PropertyGroup>

</Project>
Program.cs
The source file is still the same with Console.WriteLine() method in the main method
namespace AddPackagageSample
{
    class Program
    {
        static void Main(string[] args)
        {
            Console.WriteLine("Hello World!");
        }
    }
}
Specifying Target Framework
To specify a different target framework while creating a new project, use --framework switch along with the dotnet new command
Syntax
dotnet new <template name> --framework <target framework>Usage
dotnet new console --framework netcoreapp1.1
So if you inspect the contents of the csproj file, you will see that the TargetFramework tag will have the value which we passed in the command
<Project Sdk="Microsoft.NET.Sdk">

  <PropertyGroup>
    <OutputType>Exe</OutputType>
    <TargetFramework>netcoreapp1.1</TargetFramework>
  </PropertyGroup>

</Project>
Specifying Folder Location for Project
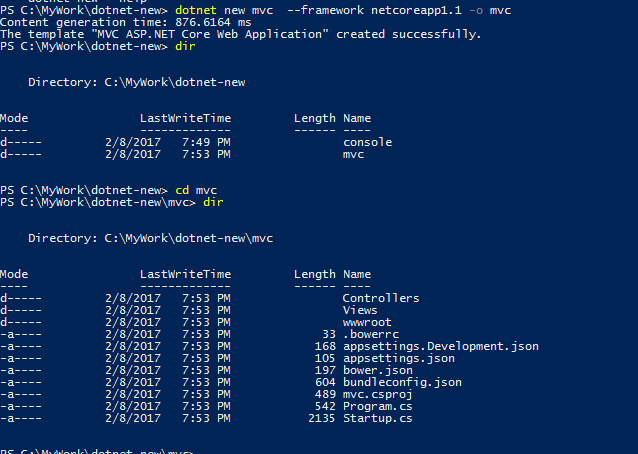
Let's see how we can create an ASP.NET Core MVC application in particular folder in the machine. To specify the location you need to use the -o switch followed by the name of the folder. If no path is specified then the folder will be created under the current directory.
dotnet new --framework netcoreapp1.1 -o mvc
The contents of csproj file will be little more than the console project due to the references for the packages by default
<Project Sdk="Microsoft.NET.Sdk.Web">

  <PropertyGroup>
    <TargetFramework>netcoreapp1.1</TargetFramework>
  </PropertyGroup>

  <ItemGroup>
    <PackageReference Include="Microsoft.AspNetCore" Version="1.1.0" />
    <PackageReference Include="Microsoft.AspNetCore.Mvc" Version="1.1.1" />
    <PackageReference Include="Microsoft.AspNetCore.StaticFiles" Version="1.1.0" />
    <PackageReference Include="Microsoft.Extensions.Logging.Debug" Version="1.1.0" />
  </ItemGroup>
</Project>
Specifying a Name for the Project
Till now what we saw is that the csproj file has the same name as the current folder, but if you want to have a different name for the project then you can use the -n switch for that as shown below
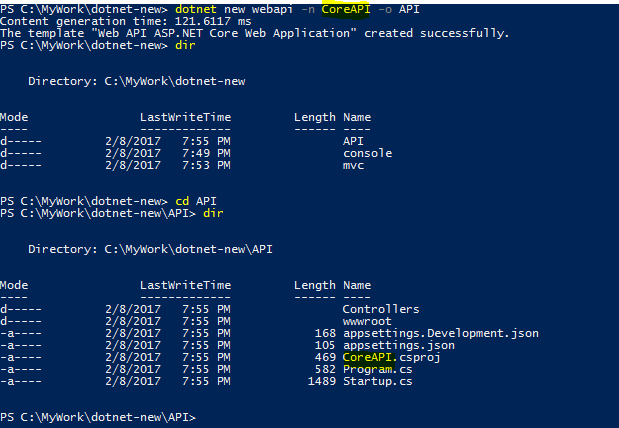
dotnet new webapi -n CoreAPI -o API
Executing this command will create a new WebAPI project in the API folder with project name CoreAPI.
No Comments
Connecting Azure Blob Storage account using Managed Identity
Posted 12/9/2022Securing Azure KeyVault connections using Managed Identity
Posted 11/26/2022Manage application settings with Azure KeyVault
Posted 11/9/2022Adding Serilog to Azure Functions created using .NET 5
Posted 4/3/2021Learn how to split log data into different tables using Serilog in ASP.NET Core
Posted 4/23/2020