Part 2 - Getting started with Kendo UI
In the last post I gave an introduction to Kendo UI about it’s features and advantages and also about the various bundles offered by them. In this post I will help you to get started with development using Kendo UI in your web applications.
As I said in my earlier post, Kendo UI is built on top of jQuery, so it’s a pre-requisite to have jQuery in your application. The latest version of Kendo UI requires jQuery version 1.9.1 or higher and you can download it from their site or can use any of the CDN’s which hosts jQuery. Please visit the link here to know more about the prerequisites.
I will be using Kendo UI Core bundle which is a free offering from Telerik and can be downloaded from their site. To download you need to register an account with them and will be able to download the archive once you signed in to their site. The downloaded archive will contain folders as shown below.
Pic Courtesy – Telerik
For using Kendo UI components in your projects, you need to add the files in the js and css directories in the archive to the root directory of your project. It’s recommended to import these files in the head section in your page and make sure you import the common.css file before the theme css file. So the head section will contain the following code.
<head>
    <title>Getting Started With Kendo UI</title>

    <!--CSS Files-->

    <!--Kendo UI common styles-->
    <link href="../css/kendo.common.min.css" rel="stylesheet" />
    <!--Kendo UI default theme-->
    <link href="../css/kendo.default.min.css" rel="stylesheet" />

    <!-- JS imports -->
    <script type="text/javascript" src="../js/jquery.min.js"></script>

    <!-- Kendo Scripts -->
    <!-- Kendo UI core javascript -->
    <script type="text/javascript" src="../js/kendo.ui.core.min.js"></script>


</head>
That’s all we need for the set up and now let’s see how we can initialize a Kendo UI widget. We can initialize it in two ways using
1. jQuery Syntax
In this we have added an input element, gave value for id property and also set type as date. Then using the jQuery selectors, select the element that needs to converted to Kendo DatePicker widget and apply the kendoDatePicker() method defined in the kendo.ui.core.js file to create the widget. This way of initializing the widget is known as Imperative Declaration
<div>
    <input type="date" id="jQDatePicker" />
</div>
<script type="text/javascript">
        $(document).ready(function(){
            $("#jQDatePicker").kendoDatePicker();

        });
</script>
2. HTML5 Syntax
The below syntax is also known as Declarative Initialization makes use of the data-* attributes in HTML5 to initialize and configure the widgets. The kendo function exposes all the functions the framework supports and in our page we will be using the init function to initialize our widget by the passing the id of the element to it.
<div>
      <input type="date" id="hTDatePicker" data-role="datepicker" />
</div>
<script>
  $(document).ready(function(){
            kendo.init($("#hTDatePicker"));
        });
<script>
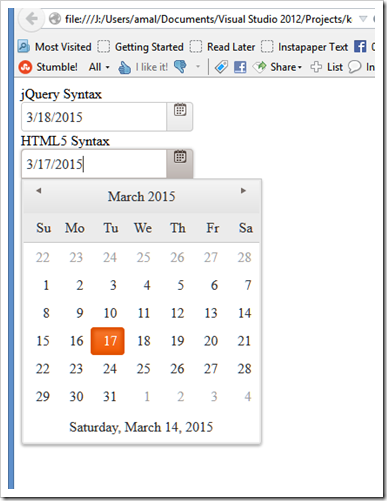
And that’s all need for creating our first Kendo UI widget. Let’s see how will it look in the browser.
Since we used the default theme, the widget is created with the default styles as shown in the picture
Source code in full is given below
<html>
<head>
    <title>Getting Started With Kendo UI</title>

    <!--CSS Files-->
    <!--Kendo UI common styles-->
    <link href="../css/kendo.common.min.css" rel="stylesheet" />
    <!--Kendo UI default theme-->
    <link href="../css/kendo.default.min.css" rel="stylesheet" />

    <!-- JS imports -->
    <script type="text/javascript" src="../js/jquery.min.js"></script>

    <!-- Kendo Scripts -->
    <!-- Kendo UI core javascript -->
    <script type="text/javascript" src="../js/kendo.ui.core.min.js"></script>
</head>
<body>
    <div>
        <div>
            <span>jQuery Syntax</span>
        </div>
        <div>
            <input type="date" id="jQDatePicker" />
        </div>
        <div>
            <span>HTML5 Syntax</span>
        </div>
        <div>
            <input type="date" id="hTDatePicker" data-role="datepicker" />
        </div>
    </div>
    <script type="text/javascript">
        $(document).ready(function(){
            $("#jQDatePicker").kendoDatePicker();
            kendo.init($("#hTDatePicker"));
        });
    </script>
</body>
</html>
That’s it for the time being and will be back with next post in the series very soon. Till next time, Happy Coding !!!
No Comments
Connecting Azure Blob Storage account using Managed Identity
Posted 12/9/2022Securing Azure KeyVault connections using Managed Identity
Posted 11/26/2022Manage application settings with Azure KeyVault
Posted 11/9/2022Adding Serilog to Azure Functions created using .NET 5
Posted 4/3/2021Learn how to split log data into different tables using Serilog in ASP.NET Core
Posted 4/23/2020

