Getting Started with Gulp
Gulp is a automation tool that will help you to automate common tasks such as minifying the css and scripts, compiling preprocesed css during the development of a website. Gult is built on top of Node.js and you need to have it installed on your machine before you proceed with installation of Gulp. If you are not familiar with Node.js installation, then you can read my post here on how to install it on your Windows machine.
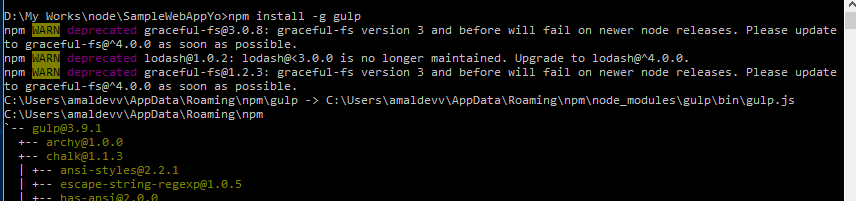
We will be using Node Package Manager or npm to install Gulp globally in the system. So use the command below to start the installation
npm install --global gulp
In this statement we are telling Node Package Manager to install the gulp in your system and by specifying the global switch we are making it available for all the projects too. You can also specify -g as shorthand instead of --global

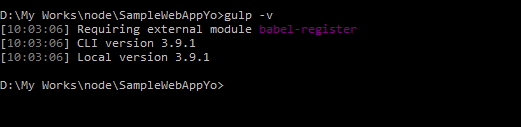
You can verify whether Gulp has installed successfully or not by executing the following statement,
gulp -v
which will list the version of Gulp as shown below.
Next up is to add Gulp as one of the dependencies for our project. Before doing that just make sure that you created package.json file which stores information about the project and it's dependencies. We can create it in two ways, using npm or by creating it manually. If are getting started with node or gulp, then it's advisable to use the npm init command
npm init
Executing this command will ask some question like name of project, description, version, entry point etc. It's not at all mandatory and can skip on to next item by pressing the enter key. When all the qusetions are done, based on our confirmation for the last question, it will create the package.json file
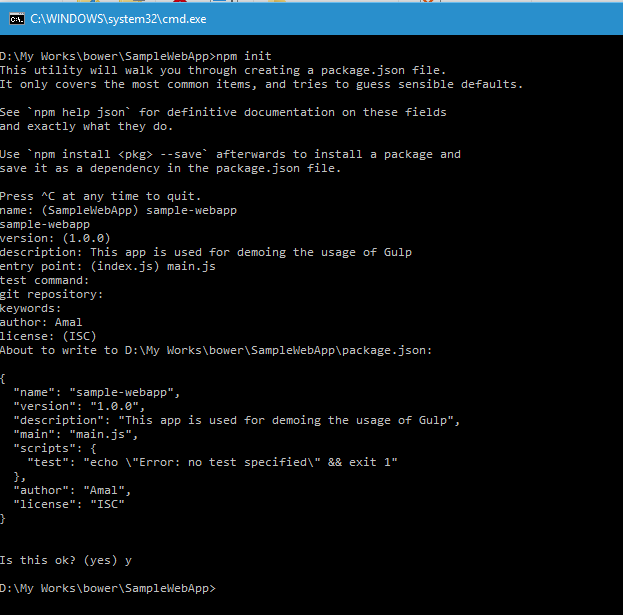
Generated code
{
  "name": "sample-webapp",
  "version": "1.0.0",
  "description": "This app is used for demoing the usage of Gulp",
  "main": "main.js",
  "scripts": {
    "test": "echo \"Error: no test specified\" && exit 1"
  },
  "author": "Amal",
  "license": "ISC"
}
In the next we need to save gulp locally, for that we needs to execute the following statement
npm install --save-dev gulp

This statement will add gulp to devDependencies in the package.json file
{
  "name": "sample-webapp",
  "version": "1.0.0",
  "description": "This app is used for demoing the usage of Gulp",
  "main": "main.js",
  "scripts": {
    "test": "echo \"Error: no test specified\" && exit 1"
  },
  "author": "Amal",
  "license": "ISC",
  "devDependencies": {
    "gulp": "^3.9.1",
  }
}
With this we have completed all the pre-requisites for using gulp in your project. Our aim is to produce error free code and we will make use of the jsHint library to do sanity checking of our js code in the project. For that we create a task in gulp that will watch all the changes we are going make in js files and when the task is run it will generate a report with all it's findings.
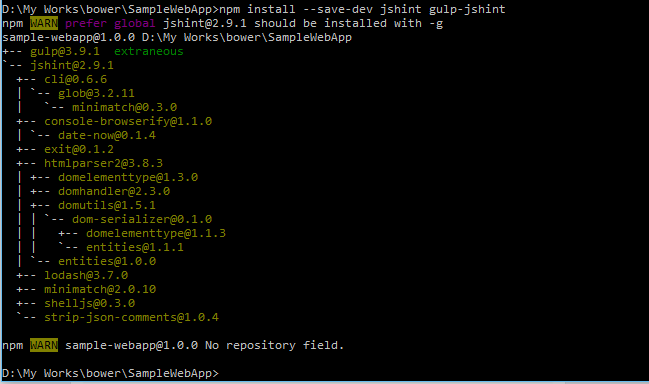
For this to work, we need to install the jshint plugin which can be done using a npm command
npm install --save-dev jshint gulp-jshint
And the output will be
With the plugin in place, we can now create the gulpfile which will define the methods for performing our task. In Gulp, there are only five methods which are available to developers for writing code for performing the tasks. The are task, run, watch, src and dest.
Let's create one and save it as gulpfile.js
var gulpMod = require("gulp");

var jshintMod = require("gulp-jshint");

gulpMod.task("lint", function(){
    return gulpMod.src("scripts/*.js")
        .pipe(jshintMod())
        .pipe(jshintMod.reporter("default"));
       // .pipe(jshintMod.reporter("fail"));
});

gulpMod.task("trackChanges", function(){
    gulpMod.watch("scripts/*.js",["lint"]);
});

gulpMod.task('default',['lint']);
Here we are first importing the gulp and jshint modules using the require function. After that we have created a task that looks up in the folder specified for src for any js files and makes sure that there are erorrs in that. The trackChanges task is the one responsible for running the lint task whenever we make changes to the source file by making use of watch function. This helps to avoid going back to command screen and executing the command again to whether it has got errors or not. I have specified a default task which is like grouping your taks also and in the second parameter, specified the task needs to be executed.
Let's create a javascript file inside the scripts folder and it contains only one statement
alert("Hi");So let's exceute the Gulp command and the output it produced
gulp
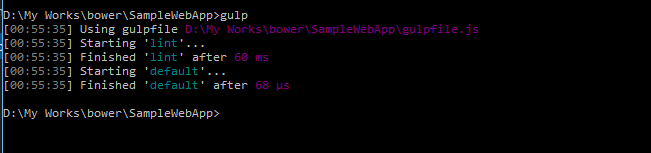
You can also execute the task by it's name too
gulp lint

So the difference between gulp and gulp lint is that the former will execute all the task in the file where as the latter will execute only the one specified along with the command
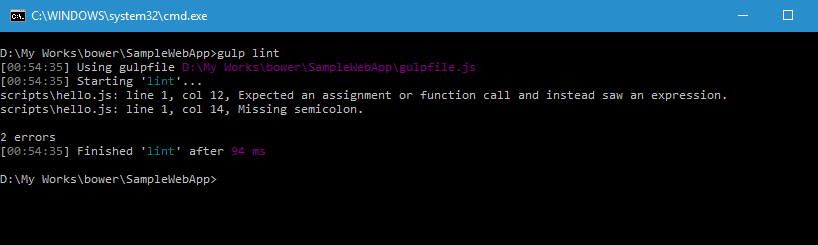
So our output is showing no errors, because the script is valid one. So let's make some typos inside that and will what gulp is going to output.
alert("Hi")dgdf;Let's execute the gulp command
gulp lint
Eventhough the task finishes, it will list all the errors encountered as shown below.
No Comments
Connecting Azure Blob Storage account using Managed Identity
Posted 12/9/2022Securing Azure KeyVault connections using Managed Identity
Posted 11/26/2022Manage application settings with Azure KeyVault
Posted 11/9/2022Adding Serilog to Azure Functions created using .NET 5
Posted 4/3/2021Learn how to split log data into different tables using Serilog in ASP.NET Core
Posted 4/23/2020