C#
ASP.MVC 6 Features - Dependency Injection Modes
In the earlier post, I have shown how to make use of the built in Dependency Injection container in MVC 6. If you missed that you can go through it here. In that post I have explained about the Instance scope and here we will see the remaining modes.
To recap the AddInstance method will always return a new instance
services.AddInstance
(new SampleRepository()); Transient is another one for specifying the scope of our instance during the object creation by DI container. By specifying it, we are instructing the container for creating a new instance whenever there is a request. The main difference between Instance and Transient methods is that in former it's our responsibility to create the instance where as it's upto the container in the latter
services.AddTransient<ISampleRepository,SampleRepository>();
ASP.MVC 6 Features - Dependency Injection
In the version prior to MVC 6 it's possible to do Dependency Injection(DI) using third party libraries like AutoFac. But in MVC 6, DI is built into right into the framework. All the libraries like MVC, WebAPI, SignalR are making use of this minimalistic DI container. The core features of the container are exposed through the IServiceProvider interface and since it's available and same for all the components of the framework, a single dependency can be resolved from any part of the application.
Let's see an example of DI in action in MVC 6
First of all I'm going to create an interface and concrete class for a repository to deal with the domain entity.
Interface
namespace samplemvc.Repository
{
    public interface ISampleRepository
    {
        string GetMessage();

    }
}
Implementation
namespace samplemvc.Repository { public class SampleRepository : ISampleRepository { public string GetMessage() { return GetHashCode().ToString(); } } }ASP.MVC 6 Features - Managing Dependencies
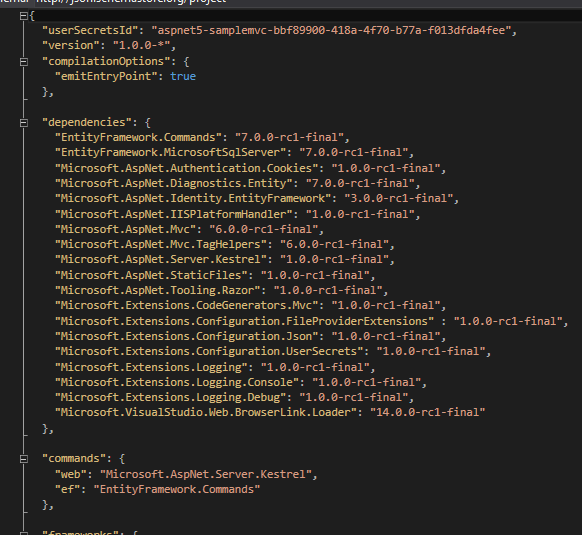
In MVC 6, Microsoft has completely revamped the logic for for adding and managing dependencies in the application. They have now introduced a file called Project.json for organizing dependencies. This new file is not only used for managing dependencies but also for other options such as compilation settings, managing runtime frameworks, adding postbuild/prebuild scripts etc.
As the name indicates the information is stored in JSON format as shown below
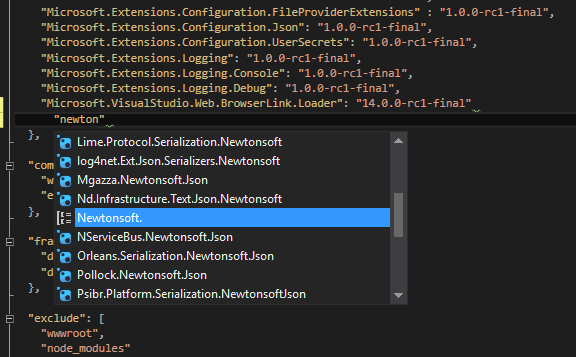
Intellisense is available inside the json file also which makes the task of adding new ones easier. It's not only limited to names but also for version numbers too. Here also note that the icon represents the type of the package that's going to added.

ASP.MVC 6 Features - Dynamic Compilation
Dynamic developement is a new feature supported by Visual Studio 2015 which comes in very handy while creating web apps using MVC 6. Whenever we made any change in the server side code, then we needed to stop debugging, compile the code again and runs it again to view the modified the code in action. This is very tedious job if we are try to debug a large application and wanted to make a slight change. The Edit-and-Continue is present while developing desktop apps since ages and with Visual Studio 2015 it's coming to web applications also.
With Visual Studio 2015, you can forget all these, just make the change in the C# code, save it, refresh the browser and voila the change is reflected in the page. This is achieved by make using of the dynamic compilation facility provided by Roslyn to compile the code automatically when we saves the file. One thing to note here is that you should start your session without debugging from Visual Studio by selecting Start Without Debugging from Debug menu or use the keyboard shortcut Ctrl + F5
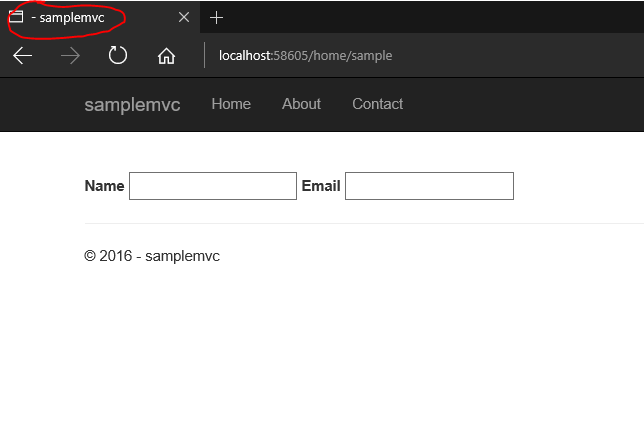
Let's see an example, in this we have two fields in our page but doesn't have any header in the page or title.
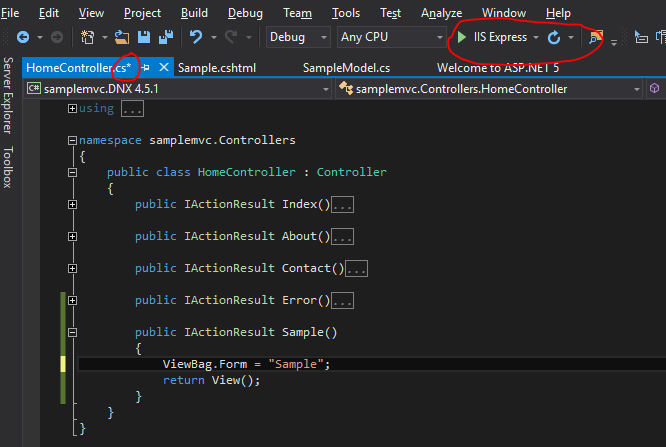
So let's make the change while running the application itself. Modified the controller to add a property in the ViewBag to store the title and save the changes. You can see that I have started the session without attaching the debugger and it's an important step if you want to try out this feature
After saving the file go and modify your cshtml to add a new heading to show the title and also set the ViewBag.Title property which is used in your layout page to show the title.
ASP.MVC 6 Features - All New Tag Helpers
We are using HTML helpers in our view pages extensively while building apps in MVC untill now. The main disadavantage of this is that it follows server side syntax and it's mix and match with html code in the page. It makes the maintainablity a tedious one and also readablity is affected.
@Html.Label("Name","Name")In ASP.NET MVC 6 we have the tag helpers which helps you achieve the same thing but this time we are writing using the HTML markup. So the equivalent code for above statment in MVC 6 will be
<label asp-for="Name"></label>
will generate the following HTML when rendered in browser
<label for="Email">Email</label>
Here the asp-for attributes extracts the display name attribute from the specified model property and displays it as the label for the control.
Let's add a class to the above control and see the difference between HTML Helpers and Tag Helpers
HTML Helper
@Html.Label("Name","Name", new {@class="label-caption"})Tag Helper
<label class ="label-caption" asp-for="Email">Email</label>
Generated HTML
<input name="Name" class="label-caption" id="Name" type="text" value="">
What's new in ASP.NET MVC 6
ASP.NET MVC 6 is built on top of ASP.NET Core 1.0 and it's MVC and Web API combined into one single package.
ASP.NET Core 1.0 is the latest version of the web framework from Microsoft built on top of the new .Net Core framework. It was earlier known as ASP.NET 5 but was changed lately to ASP.NET core. The naming caused a lot of confusion among the developer community with existence of ASP.NET 4.6 version. Since ASP.NET 5 is completely new and built from scratch, giving the version as 5 was little bit off also. This version of the framework has undergone significant changes to the architecture and now it's open source also.
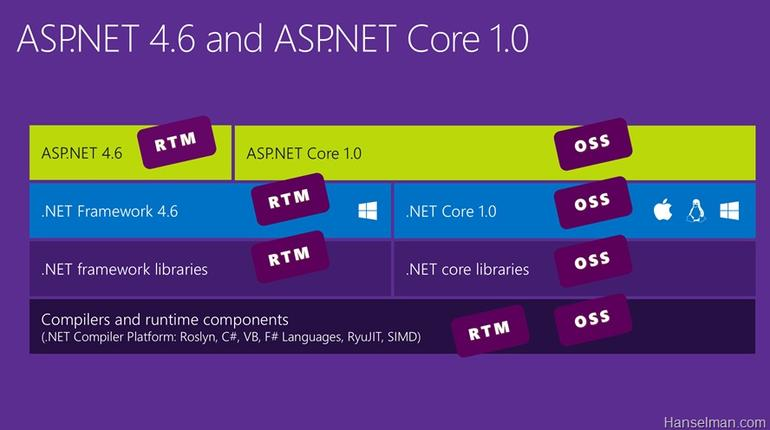
Pic Courteousy : Scot Hanselman's blog
Getting Started With ASP.NET Web API 2
Recently Microsoft revamped the Web stack and now it has become a unified framework for writing server side web applications and APIs. One of the major change is renaming ASP.NET 5 to ASP.NET Core 1.0. There was considerable amount of confusion between ASP.NET 4.6 and ASP.NET 5, since ASP.NET 5 is a significant change from the past they decided to adopt a completely new name for it.
ASP.NET MVC 6 is now part of ASP.NET Core and it’s a completely unified framework now.In the earlier version there was an WebApi framework which has got some code from the MVC framework and it was making life difficult for the developers at Microsoft. If they made some changes in one area then they needed to make the same in other area too there by maintaining it became a difficult task. So in MVC 6 they merged both these to create a unified one and takes a simple approach for developing web apps and API.
Let’s see how we can create a new Web API using MVC 6.
I am using Visual Studio Community 2015 with Update 1 for this post and depending on your installation, the screens and options may vary. Visual Studio Community 2015 a free version of Visual Studio and is available for download from here.
Create a new project using the ASP.NET Web Application from the New Project Dialog box

AutoMapper - NullSubstitution
Sometimes you may want to provide default values if there are null values for a member in the source. Automapper has got a NullSubstitute method in configuration to specify a value for a memeber having null value.
Syntax
NullSubstitute("<provide default value for null>"Usage
var config = new MapperConfiguration(cfg => { cfg.CreateMap<ModelData, ViewModel>() .ForMember(dest => dest.Name, opt => opt.NullSubstitute("Default Name")); });AutoMapper - Dynamic & ExpandoObjects
Automapper supports dynamic and ExpandoObjects and will map to/from without any additional configuration. In the example given below, mapping is done from a ExpandoObject(viewModel) to an instance of ModelData class(model)
The members for the source are dynamically created and AutoMapper maps it properly without any explicit configuration. You can see that which create the configuration object have an empty lambda expression.
using System;
using AutoMapper;
using System.Dynamic;

namespace AutoMapperSamples.Configuration
{
    namespace AutoMapperSample
    {

        public class ModelData
        {
            public string Name { get; set; }
            public DateTime StartedOn { get; set; }


        }

        public class TestAutoMapper
        {

            public static void Main()
            {

                dynamic viewModel = new ExpandoObject();
                viewModel.Name = "Bridge Construction";
                viewModel.StartedOn = DateTime.Now;
                var config = new MapperConfiguration(cfg => { });

                config.AssertConfigurationIsValid();


                var model = new ModelData { StartedOn = DateTime.Now, Name = "Bridge Construction" };

                model = config.CreateMapper().Map<modeldata>(viewModel);
                Console.WriteLine("\nName " + model.Name);
                Console.WriteLine("\nStart Date " + model.StartedOn);


                Console.ReadKey();
            }
        }
    }
}
Output
AutoMapper - Property/Field Filtering
By default Automapper will try to map not only public properties but also public fields found in source and destination.
using System;
using AutoMapper;

namespace AutoMapperSamples.Configuration
{
    namespace AutoMapperSample
    {

        public class ModelData
        {
            public string Name { get; set; }
            public DateTime StartedOn { get; set; }

            public string Location;
        }


        public class ViewModel
        {
            public string Name { get; set; }
            public DateTime StartedOn { get; set; }

            public string Location;
        }


        public class TestAutoMapper
        {

            public static void Main()
            {
                var config = new MapperConfiguration(cfg =>
                {
                    cfg.CreateMap<ModelData, ViewModel>();
                });

                config.AssertConfigurationIsValid();

                var model = new ModelData { StartedOn = DateTime.Now, Name = "Bridge Construction", Location = "India" };

                var viewModel = config.CreateMapper().Map<viewmodel>(model);
                Console.WriteLine("\nName " + viewModel.Name);
                Console.WriteLine("\nStart Date " + viewModel.StartedOn);
                Console.WriteLine("\nLocation " + viewModel.Location);


                Console.ReadKey();
            }
        }
    }
}
In this example Location is a public field and it will also get mapped automatically.
Output
AutoMapper - Working with prefix and postfix
Another configuration option we have is for recognizing prefixes or postfixes in the member names. In some scenarios we may have a prefix or postfix for all the properties in the source model and it's not there in the destination model. This cannot be handled by the default mapping rules in AutoMapper. For that we have RecognizePrefixes and RecognizePostfixes method in the MapperConfiguration class where we can specify postfix or prefix. If AutoMapper finds the prefix/postfix in the members in source instanace then it will be discarded and if it found a match in the destination instance then maps correctly.
Syntax - Prefix
RecognizePrefixes("<prefix name>");
Syntax - Postfix
RecognizePrefixes("<postfix name>");
Sample Code - Prefix
var config = new MapperConfiguration(cfg =>
{
     cfg.RecognizePrefixes("Work");
     cfg.CreateMap<ModelData, ViewModel>();
});
Sample Code - Postfix
var config = new MapperConfiguration(cfg =>
 {

     cfg.RecognizePostfixes("Work");
     cfg.CreateMap<ModelData, ViewModel>();
});AutoMapper - Replacing Member Names
Another feature available in AutoMapper is the ability to replace characters or the complete name in the source member name while doing the mapping. This will become helpful when you deal with member names having different spelling or some special characters in it. It's normally done during the configuration for mapping and needs to do only once.
Syntax
ReplaceMemberName("<orignial member name>","<matching property name>");
 var config = new MapperConfiguration(cfg =>
 {
     cfg.ReplaceMemberName("StartedOn", "Started_On");
     cfg.ReplaceMemberName("Name", "FirstName");

     cfg.CreateMap<ModelData, ViewModel>();
 });
Here we are doing couple of replacements, one for adding a underscore to Started_On property and second one for completely using a new name for the property. One thing to note here is that you should specify the replacements before the CreateMap statement otherwise it will you invalid mapping exception at runtime.
AutoMapper - Profiles
Profiles is another great feature from AutoMapper which helps you to mappings and it comes in handy when we need to apply different mapping rules for the same object. Let's take the case of a DateTime field being mapped to a String field and the requirements can be different based on the business requirements .
In the below example I have a source model which has got a DateTime field and the destination model with a string property. In one instance I needs to show the data in mm/dd/yyyy format and another case I need to show only month and year.
using System; using AutoMapper; namespace AutoMapperSamples.Configuration { namespace Profiles { public class DateTimeProfile1 : Profile { protected override void Configure() { CreateMap<DateTime, String>().ConvertUsing<DateTimeToString1TypeConverter>(); } } public class DateTimeProfile2 : Profile { protected override void Configure() { CreateMap<DateTime, String>().ConvertUsing<DateTimeToString2TypeConverter>(); } } public class DateTimeToString1TypeConverter : ITypeConverter<DateTime, String> { public string Convert(ResolutionContext context) { return DateTime.Parse(((object)context.SourceValue).ToString()).ToString("dd/MMM/yyyy"); } } public class DateTimeToString2TypeConverter : ITypeConverter<DateTime, String> { public string Convert(ResolutionContext context) { return DateTime.Parse(((object)context.SourceValue).ToString()).ToString("MMMM - yyyy"); } } public class Model1 { public DateTime StartedOn { get; set; } } public class ViewModel { public String StartedOn { get; set; } } public class TestProfile { public static void Main() { var config1 = new MapperConfiguration(cfg => { cfg.AddProfile<DateTimeProfile1>(); cfg.CreateMap<Model1, ViewModel>(); }); var config2 = new MapperConfiguration(cfg1 => { cfg1.AddProfile<DateTimeProfile2>(); cfg1.CreateMap<Model1, ViewModel>(); }); var model1 = new Model1{ StartedOn = DateTime.Now}; var viewModel1 = config1.CreateMapper().Map<ViewModel>(model1); Console.WriteLine(viewModel1.StartedOn); viewModel2 = config2.CreateMapper().Map< ViewModel>(model1); Console.WriteLine(viewModel2.StartedOn); Console.WriteLine(viewModel2.StartedOn); Console.ReadKey(); } } } }AutoMapper - Custom Type Converters
Another scenario where AutoMapper cannot do default mapping is when the types of the properties in both source and destination classes are different. Even though the names are same, there is no way AutoMapper can proceed in cases such as from String to Int32 or DateTime. If try to do mapping then AutoMapper will throw exception at the time of configuration or at the time of mapping itself.
This problem can be solved using the Custom Type Converters available in AutoMapper. We can create custom type converters by extending the ITypeConverter interface and provide the logic needed for converting the source to the destination
AutoMapper - Updating Instances
So far in this series we were dealing with mappings only with new instances of the source and destination classes. Automapper can also be used to do mapping for existing instances also, meaning instances that have data already in it before mapping. Typical example of this sceanario happens when we edit information, at that time our source will be the edited data and the destination data will be one stored in the data store.
AutoMapper - Projections
So far we saw how to do mapping between simple objects that have same name and same type using AutoMapper. In the last post, I have explained the use of MapFrom method to do a custom mapping by concatnating values from two properties. In some case we may need to map properties between two fields with different property names and AutoMapper will be unable to do the mapping by default. Here also we are going to use the MapFrom method to determin which field needs to be picked up from the source for mapping the value in the destination object.
AutoMapper - Conditional Mapping
Automapper has got another feature called conditional mapping which provides you to do mapping based on conditions. For example if you have a custom mapping for FullName property which uses FirstName and properties of source instance. In that case you want to make sure that these two fields are not null or whitespace, otherwise it will produce some undesirable results as shown in the example below.
AutoMapper - Custom Mapping
Up untill now we have gone various examples using AutoMapper that was doing one-to-one mapping. But there may arise some scenarios where we need to apply some custom logic for doing the mapping. We can do that in AutoMapper in multiple ways, one way of doing that is using ResolveUsing method while creating a map
AutoMapper - Ignoring Properties
In this post I will show you how to ignore properties from getting mapped automatically by AutoMapper. Suppose if both the source and destination has got a property with same name, but is used for representing different information, in that case we definitly not want the property to be mapped automatically. We can configure this while creating the mapping in AutoMapper as follows.
Syntax
var config = new MapperConfiguration(cfg => {
    cfg.CreateMap<Source, Destination>().ForMember(x =>x.DestinationPropertyName, opt => opt.Ignore());
});
Example
var config = new MapperConfiguration(cfg => {
    cfg.CreateMap<Person, PersonVM>().ForMember(x =>x.Name, opt => opt.Ignore());
});
Since AutoMapper supports FluentAPI, you will be able to call ForMember methods multiple time if you ignore more than one property
var config = new MapperConfiguration(cfg => {
cfg.CreateMap<Foo, FooCopy>()
.ForMember(x =>x.Name, opt => opt.Ignore())
.ForMember(x => x.Age , opt => opt.Ignore() );
});
In this example, while creating the mapping I have added the ForMember method to ignore the Name property while doing the mapping. If you look at the output window you can see that the value for Name is empty even though the property in the source instance has value in it
It will be a tedious procedure if we want to ignore a significant amount of properties from getting mapped automatically. So if you ever face that scenario do consider creating an extention class like the one below which ignores the properties based on data attribute specified in the model
Getting Started With AutoMapper
Automapper is an utility library designed for object-to-object mapping. Let's take the case of mapping columns in a data table to its equivalent business entity, we will have to manually write code for mapping each of these columns and assume if there are a lot of entities, it's quite boring as well as creates redundant code. Some bright minds in the industry took note of it and set to solve the problem by automating it and thus AutoMapper was born.
First of all you need to install AutoMapper package, which can be done from the Package Manager Console using the following statement
PM> Install-Package AutoMapper
Let's create a simple program to do a basic mapping procedure.
- Create a map which indicates the mapping flow for automapper.
var config = new MapperConfiguration(cfg => {
cfg.CreateMap<Source type, Destination type>();
});
IMapper mapper = config.CreateMapper();Suppose if you want to convert from class A to class B, then your mapping statement will be like
var config = new MapperConfiguration(cfg => {
cfg.CreateMap<A, B>();
});
IMapper mapper = config.CreateMapper();2. The actual mapping happens when we call the Mapper.Map function
var destinationObj = mapper.Map<Source type>(Source instance);
Eg: var bObj = mapper.Map<A>(aObj);

Connecting Azure Blob Storage account using Managed Identity
Posted 12/9/2022Securing Azure KeyVault connections using Managed Identity
Posted 11/26/2022Manage application settings with Azure KeyVault
Posted 11/9/2022Adding Serilog to Azure Functions created using .NET 5
Posted 4/3/2021Learn how to split log data into different tables using Serilog in ASP.NET Core
Posted 4/23/2020