Installing .NET Core in Ubuntu 15.10 in Azure
One of the benefits of being a Microsoft MVP is the credit you receive for using various services/resources like in Windows Azure which is now around 9.1K INR for each month. That credit is more than enough if you want to play with various options in Azure. So I went ahead and created a Linux VM in Azure using Ubuntu 15.10 distro, then subsequently installed Ubuntu Desktop, xrdp and xfce for connecting remotely into the VM using RDP from Windows machines. I am planning to write a post on the installation process and steps needed for configuring it and will share it as soon as it's available in the blog.
Many of you people may be knowing that Microsoft has released .NET Core 1.0 to the public last month. It's the new .NET framework completly built from scratch, modular and truely open source. In this post, I am going to show you the steps needed for installing .NET Core SDK in a Linux machine. .NET Core SDK consists of .NET Core CLR runtime and CLI tools which are needed for developing the applications in .NET core.
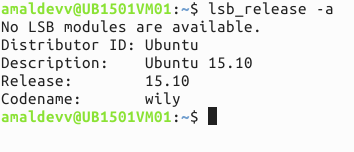
Step 1: Check Ubuntu version
Make sure that the installed version of Ubuntu is 15.10. The following steps were tried and tested in Ubuntu 15.10 and may not work in other versions. You can check the version from terminal by using the following command.
lsb_release -a
Step 2: Set up feed and update packages
Add the feed for downloading .NET Core SDK to dotnetdev.list by executing the following command.
sudo sh -c 'echo "deb [arch=amd64] https://apt-mo.trafficmanager.net/repos/dotnet-release/ trusty main" > /etc/apt/sources.list.d/dotnetdev.list'
Add the following key to the list so that packages authenticated with this key will always be considered as a trusted one.
sudo apt-key adv --keyserver apt-mo.trafficmanager.net --recv-keys 417A0893
Execute the apt-get update command to fetch the latest version and dependencies
sudo apt-get update
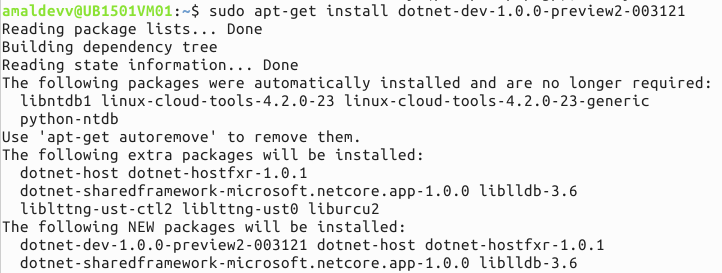
Step 3: Install .NET Core SDK
Execute the following command to start the installation of SDK
sudo apt-get install dotnet-dev-1.0.0-preview2-003121
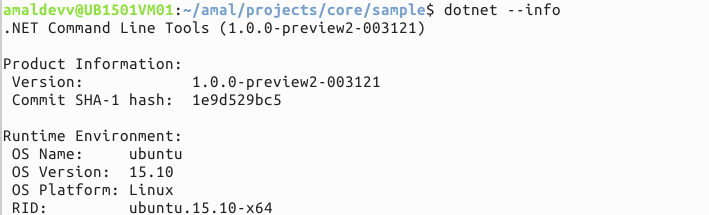
Step 4: Check Installation
When the installation is completed, you can verify whether the SDK has successfully installed or not by executing the dotnet info command in the prompt. If everything was installed correctly, you will see the version number along with the info about runtime environment displayed as the output in the console.
dotnet --info
Notes
Sometimes you may get an error saying that "The following packages have unmet dependencies. dotnet-dev-1.0.0-preview3-003180 : Depends: dotnet-sharedframework-microsoft.netcore.app-1.0.0 but it is not going to be installed" while executing the installation in Step 3.
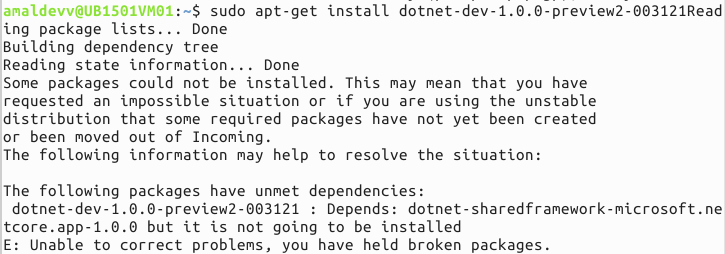
One of the main culprit for this issue may be the incorrect version of libicu55 library in Ubuntu 15.10. 15.10 uses libicu55 where as the CoreCLR binary is targeting libicu52, so we need to download that library using the following command.
The wget command will dowload the library into your machine and then the dkpg command can be used to install the packages as illustrated in the images given below
wget http://security.ubuntu.com/ubuntu/pool/main/i/icu/libicu52_52.1-8ubuntu0.2_amd64.deb

sudo dpkg -i libicu52_52.1-8ubuntu0.2_amd64.deb

Once the above two steps are completed then you resume the installation from Step 3
References
No Comments
Connecting Azure Blob Storage account using Managed Identity
Posted 12/9/2022Securing Azure KeyVault connections using Managed Identity
Posted 11/26/2022Manage application settings with Azure KeyVault
Posted 11/9/2022Adding Serilog to Azure Functions created using .NET 5
Posted 4/3/2021Learn how to split log data into different tables using Serilog in ASP.NET Core
Posted 4/23/2020