Visual Studio Code
Bundling & Minification in ASP.NET Core MVC Application
Bundling is the process of concatnating a set of files into one single file and Minification is removing all the whitespaces and comments in the code, removing extra statements to make the file smaller in size. By doing bundling and minification in our application will reduced the request payloads as well as the number of requests to the server for downloading the assets such as CSS and JS files.
.NET Framework had an in-built bundling and minification feature for sometime and since the advent of .NET Core they moved to use Grunt and Gulp for doing the same in both the RC versions. These tools primarily used JavaScript for operations such as file manipulation, automation, bundling and minification. Using these tools, we can also schedule tasks to run during a build or a publish event and is very useful in setting up a workflow for these opertions. The only downfall of these were we need to have some knowledge of programming in JavaScript and if you are not a fan of JavaScript then you will have some difficulties playing with it.
So Mads Kristensen created an extension which automates these processes and the functionality can be achieved with no code. So when Microsoft released .NET Core 1.0 they integrated this into the ASP.NET Core Web project template and is now available for you out of the box, if you are using Visual Studio 2015 for your developement. Basically it supports
- Bundling your assets into a single file
- Minification of your assets
- Create triggers for doing re-bundling automatically
- Globbing patterns
- MSBuild support
Also the same is available as a NuGet package so that non Visual Studio users will also be able to use that in their projects. In this post, I am going to show how to do this a ASP.NET Core MVC project using Visual Studio Code and .NET CLI tools.
Adding Reference & Configuring BundlerMinifier
The first is to add the BundlerMinifier package in your json file as shown below
tools": {
    "BundlerMinifier.Core": "2.0.238",
    "Microsoft.AspNetCore.Razor.Tools": "1.0.0-preview2-final",
    "Microsoft.AspNetCore.Server.IISIntegration.Tools": "1.0.0-preview2-final"
  },
Now we need to add a configuration file in which we will specifiy the files that needs to be bundled and minified. The default name for the config file is bundleconfig.json, the advantage being that the tool will take it automatically by the bundle command. If we specify a different filename, then we need to set it explicitly while executing the command for bundling.
As you can see from the above snippet, we can specify multiple files that needed to be bundled into a single file as input and when the bundling operation is completed the unified file will be named using the value set in the outputFileName property. To minify the files, just set the value as true for the enabled property in the minify element.
Logging into Console in ASP.NET Core MVC Application
One of the important upgrades happened in .NET Core is the complete rewrite of the diagnostic logging pipeline which emits different events for logging errors. .NET Core now supports logging framework out of the box and also supports extensibility to make use of third party logging frameworks such as Log4Net, NLog etc. Logging can be implemented in quick time with a minimal amount of code in your application.
Microsoft uses Microsoft.Extensions.Logging namespace for implement logging functionality and acts a wrapper for third party logging frameworks. This eradicates the need of writing our own logging framework to provide abstraction for third party frameworks such NLog, Log4Net etc. Also it has got inbuilt providers for supporting logging into Console, Event log, Trace Logging etc.
Console logging in ASP.NET Core MVC application.
As I said earlier logging has got inbuilt support provided by the ILogger class in .NET Core. For that, first we need to add a reference to the Microsoft.Extensions.Logging package in project.json file. Add the following entries under dependencies section in the json file for implementing providers for console and debug logging.
"Microsoft.Extensions.Logging": "1.0.0-rc2-final",
"Microsoft.Extensions.Logging.Console": "1.0.0-rc2-final",
"Microsoft.Extensions.Logging.Debug": "1.0.0-rc2-final",
Custom Error Pages in ASP.NET Core MVC Application Using StatusCodePages Middleware
While developing a web application, one of the best practice every developer should follow is to set up a custom error page for the site. Showing that dreaded yellow page to the user during the occurance of an exception is highly unprofessional and is prone to security risks. In one of the earlier post in the blog, I have explained the use of StatusCodePages middleware and various approaches for implementing it in a ASP.NET Core web application.
In this post, I am going to implement custom error handling in an ASP.NET Core MVC application using the StatusCodePages Middleware. I will use the UseStatusCodePagesWithReExecute method provided by the middleware for showing the error the page in the case of an error. So let's add the following line in the Configure method in the Startup.cs file as shown below
app.UseStatusCodePagesWithReExecute("/Error");This method is telling the web server to execute the action method name Index in the ErrorController. Since we are using the ReExecute method the redirection will happen in the server itself thereby avoiding a round trip between the server and the client.
Now, we need to create the controller and the action method in it. Create a file in the Controller folder, save it as ErrorController.cs and add the following lines in it
Using StatusCodePages middleware in ASP.NET Core Application
In ASP.NET Web and MVC applications, we have a customErrors.Mode property in the web.config file to specify custom error pages for exceptions happening in the application.
In an ASP.NET Core web application we can make use of the UseStatusPages middleware to return a custom error page or a error message to the output stream. The middleware can be used to return a custom error message or page when there is an invlid response code between 400 and 600. Normally, the 4xx error is used for client errors where as 5xx is used for server errors.
To explain the various options available in the middleware, I am going to use a ASP.NET Core web application created using Visual Studio Code and .NET CLI tools to run the application. You can also do the same using Visual Studio IDE too.
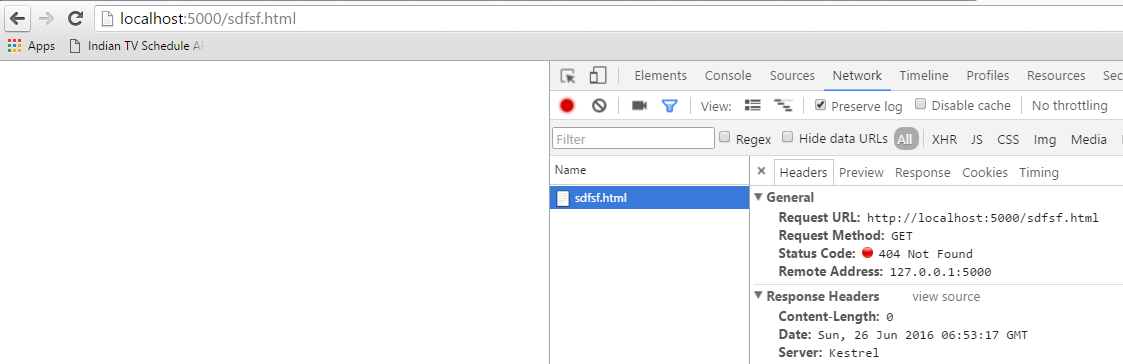
Let's create a empty MVC project and run the application using the dotnet run command. It will self host the application and exposes port# 5000 for accessing the site. Open the site in the default browser by typing in http://localhost:5000/ and if you try to access a page which doesn't exists in the project, the browser will show an empty page or a page with a message saying that Page not found. Given below is the screenshot of the page I got in Chrome. If you open up the developer tools by pressing F12, you can see that the response from the server has 404 as status code.
Creating ASP.NET Core Web App Using VS Code
VS Code is a brand new cross-platform open source editor from Microsoft which supports a variety of languages. You can read more about it in following posts I have blogged earlier
Installing Visual Studio Code in Windows 10
In this post, I am going to show you to create ASP.NET app targeting ASP.NET Core framework. ASP.NET Core which was earlier known as ASP.NET 5 is built from the scratch, is very lightweight, more modular and cross platform.
Before we get started with this, there are some pre-requisites which needs to be setup properly for our sample to work.
- VS Code Editor
- Node.js
- Gulp
- Git for Windows
You can refer the following links for installing Node, Gulp and Git
Installing node.js in Windows 10
Installing Git Client in Windows 10.
Connecting Azure Blob Storage account using Managed Identity
Posted 12/9/2022Securing Azure KeyVault connections using Managed Identity
Posted 11/26/2022Manage application settings with Azure KeyVault
Posted 11/9/2022Adding Serilog to Azure Functions created using .NET 5
Posted 4/3/2021Learn how to split log data into different tables using Serilog in ASP.NET Core
Posted 4/23/2020