Web Developement
What's Json.NET
What is JSON ?
JSON(Javascript Object Notation) is a lightweight data format and is one of the widely used data format to transfer data between a server and a client. In JSON the data is transferred in text format and normaly in the form of Key Value Pairs.
Sample JSON
{
  "FirstName": "Amal",
  "LastName": "Dev
}
So we developers most often stumble across scenarios where we need to map this attributes in JSON to domain entity. Mapping each attribute in the JSON to the properties of a class is tedious as well as a repetitive job. That's where frameworks such as Json.NET comes in handy, it helps you map the items using one single statment.
Json.NET
Json.NET is the most popular of them all and is widely used acros the world. Such is its performance and popularity that it became the defacto way of passing data in ASP.NET Web API. It started as a hobby project having very limited features and by 2006 it evolved into a great product with lot of features culminating with the release of the first version.
Another great advantage of using Json.NET is that it's a open sourced project and is free for commercial use too.
Features
Has a great serializer for converting .NET objects to JSON
High Performance
Creates indented JSON
Conversion from XML to JSON and vice versa
Supports frameworks from .Net 2.0 to 4.5, Silverlight, UWP
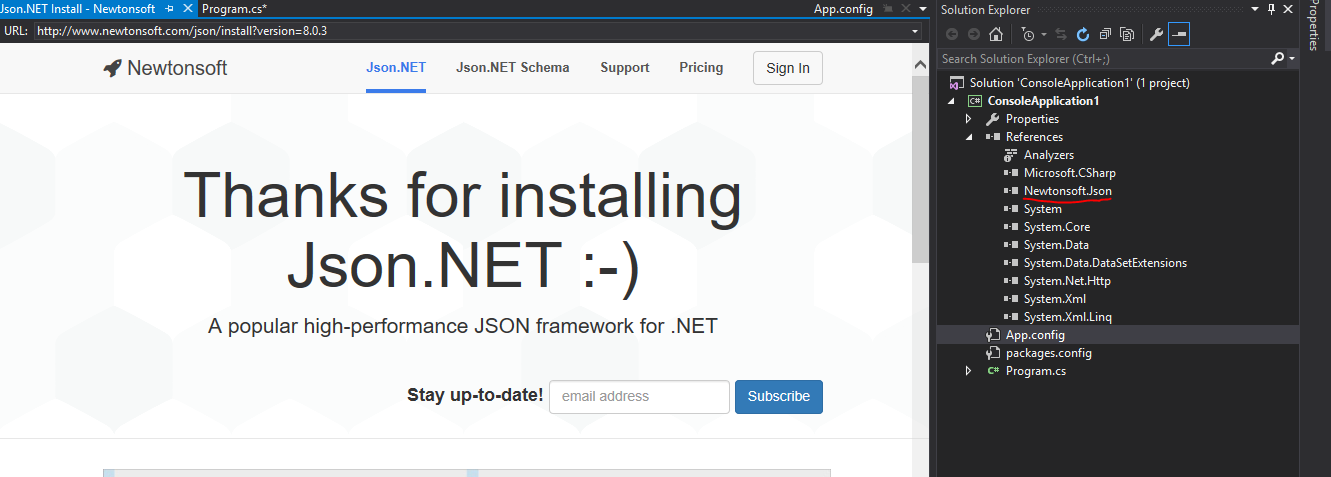
It's a free library and you can add to your project by either manually executing the command from the Package Manager Console window or by using the Package Manager in Visual Studio
Using Package Manager Console
Install-Package Newtonsoft.Json
Creating ASP.NET Core Web App Using VS Code
VS Code is a brand new cross-platform open source editor from Microsoft which supports a variety of languages. You can read more about it in following posts I have blogged earlier
Installing Visual Studio Code in Windows 10
In this post, I am going to show you to create ASP.NET app targeting ASP.NET Core framework. ASP.NET Core which was earlier known as ASP.NET 5 is built from the scratch, is very lightweight, more modular and cross platform.
Before we get started with this, there are some pre-requisites which needs to be setup properly for our sample to work.
- VS Code Editor
- Node.js
- Gulp
- Git for Windows
You can refer the following links for installing Node, Gulp and Git
Installing node.js in Windows 10
Installing Git Client in Windows 10.
Scaffolding Using Yeoman
Today, I am going to explain the scaffolding process using Yeoman. If you are hearing the word Yeoman for the first time, please refer my earlier post on Introuduction to Yeoman to get a better idea.
So let's see what all generators are installed in the system using the command
yo --generators
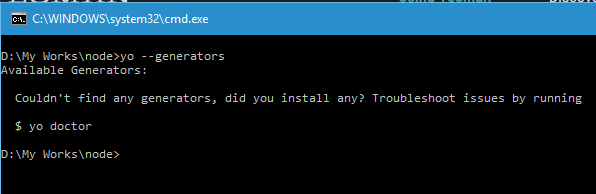
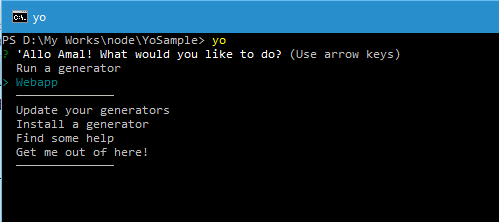
There are no generators available in my system right now. So let me install one using the Install command or use the option from the menu
yo
So let's install the webapp generator using the following command.
npm install --global generator-webapp

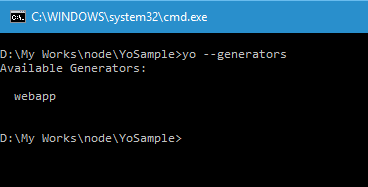
This will install the webapp generator globally and if you run the yo --generators command, it will list the newly added generator. Now let's create a folder for our project and run the following command from the root folder of your project to scaffold items.
Before doing that you need to make sure that you have bower and gulp already installed in your system. Otherwise you won't be able to proceed with the scaffolding operation. I have already blogged about the installation procedure for bower and gulp and use the below links for accessing it
Installing Bower on your Windows machine
Run the statement below to start the scaffolding.
yo webapp
Working with Multiple Tasks in Gulp
In this post, I am going to create a gulp program which will do check my js files for any errors, concatenate, minify and rename our js file. For that I am going to make use of the following plugins.
- gulp-jshint
- gulp-concat
- gulp-rename
I am assuming that you are already familiar with Node and packaging frameworks such as Grunt or Gulp, then you can proceed to the below part. If you are new to this, then you can refer my previous post on how to set up gulp and about gulp tasks in the links given below
Getting Started with Gulp
Gulp Tasks in Detail
First thing we need to do is installing the required plugins in our project. The below command will download and install all the three plugins at once.
npm install --save-dev jshint gulp-jshint gulp-concat gulp-rename gulp-uglify
Once you executes the command, will get an output as the one below.
result
Now we will create a file to define all the tasks for gulp and is saved as gulpfile.js
var gulpMod = require("gulp"); var jshintMod = require("gulp-jshint"); var jsconcatMod = require("gulp-concat"); var uglifyMod = require("gulp-uglify"); var jsrenameMod = require("gulp-rename"); //sanity check gulpMod.task("sanity", function(){ return gulpMod.src("scripts/*.js") .pipe(jshintMod()) .pipe(jshintMod.reporter("default")); }); gulpMod.task('scriptsmanip', function() { return gulpMod.src('scripts/*.js') .pipe(jsconcatMod('all.js')) .pipe(gulpMod.dest('dist')) .pipe(jsrenameMod('all.min.js')) .pipe(uglifyMod()) .pipe(gulpMod.dest('dist')) }); gulpMod.task("trackChanges", function(){ gulpMod.watch("scripts/*.js",["sanity",'scriptsmanip']); }); gulpMod.task('default',['sanity','scriptsmanip']);Gulp Tasks in Detail
In this post I am going to explain about the 5 methods availabe in Gulp and it's functionality in detail.In the earlier post, I have gone through the process of setting up Gulp in your local Windows box and also about getting started with a simple task. You can refer that post here.
As I mentioned in that post, there are only five methods available in git, namely
- task
- run
- watch
- src
- dest
gulp.task() is used for defining our tasks. Expected parameters are task name, array of task names and a function that performs the task.
Syntax
gulp.task('<task name>',['<task 1>','<task 2>'], funtion{});The second parameter is optional, so the task method can have two forms
 gulp.task('parenttask', funtion{
     // perform parent task
   });
gulp.task('childtask', ['parenttask'], funtion{
// perform child task after parent task is completed
});gulp.src() is used to provide the path for our source files and it takes two parameters, one glob and an optional options object. In the src method, .pipe function is called extensively to chain output into other methods.
Syntax
gulp.task('<glob>', funtion{});Getting Started with Gulp
Gulp is a automation tool that will help you to automate common tasks such as minifying the css and scripts, compiling preprocesed css during the development of a website. Gult is built on top of Node.js and you need to have it installed on your machine before you proceed with installation of Gulp. If you are not familiar with Node.js installation, then you can read my post here on how to install it on your Windows machine.
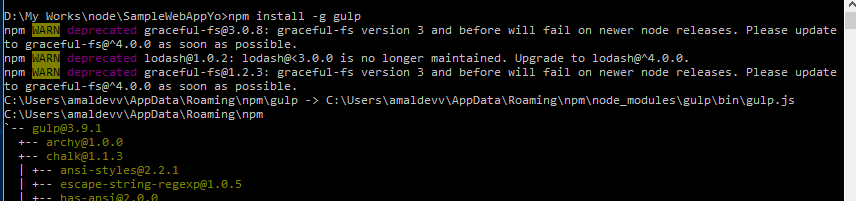
We will be using Node Package Manager or npm to install Gulp globally in the system. So use the command below to start the installation
npm install --global gulp
In this statement we are telling Node Package Manager to install the gulp in your system and by specifying the global switch we are making it available for all the projects too. You can also specify -g as shorthand instead of --global

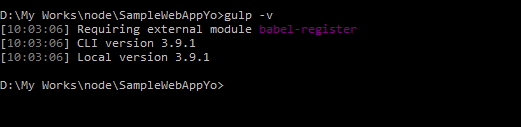
You can verify whether Gulp has installed successfully or not by executing the following statement,
gulp -v
which will list the version of Gulp as shown below.
Installing packages using Bower in your Windows machine
In the last post, I have detailed the steps needs for installing Bower in your Windows machine and in this one I will be showing how to use Bower to install packages in your projects. If you have missed my earlier one on installation, you can read it here.
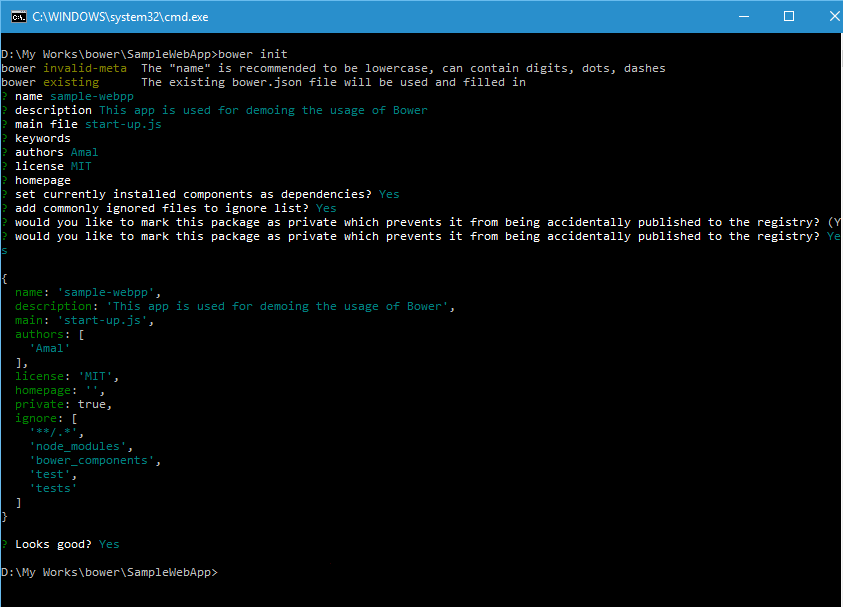
If you want to use bower in your project, you need to initialize it first. You can do that using the bower init command to create bower.json file in the root folder and you can create one manually using any text editor.
When you execute init command, it will ask some questions and it's not mandatory to give answers for that. Once it's with collecting data it will ask for a confirmation to save the changes and creates the json file.
bower init
Output
So we have the environment setup for the project and let's add jQuery. Since I am not sure about the locations of the packages, I will search for it in the registry and will then install it. For searching the registry, we have got two options, one option is using the Bower website and other is from the command line.
Syntax for searching from CLI
bower search <query>
Installing Bower on your Windows machine
Managing dependencies is one of the hardest job in the life of a web developer. For example, Whenever we installs a new library, we may need to add other libraries which our newly added library depends upon for working correctly. Some times adding incorrect versions also will give undesired results. This problem was solved by package manager applications like NuGet for server side frameworks.
For client side frameworks, it's even a bigger issue. A web site will normally contain a lot of client side frameworks such as jQuery, AngularJS, MomentJS etc and keeping track of updates and making sure that specific versions are used by libraries is a tedious job. That's where tools like Bower comes in handy
Bower makes sure that it installs the right versions of the packages and dependencies we need. It can manage components that can have HTML, Javascript, fonts, css, image files etc. What Bower basically does is that searches for the web for the package and dependencies all over the web, downloads and saves it for your use. It creates a file called bower.json which it uses for tracking the saved ones.
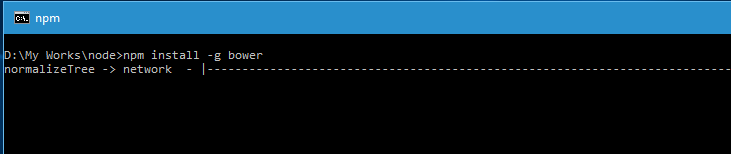
Let's now proceed with installation of Bower. You will need Node.js in the machine as we are using Node Package Manager or npm for installing Bower. If your machine doesn't have one, head over to this post to know more about installing Node.js.
So the command used for installing bower is
npm install -g bower
This statement will install bower globally in your system, meaning it's avaliable for all of the projects you are going create from now.
Getting Started With Yeoman
Yeoman is another great code generator which can create any type of app. It's a language agnostic scaffolding system which helps us to get started with projects very easily and rapidly.
The main component is the generators which are like plugins for Yeoman. It's the role of these generators to create the project for different types of languages such as C#, Python, Java etc. There are tons of generators available in the public domain which helps you to get started with most of the languages under the sun.
In couple of earlier posts, I had gone through the process of installing and setting up Node.js in your local machine. If you have missed that part, you can refer them in the links given below.
Installing node.js in Windows 10
Creating Your First Application With Node.js
Along with Node.js some other utilities will also get installed during the installation of node and one of them is Node Package Manager or npm. For installing Yeoman, npm is needed because Yeoman is being delivered as node package.
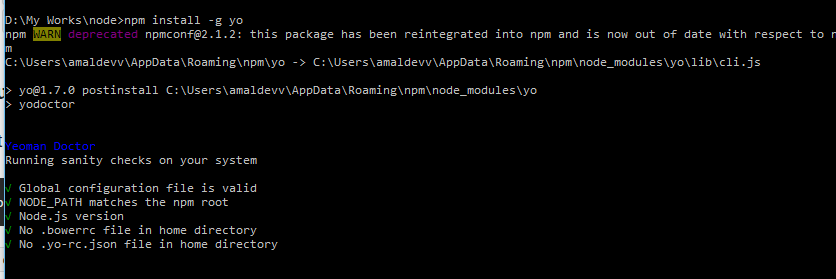
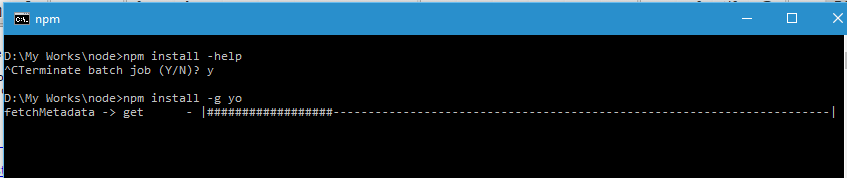
Yeoman has a command line utility called yo which is used for creating projects using generators. So we will go ahead and install yo using npm using the command below.
npm install -g yo
Creating Your First Application With Node.js
In the earlier post, I showed you how to install Node.js in your local machine and how to verify whether it's running correctly or not. If you missed that one, you refer it here.
A Node.js program contains mainly 3 blocks.
- Import Required Modules
- Create Server
- Intercept Request and Return Response
Let's create a program and will explain the blocks in detail with examples.
Basically our program will intercept the request and will send the IP address from where the request originated as the response back to the client. For that first we need to import the http module which can be done using the require attribute as follows
var httpMod = require("http");Here the httpMod variable will store the http instance returned by the require module. This is the first block in the Node.js program where you import all your modules using the required directive.
In the next block, we will create the server which will listen in the specified port for incoming request from the client and returns the response.
httpMod.createServer(function(request,response) { response.writeHead(200, {'Content-Type': 'text/plain'}); response.end("Requested From ->" + request.connection.remoteAddress); } ).listen(9095);Installing node.js in Windows 10
Node.js is an open-source, cross-platfrom runtime built using V8 engine, the same one powers Chrome's javascript engine. It helps you to create robust and scalable server-side and networking applications. Applications targeting node.js or node are created using Javascript and can be run within the runtime on Windows, Mac or Linux.
According to the official documentation
Node.js uses an event-driven, non-blocking I/O model that makes it lightweight and efficient, perfect for data-intensive real-time applications that run across distributed devices.Let's see how can we install node.js on your machine. First you to download the desired package from the node site. Since I am using Windows 10, am going to download the Windows flavor and will proceed with version 5.10.1 from stable line branch
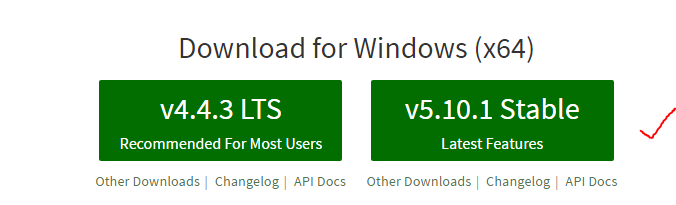
The installer size is around 10 MB and won't much time to download. Once it's finished downloading, go to the downloads folder and double click on the installer to start the installation.
ASP.MVC 6 - Using dnu restore command
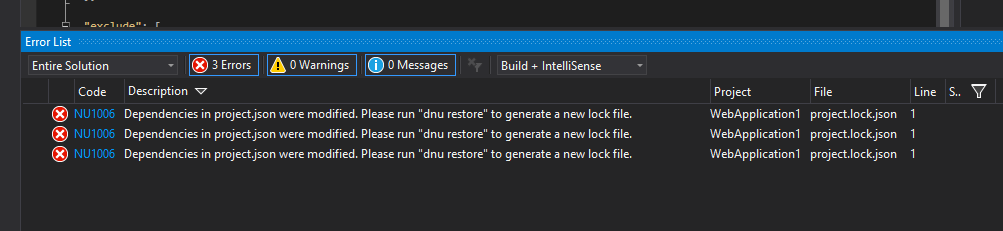
Recently I was playing around with the new MVC 6 web application templates to create some sample websites for learning the new features in the latest version. And suddenly out of the blue got the following error while try to start a debugging session and won't allow you the run the application without resolving this issue.
So I had no clue at first about, so I googled about the error and learned how this error came about and the ways to fix it too.
Visual Studio has got a project.json file as well as project.lock.json file inside the project. The project.json file can contain ranged versions or with specific versions like the one below
    "Microsoft.AspNet.Mvc": "6.0.0-beta6-*",
    "Newtonsoft.Json": "7.0.1"
The project.lock.json file will contain the specific version that is being used by the project. If we doesn't specified ranged versions in the project.json file, then both the files will be identical. The project.lock.json is used by dnx enviroment for loading the references for your project because using project.json file may cause to resolve the versions every time the application is run.
The lock file contians a key the very top called locked and when it's set to true then dnu or nuget will always restore and use the specific versions of every dependency specified in the lock file.
Setting up dnx environment in your machine
If you are not a die hard fan of Visual Studio and regularly uses command prompt and text editors like Notepad or Sublime text for doing coding in C# and compilation, then there is a good news for you. You can make of the DNVM(.NET Version Manager) from ASP.NET Core from now.
If you have Visual Studio in your machine, then you can skip the set up part and jump straight into the command sections. Becuase Visual Studion installs DNVM by default and no set up is needed.
Pre-requisites
- .NET version 4.5.2 or higher. If you don’t have it in your machine, install it from here. Need around 3 GB on your Windows drive, also admin access is needed for install. Don’t forget to reboot after the installation
- PowerShell version 4.0 or higher. Upgrade it here if you are running an older version. Admin access is needed for installation and also reboot is necessary once the installation is completed
- Install Visual C++ 2013 distributable package from here if it’s missing from your machine. Admin access is needed for this one also and you need to install both x86 and x64 versions
Let’s confirm now that we are having the required version of Powershell by using the command below
$PSVersionTable.PSVersion
It should show 4 if you have upgraded using the link above. Basically the version should be 4 or higher.
So we have everything needed for the dnx environment to be installed in your box, so let’s type in the following command in the Command Prompt window to install it
@powershell -NoProfile -ExecutionPolicy unrestricted -Command “&{$Branch=’dev';iex ((new-object net.webclient).DownloadString(‘https://raw.githubusercontent.com/aspnet/Home/dev/dnvminstall.ps1′))}”
This will install the DNVM(.NET Version Manager) in to your user folder
You can verify the installation is happened correctly by typing the command
dnvm
in PowerShell or Command Prompt. It will display a help information screen as shown below.
ASP.MVC 6 Features - wwwroot folder
Whenever we web develop applications in .NET framework the root directory of the website has always been the directory where our project is located. All our C# source files, html pages, js files, aspx pages, cshtml files all reside under this root. The file system based approach has got many disadvantages especially when it comes to protecting sensitive project resources. Normally people used black listing to lock out access to files such as Global.asax and web.config being served to the clients as response and this was being done at framework level. It is always advisable to use whitelisting technique rather than using a blacklisting method from a security perspective.
Also we will have different version of the same file say web.config for developement , testing, staging and production. And coming to scripts files we normally use the readable version of the files during development, but when it goes to the production we deploys only the minified version of it. Handling of these scenarios were getting difficult with each version and that's how the structure was devised for web projects in MVC 6
By default the wwwroot folder will act as the root for your website and all the static files such as images, scripts, styles will reside in this folder. And the sensitive files like project.json, appsettings.json etc are not under wwwroot folder and will never be accessible if our site is compromised. Thus instead of blacklisting, we are giving access only to those files which are accessible.

ASP.MVC 6 Features - Managing Packages
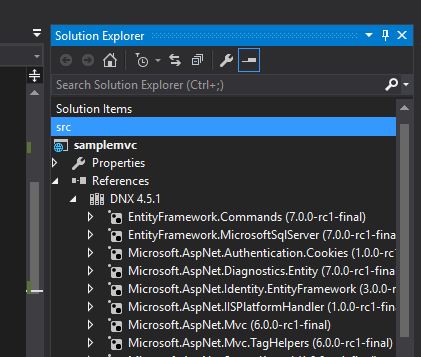
As developers, one of the thing we do frequently is adding references in the project. All these added dll's are listed under the References folder. Also listed are the libraries added by NuGet package manager used in C# code. These are called server side dependencies and is used in server side coding part.
Since it's now possible to target multiple frameworks, the refernces are now grouped under References folder based on the targeted environments.
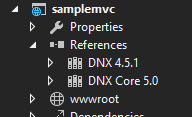
By default, it will list two items under References, DNX 4.5.1 is targeting .NET framework 4.5 and DNX Core 5.0 is targetting .NET Core framework. If you expand it, then all referenced dll's will be listed.
If you look closely the icons for the references, you can see that it's having the icon of Nuget. It indicates that these are all NuGet packages and if you manually added a dll, then it will have a different icon.
Apart from these we will making use of different types of client side libraries like jQuery, Kendo, Angular etc. In MVC 6 all of it are placed under the dependencies folder. Managing client side frameworks is more tedious when compared to the server side cousins and two of the great names in open source package management is now supported in MVC 6. Bower and npm packages will be listed under the Dependencies
ASP.MVC 6 Features - In Memory Execution
In one of the earlier post we have seen that in MVC 6 it's now possible to do edit-and-continue very much like what we do while developing a desktop application
Similarly, another important feature shipped with MVC 6 is the ability to do in memory compilation of the code. That means while building the application, output is generated in the bin folder and the web server load the files from there to run the application. But in MVC 6 this is turned of by default and the files are compiled and stored in memory. One advantage of doing this is that it reduces the start up time considerably since there is very little time spent on disk I/O operations.
Let's create a sample MVC 6 web project by selecting the Web Application template under ASP.NET 5 from Visual Studio.

Visual Studio will create MVC project with model, controllers and views out of the box and you will get a barebone site without writing a single line of code.
ASP.MVC 6 Features - Dependency Injection Modes
In the earlier post, I have shown how to make use of the built in Dependency Injection container in MVC 6. If you missed that you can go through it here. In that post I have explained about the Instance scope and here we will see the remaining modes.
To recap the AddInstance method will always return a new instance
services.AddInstance
(new SampleRepository()); Transient is another one for specifying the scope of our instance during the object creation by DI container. By specifying it, we are instructing the container for creating a new instance whenever there is a request. The main difference between Instance and Transient methods is that in former it's our responsibility to create the instance where as it's upto the container in the latter
services.AddTransient<ISampleRepository,SampleRepository>();
ASP.MVC 6 Features - Dependency Injection
In the version prior to MVC 6 it's possible to do Dependency Injection(DI) using third party libraries like AutoFac. But in MVC 6, DI is built into right into the framework. All the libraries like MVC, WebAPI, SignalR are making use of this minimalistic DI container. The core features of the container are exposed through the IServiceProvider interface and since it's available and same for all the components of the framework, a single dependency can be resolved from any part of the application.
Let's see an example of DI in action in MVC 6
First of all I'm going to create an interface and concrete class for a repository to deal with the domain entity.
Interface
namespace samplemvc.Repository
{
    public interface ISampleRepository
    {
        string GetMessage();

    }
}
Implementation
namespace samplemvc.Repository { public class SampleRepository : ISampleRepository { public string GetMessage() { return GetHashCode().ToString(); } } }ASP.MVC 6 Features - Managing Dependencies
In MVC 6, Microsoft has completely revamped the logic for for adding and managing dependencies in the application. They have now introduced a file called Project.json for organizing dependencies. This new file is not only used for managing dependencies but also for other options such as compilation settings, managing runtime frameworks, adding postbuild/prebuild scripts etc.
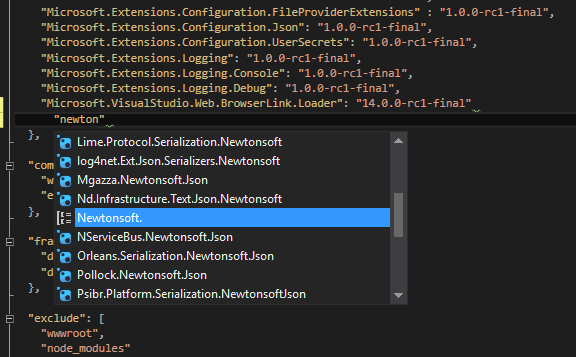
As the name indicates the information is stored in JSON format as shown below
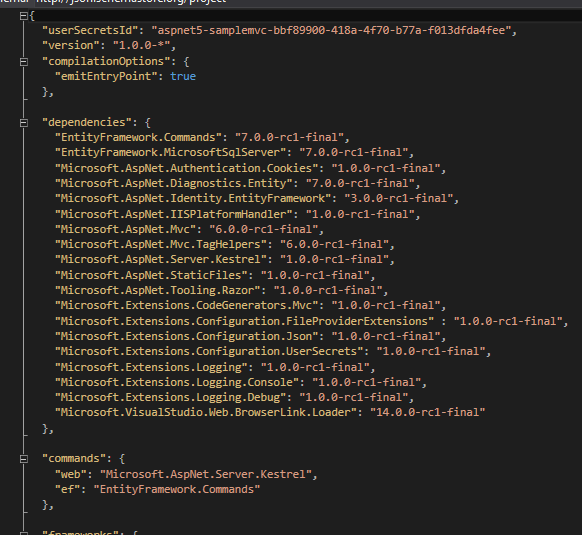
Intellisense is available inside the json file also which makes the task of adding new ones easier. It's not only limited to names but also for version numbers too. Here also note that the icon represents the type of the package that's going to added.

ASP.MVC 6 Features - Dynamic Compilation
Dynamic developement is a new feature supported by Visual Studio 2015 which comes in very handy while creating web apps using MVC 6. Whenever we made any change in the server side code, then we needed to stop debugging, compile the code again and runs it again to view the modified the code in action. This is very tedious job if we are try to debug a large application and wanted to make a slight change. The Edit-and-Continue is present while developing desktop apps since ages and with Visual Studio 2015 it's coming to web applications also.
With Visual Studio 2015, you can forget all these, just make the change in the C# code, save it, refresh the browser and voila the change is reflected in the page. This is achieved by make using of the dynamic compilation facility provided by Roslyn to compile the code automatically when we saves the file. One thing to note here is that you should start your session without debugging from Visual Studio by selecting Start Without Debugging from Debug menu or use the keyboard shortcut Ctrl + F5
Let's see an example, in this we have two fields in our page but doesn't have any header in the page or title.
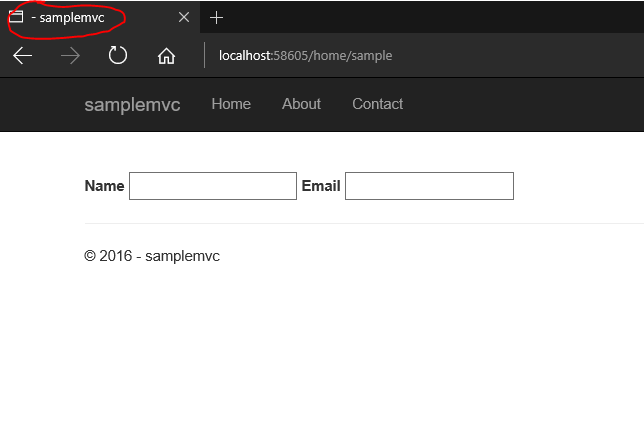
So let's make the change while running the application itself. Modified the controller to add a property in the ViewBag to store the title and save the changes. You can see that I have started the session without attaching the debugger and it's an important step if you want to try out this feature
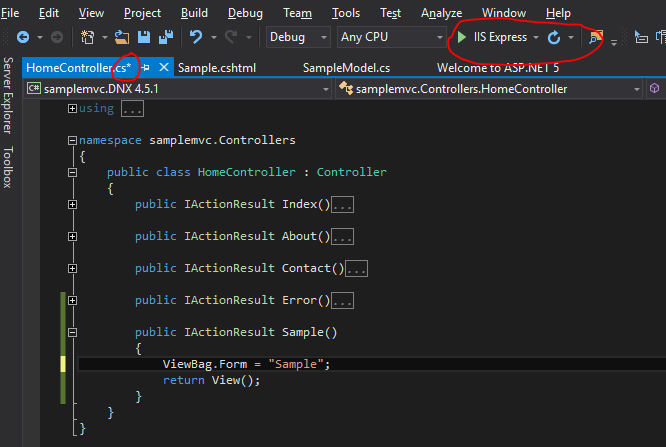
After saving the file go and modify your cshtml to add a new heading to show the title and also set the ViewBag.Title property which is used in your layout page to show the title.
Connecting Azure Blob Storage account using Managed Identity
Posted 12/9/2022Securing Azure KeyVault connections using Managed Identity
Posted 11/26/2022Manage application settings with Azure KeyVault
Posted 11/9/2022Adding Serilog to Azure Functions created using .NET 5
Posted 4/3/2021Learn how to split log data into different tables using Serilog in ASP.NET Core
Posted 4/23/2020