nginx
Using Nginx as a Reverse Proxy for ASP.NET Core Web App in Docker
One of the main features of .NET Core framework is the ability to run the applications on variety of environments such as Linux, MacOS etc. It includes a light weight server known as Kestrel which is used to run web apps targeting the .NET Core framework. But one of the main disadvantage of Kestrel is that it is primarily a development server and is not recommended for production environments. We always used IIS as server for hosting .NET Web app, but in the case of .NET Core since it's cross platform and we can't rely on IIS for platforms other than Windows. In the case of Linux, Nginx is one of the most popular web server out there and is very good at serving static content. But, for the example in this post we are going to make use of the reverse proxy(passing requests to other servers) feature in Nginx to serve our core web app from a docker container running on a Linux distro.
I had already written a post about the on how to get started with Nginx and I recommend you to go through the post here if you are working with Nginx for the first time. In this post, I am going to host a .NET Core web app in a Docker container using Nginx and Kestrel to serve the site on a Linux machine.
Before I get started with coding, here's a little advice for all you guys. It is always a recommended thing to follow a proper structure for your source files in your project. In this case, I have created two folders, one for putting all the files related to .NET and one for putting all those related to Nginx as shown in the screenshot below.

Step 1 : Create .NET Core App
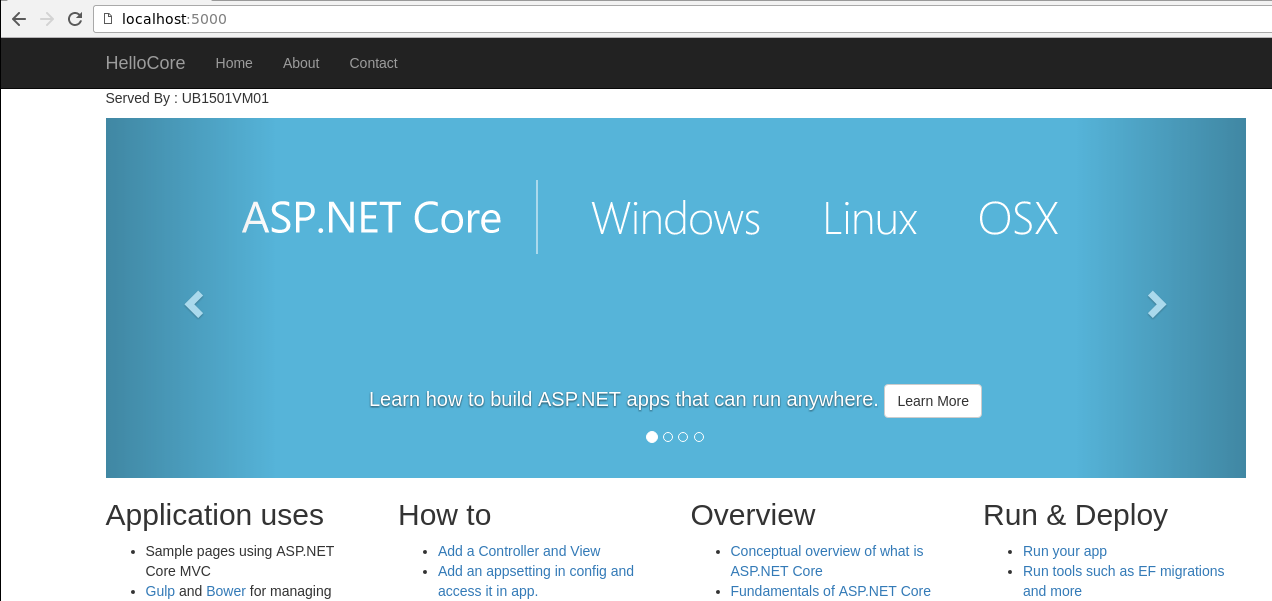
Create a sample mvc core application under the dotnet folder. I created this one using the boiler plate template provided by yeoman which generated all the folders and files showed in the above image. If you run the application now using the dotnet run command, it will host the application in Kestrel and can be accessed by using the url http://localhost:5000. I have modified the sample page to show the name of the server using the below code.
Served By : @System.Environment.MachineNameSince I'm running it from the local machine, the page will show the name of my local box as the server name as shown in the image below.
Since we are going to host our application inside the Docker container, let's create a docker file which contains some instructions to Docker to set up the container. It basically tells which base image should be used, copies the files from the current folder to a folder called app inside the container and sets it's as the working directory. Then it executes two dotnet commands to restore the packages first and then executes the build. Once the build is completed it exposes the port #8018 for serving the app from the container. The ENTRYPOINT command is used execute the application when we start the container and in our case it will execute the run command to host the application.
Serving Static Files Using nginx in Docker
nginx is an open source web server lighting up the hosting world with rapid growth and is catching up with the sector leader Apache very fast. It's very fast, light weight web server which can also act as a load balancer or a caching server. One of the main feature of nginx is it's capability to handle a large number of concurrent connections and is the main reason why the popular sites such as wordpress.com, Hulu etc is using it. In nginx, scaling is implemented using an asynchronous architecture instead of threads to handle simultaneous requests. This helps nginx to serve lot of requests concurrently without consuming lot of system resources.
In this post, I am going to take you through the various steps needed to set up nginx in a Docker container to serve static files.
Step 1 : Pulling Docker Image
The image for ngnix for Docker is available in the Docker Hub and can use the below command to pull down the latest image into your local Docker client.
docker pull nginx
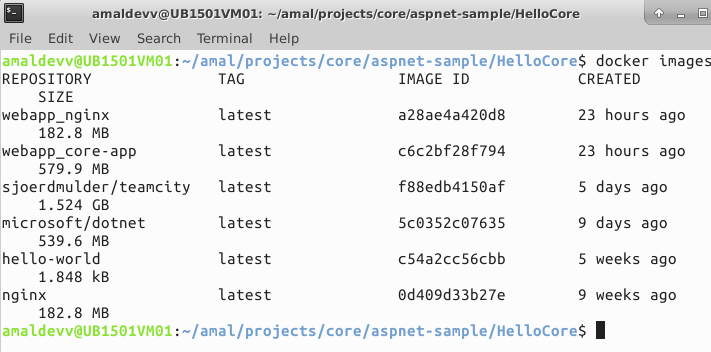
It will pull the latest image from the hub if it's not found in your local docker client and once the download is completed we can verify the same by executing the docker images command. I had downloaded the image some time back and you can see that in the below screenshot as the last item in the list.
Installing .NET Core in Ubuntu 15.10 in Azure
One of the benefits of being a Microsoft MVP is the credit you receive for using various services/resources like in Windows Azure which is now around 9.1K INR for each month. That credit is more than enough if you want to play with various options in Azure. So I went ahead and created a Linux VM in Azure using Ubuntu 15.10 distro, then subsequently installed Ubuntu Desktop, xrdp and xfce for connecting remotely into the VM using RDP from Windows machines. I am planning to write a post on the installation process and steps needed for configuring it and will share it as soon as it's available in the blog.
Many of you people may be knowing that Microsoft has released .NET Core 1.0 to the public last month. It's the new .NET framework completly built from scratch, modular and truely open source. In this post, I am going to show you the steps needed for installing .NET Core SDK in a Linux machine. .NET Core SDK consists of .NET Core CLR runtime and CLI tools which are needed for developing the applications in .NET core.
Step 1: Check Ubuntu version
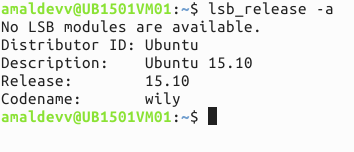
Make sure that the installed version of Ubuntu is 15.10. The following steps were tried and tested in Ubuntu 15.10 and may not work in other versions. You can check the version from terminal by using the following command.
lsb_release -a
Step 2: Set up feed and update packages
Add the feed for downloading .NET Core SDK to dotnetdev.list by executing the following command.
sudo sh -c 'echo "deb [arch=amd64] https://apt-mo.trafficmanager.net/repos/dotnet-release/ trusty main" > /etc/apt/sources.list.d/dotnetdev.list'
Add the following key to the list so that packages authenticated with this key will always be considered as a trusted one.
sudo apt-key adv --keyserver apt-mo.trafficmanager.net --recv-keys 417A0893
Execute the apt-get update command to fetch the latest version and dependencies
sudo apt-get update
Connecting Azure Blob Storage account using Managed Identity
Posted 12/9/2022Securing Azure KeyVault connections using Managed Identity
Posted 11/26/2022Manage application settings with Azure KeyVault
Posted 11/9/2022Adding Serilog to Azure Functions created using .NET 5
Posted 4/3/2021Learn how to split log data into different tables using Serilog in ASP.NET Core
Posted 4/23/2020