Web Developement
Learn how to split log data into different tables using Serilog in ASP.NET Core
For most of the application developers, file systems are the primary choice for storing the information generated by the logging providers. One of the main drawbacks of using the files is that it's very difficult for the search for information or to do an analysis of the information written to it over time. Third-party logging providers such as Serilog have facilities to persist the data in database tables instead of the file system. Even then, if you use a single table to write all you errors and other debug information, the size of the table will grow considerably over time which can affect the performance of the whole operation itself.
So, in this post, I will explore the possibility of using multiple tables for storing the logging information using Serilog. If you are new to Serilog, please refer to my previous articles on the same here using the links given below.
- Implementing Logging in a .NET Core Web Application using Serilog
- Rollover log files automatically in an ASP.NET Core Web Application using Serilog
- Write your logs into database in an ASP.NET Core application using Serilog
Code snippets in this post are based on .NET Core 5.0 Preview 5
Step 1: Create a Web Application in .NET Core
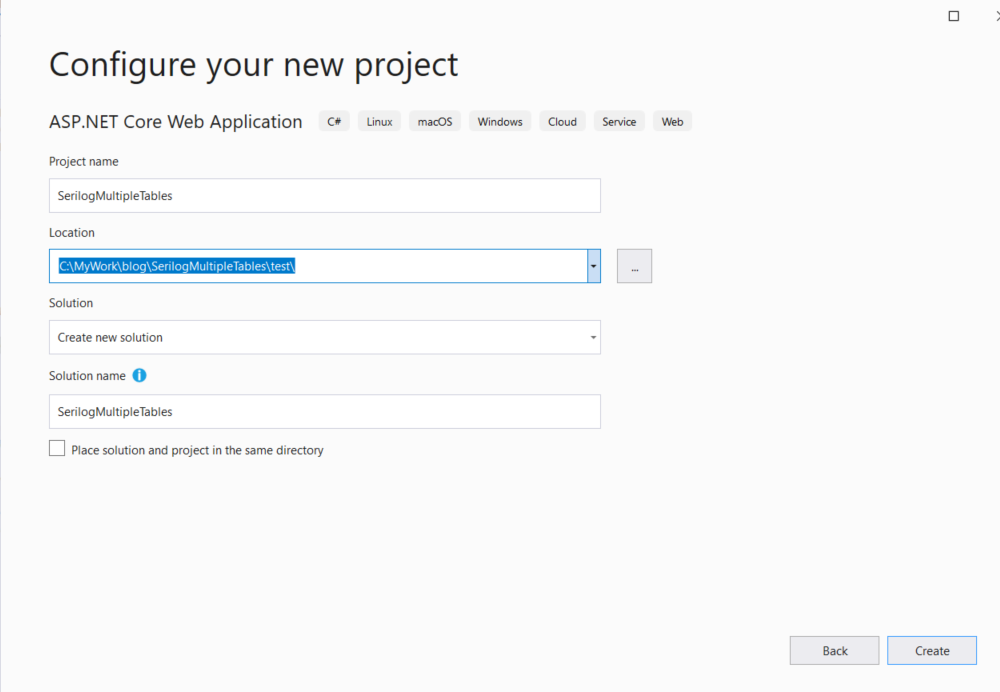
To get started we will create a new empty web application using the default template available in Visual Studio. Goto File -> New Project -> ASP.NET Core Web Application
Give a name for the application, leave the rest of the fields with default values and click Create
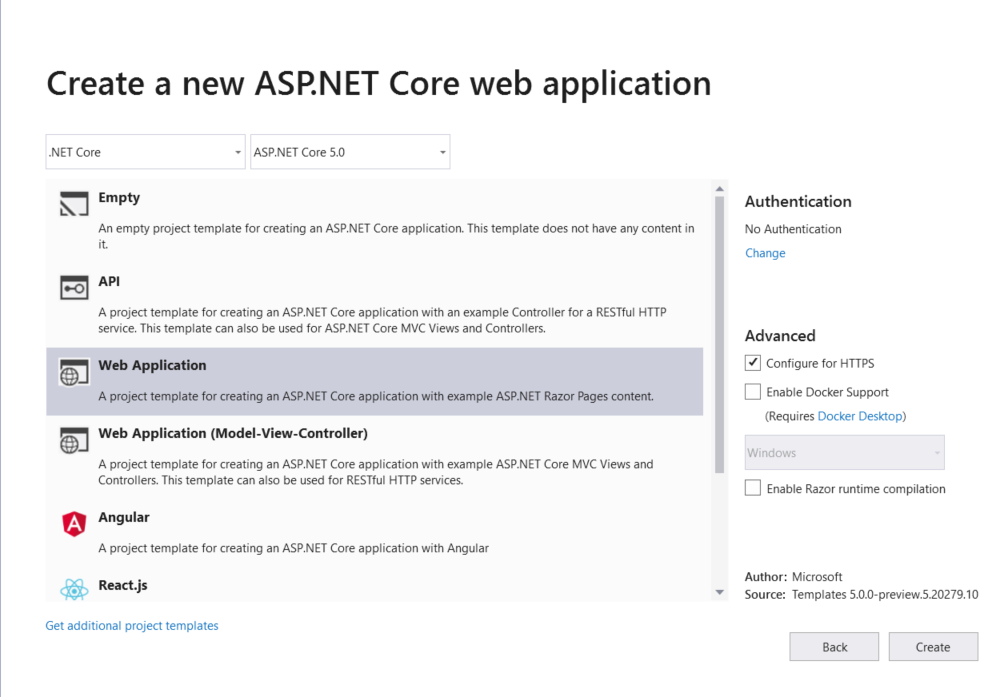
In the next window, select Web Application as a project template. Before you click on the Create button, make sure that you have selected the desired version of .NET Core in the dropdown shown at the top. Here, for this one, I selected .NET 5.0
You can also do this from .NET CLI using the following command
dotnet new web --name SerilogMultipleTablesWhen the command is executed it will scaffold a new application using the MVC structure and then restores the necessary packages needed for the default template.
Writing logs to different files using Serilog in ASP.NET Core Web Application
Application log files play an important role in analyzing the bugs and for troubleshooting issues in an application. It’s worth noting that the log files are also used for writing information about events and other information that occurs when the application is running or serving requests in the case of a web application. Most application developers use a single file to log everything from errors, warnings, debug information, etc. There is no harm in following this approach, but the downside is that it will be harder for you to segregate information from the file easily. We can easily overcome this by maintaining multiple log files depending on the need. In this post, I am going to show how we can achieve this with Serilog
Serilog is a popular third party diagnostic logging library for .NET applications, I have already written some post about it and it’s usage already. If you are new to Serilog, please refer to those posts using the links given below.
- Implementing Logging in a .NET Core Web Application using Serilog
- Rollover log files automatically in an ASP.NET Core Web Application using Serilog
- Write your logs into database in an ASP.NET Core application using Serilog
Code snippets in this post are based on .NET Core 5.0 Preview 5
Step 1 : Create a Web Application in .NET Core
Create a new ASP.NET Core MVC application using the below command
dotnet new mvc --name MultiLogFileSampleYou can also do this from Visual Studio by going into File -> New Project -> ASP .NET Core Web Application
When the command is executed it will scaffold a new application using the MVC structure and then restores the necessary packages needed for the default template.
By default, it will create two
jsonfiles named,appsettings.jsonandappsettings.development.json. These are the configuration files for the application and are chosen based on the environment where your application is running. These files will have a default configuration as shown below basically sets the default level for logging.{ "Logging":{ "LogLevel":{ "Default":Information", "Microsoft":Warning", "Microsoft.Hosting.Lifetime":Information" } } }By default, it is set as
Information, which writes a lot of data to the logs. This setting is very useful while we are developing the application, but we should set it higher severity levels when the application is deployed to higher environments. Since Serilog is not going to reference this section, we can safely remove this from the configuration filesWrite your logs into database in an ASP.NET Core application using Serilog
In most scenarios, we normally use a flat-files for writing your logs or exception messages. But what if you write that information into the table in a database instead of a file. To implement this functionality, we can make use of third-party providers such as Serilog to log information in a SQL server database. Even though it's not a recommended approach, one can easily search the logs by executing SQL queries against the table.
Installing Packages
Serilog provides the functionality to write logs to different sources such as files, trace logs, database and the providers for these are called Serilog Sinks. To write logs to a table in a SQL Server database, you will need to add the following NuGet packages
Install-Package Serilog
Install-Package Serilog.Settings.Configuration
Install-Package Serilog.Sinks.MSSqlServer
The first package contains the core runtime, the second package can read the key under the "Serilog" section from a valid IConfiguration source and the last one is responsible for making the connection to the database and writing information into the log table.
Configuring Serilog
Modify the
appsettings.jsonfile to add a new section called "Serilog". We will set up the connection string to the database, provide the name of the table and instruct Serilog to create the table if not found in the DB"Serilog": { "MinimumLevel": "Error", "WriteTo": [ { "Name": "MSSqlServer", "Args": { "connectionString": "Server=(localdb)\\MSSQLLocalDB;Database=Employee;Trusted_Connection=True;MultipleActiveResultSets=true", "tableName": "Logs", "autoCreateSqlTable": true } } ] },Serializing enums as strings using System.Text.Json library in .NET Core 3.0
.NET Core 3.0 uses the System.Text.Json API by default for JSON serialization operations. Prior versions of .NET Core relied on JSON.NET, a third party library developed by Newtonsoft and the framework team decided to create a brand new library that can make use of the latest features in the language and the framework.
The new library has got support for all the new features that got introduced in the latest version of C#. And this was one of the main reasons behind the development of the new library because implementing these changes in JSON.NET meant a significant rewrite.
While serializing an object into JSON using the new library we can control various options such as casing, indentation, etc, but one notable omission is the support for enums by default. If you try to serialize an enum in .NET Core 3.0 with the default library, it will convert it into an integer value instead of the name of the enum.
For example, let consider the following model and see if what happens when we serialize it using the System.Text.Json librarypublic enum AddressType { HomeAddress, OfficeAddress, CommunicationAddress } public class Employee { public string FirstName { get; set; } public string LastName { get; set; } public AddressType CommunicationPreference { get; set; } }and when you serialize it using the serialize method
List
employees = new List { new Employee{ FirstName = "Amal", LastName ="Dev", CommunicationPreference = AddressType.HomeAddress }, new Employee{ FirstName = "Dev", LastName ="D", CommunicationPreference = AddressType.CommunicationAddress }, new Employee{ FirstName = "Tris", LastName ="Tru", CommunicationPreference = AddressType.OfficeAddress } } JsonSerializer.Serialize(employees); it will produce an output like the one given below
[ { "FirstName":"Amal", "LastName":"Dev", "CommunicationPreference":0 }, { "FirstName":"Dev", "LastName":"D", "CommunicationPreference":2 }, { "FirstName":"Tris", "LastName":"Tru", "CommunicationPreference":1 } ]Avoid conversion errors by using Custom Converters in System.Text.Json API(.NET Core 3.0)
The post is based on .NET Core 3.0
SDK used : 3.0.100One of the most common error encountered while doing JSON serialization and deserialization is the data type conversion errors. Till now, we were using the Json.NET library from Newtonsoft for performing the serialization and deserialization in .NET/ASP.NET/.NET Core, but in the latest iteration of .NET Core which is currently under preview, they have removed the dependency on Json.NET and introduced a new built-in library for doing the same. Along with that, the all new library that is going to be introduced with .NET Core 3.0 provides you to define custom converters that can be implemented to get rid of this kind of errors. If you are not aware of it, I have already written a couple of posts about it which you can refer to using the following links.
Serializing and Deserializing Json in .NET Core 3.0 using System.Text.Json API
Step-By-Step Guide to Serialize and Deserialize JSON Using System.Text.Json
The new API is included with the System namespace and you don't need to add any NuGet package to get started with it. Along with the normally used methods for serializing/deserializing JSON, it also includes methods for supporting asynchronous programming. One of the known limitation in the v1 of the API is the limited support for the data types, given below is the list of currently supported types. For more detail, please refer this link Serializer API Document
- Array
- Boolean
- Byte
- Char (as a JSON string of length 1)
- DateTime
- DateTimeOffset
- Dictionary<string, TValue> (currently just primitives in Preview 5)
- Double
- Enum (as integer for now)
- Int16
- Int32
- Int64
- IEnumerable
- IList
- Object (polymorhic mode for serialization only)
- Nullable < T >
- SByte
- Single
- String
- UInt16
- UInt32
- UInt64
Step-By-Step Guide to Serialize and Deserialize JSON Using System.Text.Json
The post is based on .NET Core 3.0 version.Update : In preview 7 few changes were made to the API. For serialization use Serialize method instead of ToString and Deserialize method instead of Parse. Post updated to reflect these changes. SDK version : 3.0.100-preview7-012821
In the last post, I have already given an overview of the System.Text.Json API that is going to be introduced with the release with .NET Core 3.0. This API will replace the Json.NET library by Newtonsoft which is baked into the framework for doing serialization and deserialization of JSON. You can read more about it using this link.
Step 1: Refer the namespaces
Add the following lines in your code. If you are working .NET Core 3 project, then there is no need to add any NuGet packages to your project. For .NET Standard and .NET Framework project, install the System.Text.Json NuGet package. Make sure that Preview is enabled and select install version 4.6.0-preview6.19303.8 or higher
using System.Text.Json;
using System.Text.Json.Serialization;
Step 2: Serializing an object into
JSON stringSerialization is the process of converting an object into a format that can be saved. JSON is one of the most preferred format for encoding object into strings. You will be able to do this conversion by calling the ToString method in the JsonSerializer class available in the System.Text.Json API
For example, to convert a Dictionary object to a JSON string we can use the following statement
JsonSerializer.ToString<Dictionary<string,object>>(dictObj)
Serializing and Deserializing Json in .NET Core 3.0 using System.Text.Json API
The post is based on .NET Core 3.0 versionLast October, the .NET Core team at Microsoft has announced that they are stripping out Json.Net, a popular library used by developers for serializing and deserializing the JSON from the upcoming version of the framework. Along with that, they also announced that they are working on a new namespace System.Text.Json in the framework for doing the same. With the release of the latest preview version of .NET Core 3.0, developers will now be able to make use of this namespace for performing JSON operations.
The new namespace comes as part of the framework and there is no need to install any NuGet packages for using it. It has got the support for a reader, writer, document object model
and a serializer.Why a new library now?
JSON is one of the most widely used formats for data transfer especially from the client-side, be it web, mobile or IoT to the server backends. Most of the developers using the .NET Framework were relying on popular libraries like Json.NET because of the lack of the out of the box support provided by Microsoft.
One of the major reasons to develop a new library was to increase the performance of the APIs. To integrate the support for Span<T> and UTF-8 processing into the Json.NET library was nearly impossible because it would either break the existing functionality or the performance would have taken a hit
Even though Json.NET is getting updated very frequently for patches and new features, the tight integration with the ASP.NET Core framework meant these features got into the framework only when an update to the framework is released. So the .NET team has decided to strip the library from the framework and the developers will now be able to add it as a dependency in .NET core 3.0 meaning they will be free to choose whichever version of the Json.NET library they want
Now the developers
has got two options for performing the Json operations, either use System.Text.Json namespace or use Json.NET library which can be added as a NuGet package and using AddNewtonsoftJson extension method.Referring the library in your projects
.NET Core
To use it in a .NET Core project, you will need to install the latest preview version of .NET Core..NET Standard, .NET Framework
Install the System.Text.Json package from NuGet, make sure that you select Includes Preview and install version 4.6.0-preview6.19303.8 or higherAs of now, the support for OpenAPI / Swagger is still under development and most probably won't make be available in time for .NET Core 3.0 release.
Reference : Try the new System.Text.Json APIsPart
2 : Step-By-Step Guide to Serialize and Deserialize JSON Using System.Text.JsonBreaking Changes coming your way for ASP.NET Core 3.0
Microsoft is in the process of releasing a new version for their .NET Core framework and there are some significant changes coming your way in that release. The most important ones are
- Removal of some sub-components
- Removal of the
PackageReference to Microsoft.AspNetCore.App - Reducing duplication between NuGet packages and shared frameworks
In v3.0, the ASP.NET Core framework will contain only those assemblies which are fully developed, supported and serviceable by Microsoft. They are doing this to reap all the benefits provided by the .NET Core shared frameworks like smaller deployment size, faster bootup time, centralized patching etc
Removal of some sub-components
In this version, they are removing some sub-components from the ASP.NET Core shared framework and most notable among them are the following
Json.NET
JSON format has become so popular these days and has become the primary method for transferring data in all modern applications. But .NET doesn't have a built-in library to deal with JSON and relied on third-party libraries like JSON.NET for some time now. In ASP.NET Core, it has a tight integration with Json.NET which restricted the users to chose another library or a different version of Json.NET itself.
So with version 3.0 they have decoupled Json.NET from the ASP.NET Core shared framework and is planning to replace it with high-performance JSON APIs. That means you will now need to add Json.NET as a separate package in you ASP.NET Core 3.0 project
and then update your ConfigureServices method to include a call to AddNewtonsoftJson() as shown below
public void ConfigureServices(IServiceCollection services) { services.AddMvc() .AddNewtonsoftJson(); }Spin up Docker Containers in a Kubernetes Cluster hosted in Azure Container Service
In one of the earlier posts, I have explained in details about the steps that need to be performed for running Docker containers in a Kubernetes cluster hosted in Azure. In that example, I used the default IIS image from Docker Hub for spinning up a new container in the cluster. In this post, I will show you how to containerize an ASP.NET Core MVC application using a private Docker registry and spin-off containers in a cluster hosted in Azure using Azure Container Service
Pre-Requisites
You need to install both the CLI tools for Azure and Kubernetes in your local machine for these commands to work and needs an Azure subscription for deploying the cluster in Azure Container Service.
Step 1: Create a Kubernetes Cluster using Azure Container Service
The first step is to create the create the cluster in Azure, for that we will use the az
acs create command available in Azure CLI. You need to provide a resource group and a name for the cluster. A resource group in Azure is like a virtual container that holds a collection of assets for easy monitoring, access control etc. The --generate-ssh-keys parameter will tell the command to create the public and private key files which can be used for connecting to the cluster.az acs create --orchestrator-type kubernetes --resource-group TrainingInstanceRG1 --name TrainingCluster1 --generate-ssh-keys
Step 2: Get the credentials for the Kubernetes Cluster
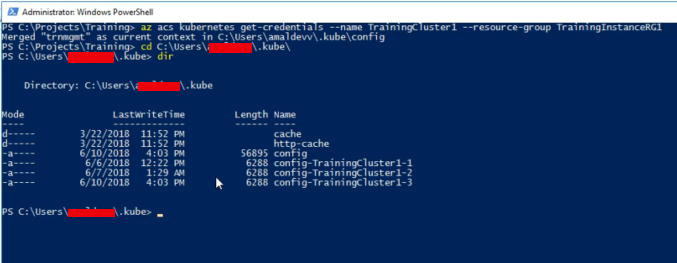
Now we need to download the credentials to our local machine for accessing the cluster.
az acs kubernetes get-credentials --name TrainingCluster1 --resource-group TrainingInstanceRG1
When the command is executed it will download the key files to your local machine and by default, it will reside in a folder under user folder.
Running Sql Server Linux on a Docker Container
One of the new features added to the SQL Server 2016 is the ability to run it on Linux. Along with that, they brought in support for Docker and released an official image which is available in Docker Hub. It has already got over 5 million + pulls from the repository and is gaining momentum day by day. Let's see the various steps for setting up a container based on this image.
Step 1
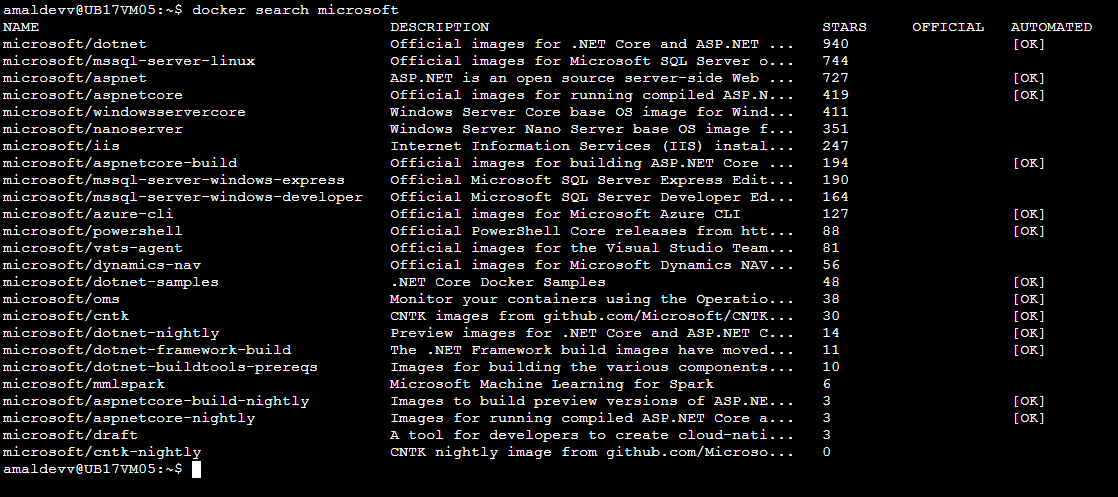
Search for the image in the Docker Hub and pull the official image from the Docker hub
docker search microsoft
So the image we are looking for is mssql-server-linux
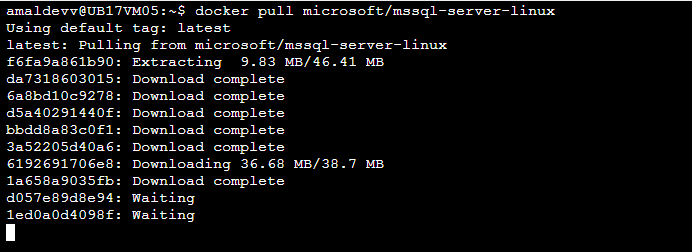
docker pull microsoft/mssql-server-linux
Implementing Functional Testing in MVC Application using ASP.NET Core 2.1.0-preview1
Functional Testing plays an important role in delivering software products with great quality and reliability. Even though the ability to write in-memory functional tests in ASP. NET Core MVC application is present in ASP.NET Core 2.0, it had some pitfalls
- Manual copying of the .deps files from application project into the bin folder of the test project
- Needed to manually set the content root of the application project so that static files and views can be found
Bootstrapping the app on the Test Server.
In ASP.NET Core 2.1, Microsoft has released a new package Microsoft.AspNetCore.Mvc.Testing which solves all the above mentioned problems and helps you to write and execute in-memory functional tests more efficiently. To check how it can be done, let's create two projects - one for the web application and another for our test project.
Step 1
Create an ASP.NET Core MVC project without any authentication. The following command will create one in the folder specified by the -o switch
dotnet new mvc -au none -o SampleWeb/src/WebApp
Step 2
Let's add a test project based on Xunit test framework using the below command. As in Step 1, the project will be created in the specified folder
dotnet new xunit -o SampleWeb/test/WebApp.Tests
Step 3
Now we will create a solution file and add these two projects into it.
cd SampleWeb

dotnet new sln

dotnet sln add src/WebApp/WebApp.csproj

dotnet sln add .\test\WebApp.Tests\WebApp.Tests.csprojMake Your HTML Pages Dynamic Using Handlebars Templating Engine
Technologies and methods for designing and developing web pages have come a long way and with a plethora of tools available at one's disposal, getting a minimal website is not a rocket science anymore. As web developers, we often face a dilemma to go for a static site using plain HTML or to go for a dynamic one with some server-side programming stack. Both of the approaches has got advantages as well as disadvantages.
If we go for a static one, the advantages are
- Time needed for development is less.
- Easy to create and less expertise is needed
- Site will be super fast
Disadvantages,
- Hard to maintain
- Lot of repetitive work
- Hard to scale
And for the dynamic approach, advantages are
- Easy to maintain
- Repetitive work can be avoided
- Scaling is easy and more features can be easily integrated
Disadvantages
- Dedicated personal is needed
- Cost factor increases
We can overcome some of the cons mentioned above by applying JavaScript Templating. JavaScript Templates helps to segregate HTML code and content which it is rendering in the browser. This separation of concerns helps to build a codebase which is easy to maintain in the future, modifications can be easily done with minimal disruption to the existing codebase.
Some of the most popular JavaScript templating engines are Mustache, Underscore, EJS, and Handlebars and in this post, I am going in detail to show how we can make of Handlebars to generate HTML content from the template.
Creating a Kubernetes cluster using Azure Container Serivce and Cloud Shell
Azure Container Service(ACS) is a service offering from Microsoft in Azure which helps you to create, configure and manage a cluster of VM's for hosting your containerized applications. It has got support for orchestrators such as DC/OS, Docker Swarm, and Kubernetes. There are a lot of ways in which you can set up ACS in Azure like setting it up directly from the Portal itself or using Azure CLI from your local machine etc. But in this post, I will be using the Azure Cloud Shell to set up the service and the orchestrator will be Kubernetes.
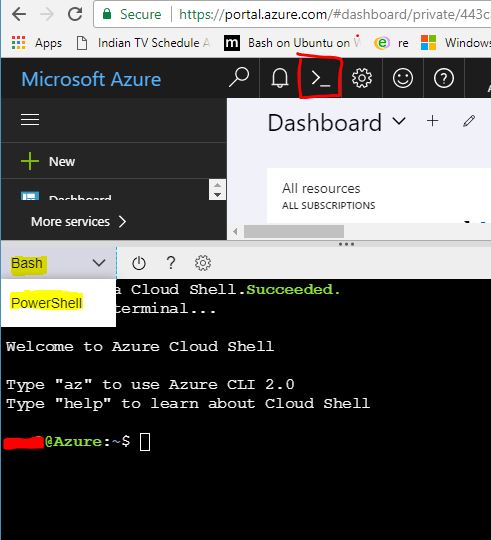
All the steps shown in this post is executed from the Azure Cloud Shell, it's an online terminal available in the Azure portal itself and can be invoked by clicking on the icon in the top right corner in the portal. Since Azure CLI and Kuberbetes is installed in the shell by default we can straight away go and execute the commands used in the post
Step 1
Whatever resource we creates in Azure like Web Apps, Virtual Machines, IP Addresses, Virtual Machines, Blob storage etc needs to be associated with a resource group. A resource group acts as a container that holds all the resources used by the solution in Azure and it is recommended to keep all the resources that are related to your solution in a single resource group.
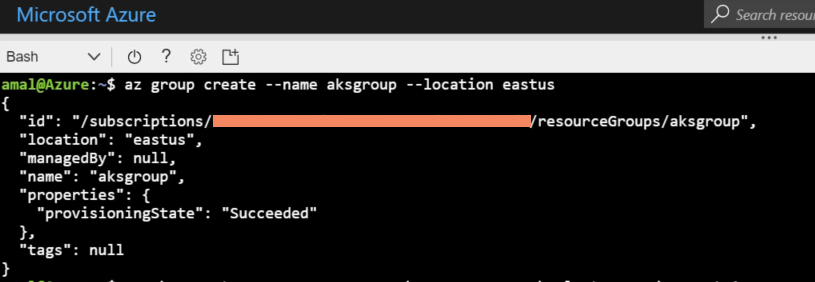
Let's create a resource group first in Azure using the following command
az group create --name aksgroup --location eastus
This command will create a new group with name aksgroup in the data center located in East US region
How to a create a private Docker registry in Azure
The containerization technology has been around for some years, but it only came to the forefront when a company called Docker released their toolset which is also called Docker. Just like what shipping containers did to the logistics industry, docker revolutionized the
way which we shipped software. Along with the tooling, they also created a public registry called Docker Hub to store the images created using the toolset. It's free and open to all, but in some case such as enterprises building their own proprietary software doesn't want to keep it in a public domain. So to avoid this Docker supports private registries also and it can reside in on-premises servers or in the cloud. In this post, I am going to show how can we create a private registry in Azure, Microsoft's cloud platform and then to use it for pushing and pulling images from it.Pre-Requisites
- An Azure Subscription
- Somewhat familiarity in Azure
- Beginner level knowledge in using Docker
I have already written an article about creating an image and a container based on it using Docker, please feel free to refer it if want to get a quick refresher.
Setup
In this post, I will be using the Azure Cloud Shell which is available on the portal to run all the commands. If you are hearing it for the first time, please refer the official documentation here. It basically gives a browser-based shell experience and supports both Bash and PowerShell. You can also the portal or Azure CLI for the same.
First of all, we will check what all subscriptions are available for you and will set one as default if you have more than one using the following commands
To list the available subscriptions,
az account list
and to set one as default
az account set --subscription <subscription id or name>
Creating Azure Container Registry
Whenever you provision anything in Azure, it will create a set of assets, for example in the case of a VM it will create storage, virtual networks, availability sets etc. It will hold all these assets in a container which is called the Resource Groups, which helps to monitor, control all the assets from a single location. So for our private registry, let's create a new resource group using the following command
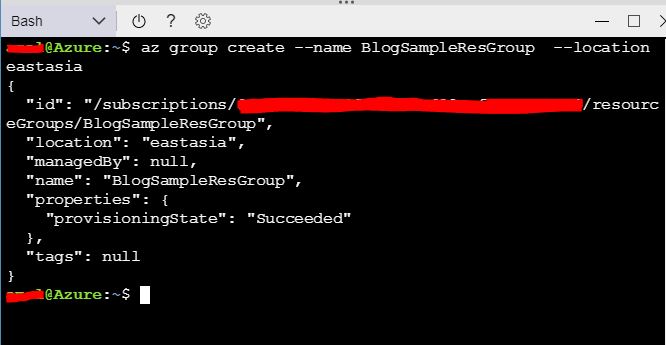
az group create --name BlogSampleResGroup --location eastasia
This will create a resource group named BlogSamplesResGroup in East Asia region
To create the registry, we will use
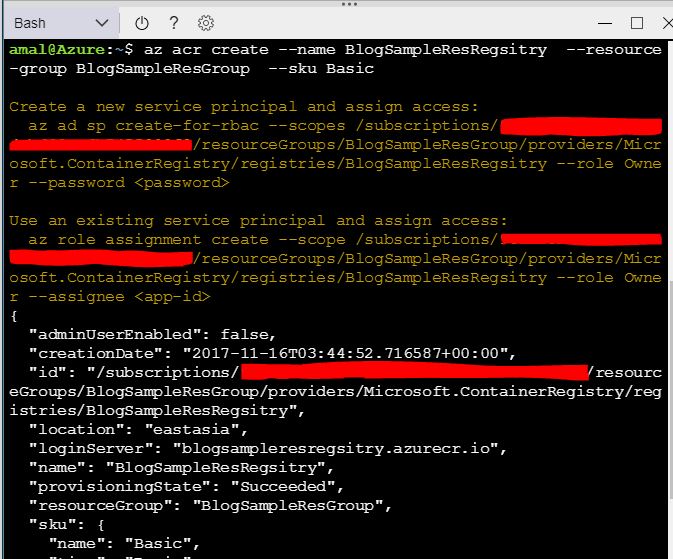
az acr create --name BlogSampleResRegsitry --resource-group BlogSampleResGroup --sku Basic
The value in the name parameter will be the name of our registry and will be created in the BlogSamplesResGroup. Azure Container Registry have 3 tiers which provide different pricing and other options. Those are Basic, Standard, and Premium. Please refer the documentation for more details. That's all we need to do for setting up the registry and if you go to the portal now, you can see the newly created registry.
Pushing Image to the Repository.
So we have the private repository up and running, now we let's push an image to the repository. For
this I will be making use of the hello-world image available in the Docker Hub. I will pull that image down to my local machine using the docker pull command.docker pull hello-world
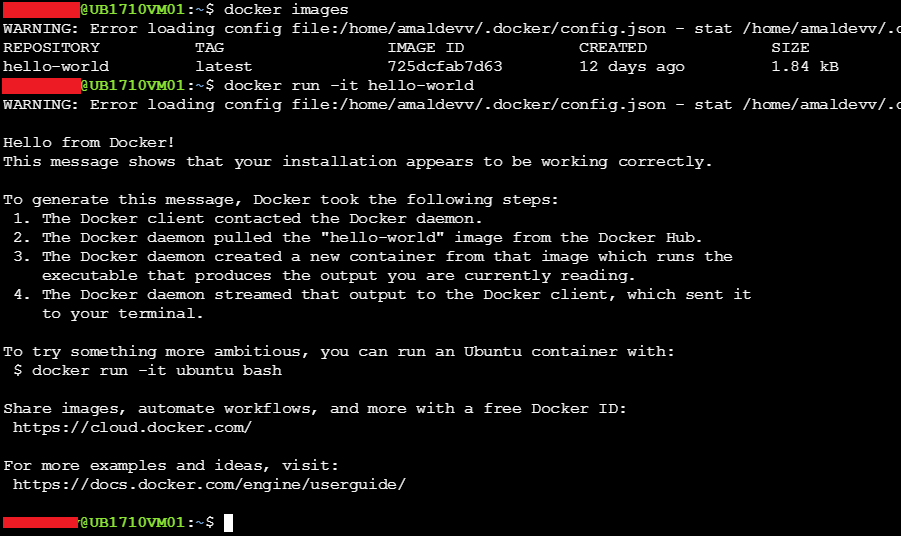
If you execute the docker images command. it will be shown on the list. To create a container in the local machine using this image, use the below command
docker run -it hello-world
The output of the command will be as shown in the image below.
So, we have verified that the image is good and we can create a container using it. Now let's push that image to our private registry. Before that, I will use the docker tag command to tag the name of the repository that matches our registry name
docker tag hello-world blogsampleresregsitry.azurecr.io/blog/hello-world
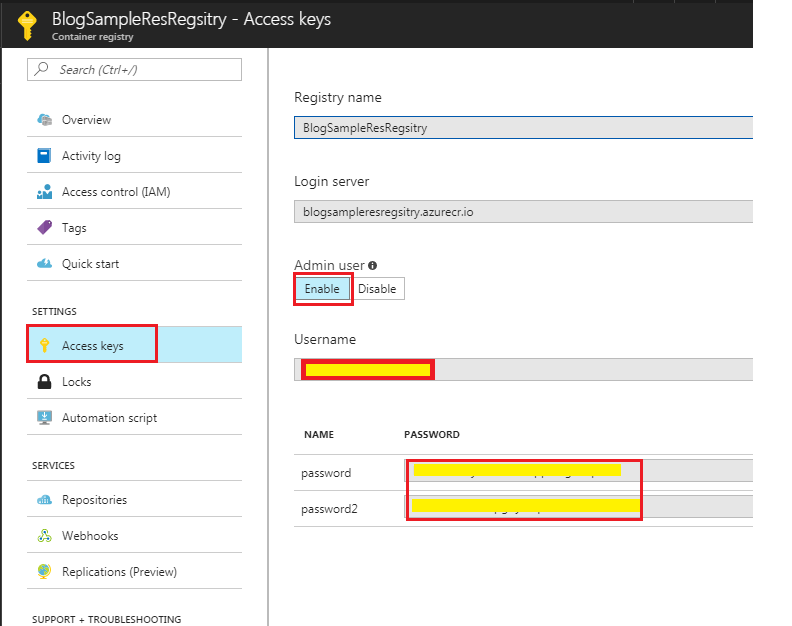
Before you push the image, the first thing you will need to do is to log in to our registry. For that, you will need to execute the docker login command and the parameters such as repository name, username and password are needed and you can get it from the Azure portal itself. You can find this information under Access Keys in Settings.
To upload the image to the repository, use the docker push command
docker push blogsampleresregsitry.azurecr.io/blog/hello-world
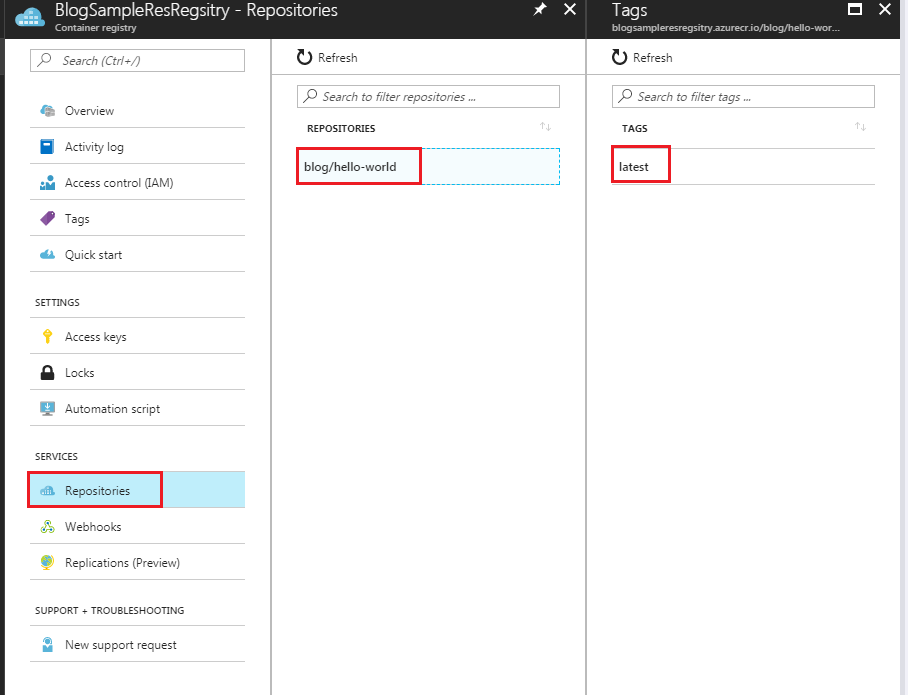
If you now go to the Repositories in the Registry, you will see our newly pushed image there.
Hosting a ASP.NET Core application in a Docker container using microsoft/aspnetcore image
You all will be familiar with Docker by now given its popularity among developers and infra people and some of you may have already created containers using Docker images. One of the most widely used workflows among people using .NET Core will create a new web application by using the dotnet new command as shown below.
The below example uses ASP.NET Core 2.0 framework, in which the dotnet new command will create the project as well as restores the dependencies specified in the csproj file by default. I have already written a post about it and you can refer it for information about it.
Then you will do a build to see if there are any errors and use dotnet run command which will self-host the web application
What's changed with new command in .NET Core 2.0
Microsoft has released a major revision to the .NET Core framework around mid of August bumping the version to 2.0. This release includes not only the upgrade to the core framework but also include ASP.NET Core 2.0 and Entity Framework 2.0. Also along with this .NET Standard 2.0 is also released and it's now supporting around 32K + APIs and is a huge leap from what we had until now. You can read more about it by going to the announcement here.
One of the changes among these is that the
dotnet restore is now an implicit command which means that there is no need to execute the restore command explicitly for commands which needed to do a restore before executing it.For example in .NET Core 1.1 whenever we executed a
dotnet new command for creating a project we needed to execute the restore command before doing a build or execution. With .NET Core 2.0 when we execute the new command, the restore is now run automatically as part of the tooling. The following are the list of the commands which have got implicit support for restoration.newrun
build
publish
pack
testGetting Started with Angular Development Using Cloud9 Online IDE
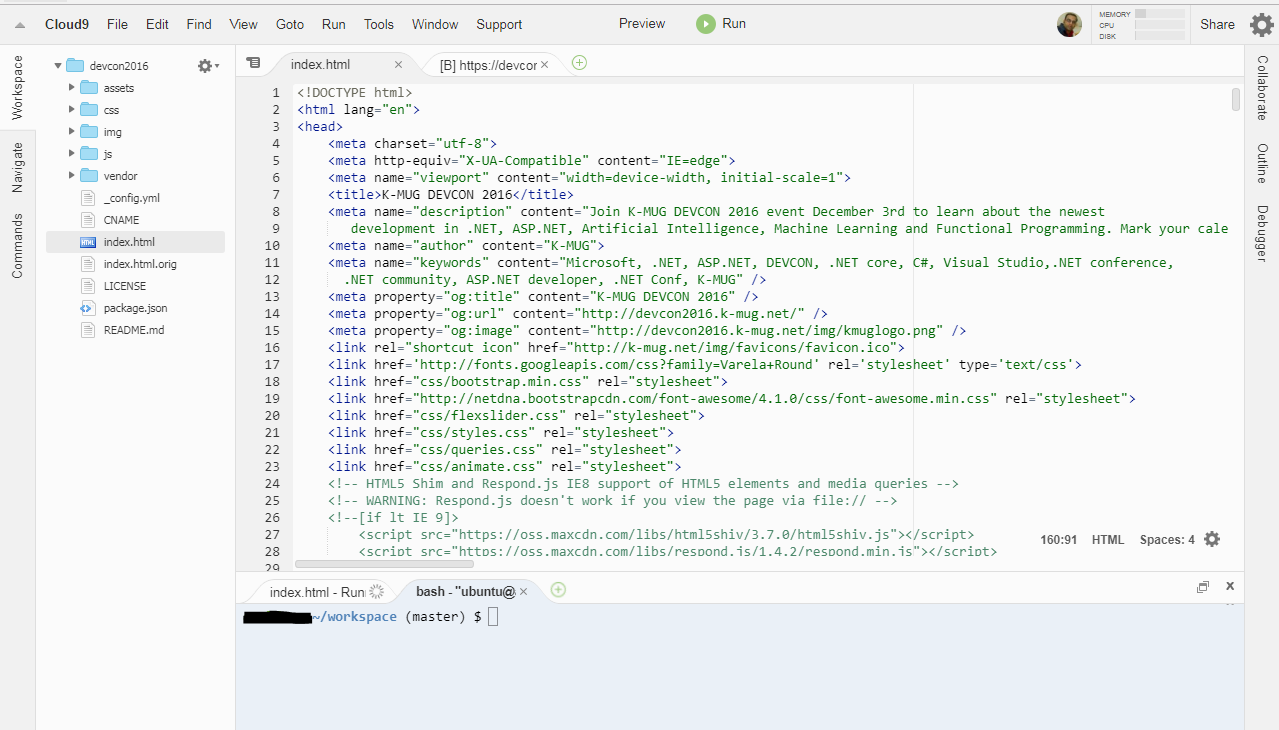
Cloud 9 is an online IDE hosted in the cloud and runs inside the browser. It's built on top of a Linux container and offers most of the features found in a standalone IDE. To start using it, one needs to create an account at Cloud 9 website. Once you created the account, you will be able to create workspaces as per your development needs. Given below is the screenshot of the IDE which I created for web development.
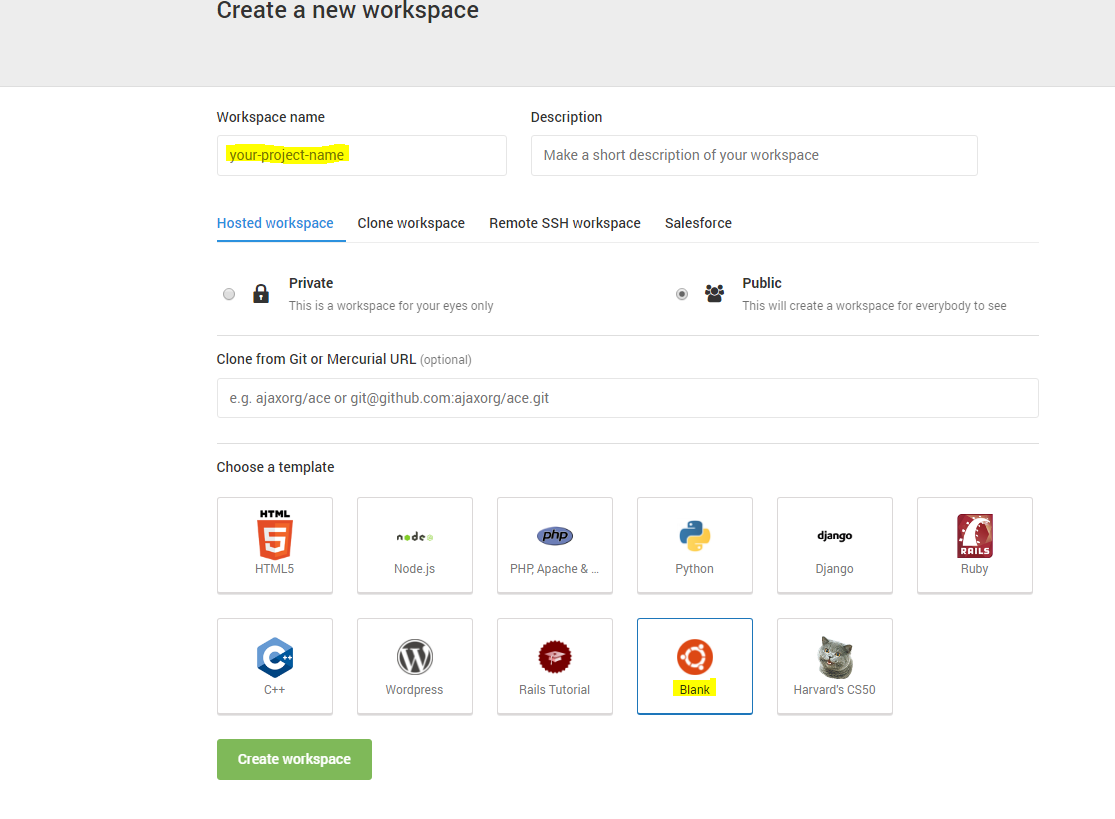
For using Cloud9 or c9 in short for all your development needs, you will need to create a workspace based on the Blank template as shown below
Bug : dotnet CLI Template Engine Produces Invalid Code if Name of the Directory is a Valid C# Keyword
With the release of .NET Core 1.0 tooling, dotnet new make use of the templating engine to generate various types of projects like Console App, Web App, WebAPI etc. If you are not aware of it, please read my earlier post on it here.
Executing a Task in the Background in ASP.NET MVC
In some cases we want to execute some long running task in the background without affecting the main thread. One classic example is sending mails when we are implementing a sign in module. Mostly people will either go for a scheduled job independent of the application or do it in the main thread itself.
.NET Framework 4.5.2 has got a new API called QueueBackgroundWorkItem which can execute short-lived resource intense tasks in an effective and reliable manner. As per the documentation
QBWI schedules a task which can run in the background, independent of any request. This differs from a normal ThreadPool work item in that ASP.NET automatically keeps track of how many work items registered through this API are currently running, and the ASP.NET runtime will try to delay AppDomain shutdown until these work items have finished executing.
One of the advantages of using the QBWI(QueueBackgroundWorkItem) is that it can keep track of the items that are registered through this API is currently running and the runtime will be able to delay the shutdown of the App Domain upto 90 seconds so that the running tasks can be completed.
Let's see an example of file upload in ASP.NET MVC. In this example, I will chose file from the local machine using the file upload control and when you click the Upload button, the file will be saved inside a folder in the server which will be handled by the QBWI.
View
@{ ViewBag.Title = "Index"; } @model List<string> <h2>Index</h2> @using (Html.BeginForm("UploadFile", "Home", FormMethod.Post, new { id = "frmImageGallery", enctype = "multipart/form-data" })) { <input type="file" name="file" /> <input type="submit" value="Upload" id="btnUpload" /> } <h2>Images</h2> @foreach (var item in Model) { <p><img src="@String.Concat("Images/Uploaded/",item)" style="height:200px" /></p><br /> } <script> $(function () { $(document).on("click", "#btnUpload", function (event) { event.preventDefault(); var fileOptions = { success: res, dataType: "json" } $("#frmImageGallery").ajaxSubmit(fileOptions); }); }); </script>Host ASP.NET MVC Application in a Windows Container in Docker
In an earlier post which I published a week go, went through the steps needed for setting up an IIS server in a Docker container running on a Windows Server 2016 machine. In this post, I will explain the steps needed to host an ASP.NET MVC application on a IIS server running inside a docker container based on Windows
Step 1 : Setup IIS with ASP.NET Support
First, we will create a new image based on the official IIS image released by Microsoft. Because in that image features such as ASP.NET 4.5 and Microsoft Web Deploy are not installed by default and we need to have it for deloying our application. So download the installer package for Web Deploy from the Microsoft site and store it in a folder in your local machine. To create the image I have created a Dockerfile as given below
FROM microsoft/iis

RUN dism /online /enable-feature /all /featurename:IIS-ASPNET45

RUN mkdir c:\install

ADD WebDeploy_amd64_en-US.msi /install/WebDeploy_amd64_en-US.msi

WORKDIR /install
RUN powershell start-Process msiexec.exe -ArgumentList '/i c:\install\WebDeploy_amd64_en-US.msi /qn' -Wait
Let's create the image by executing the following command
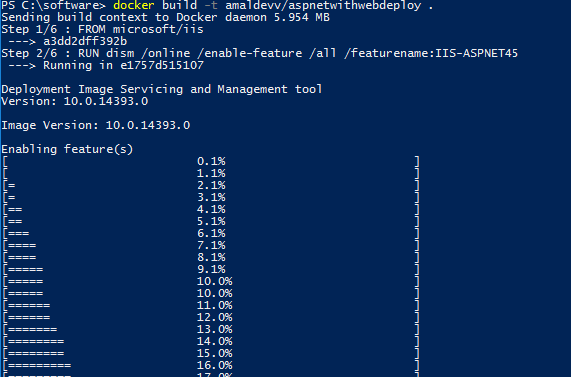
docker build -t amaldevv/aspnetwithwebdeploy .
When the command is executed, it will first check whether image for IIS is available in locally in docker and if it's not found then will download it from Microsoft repository in Docker Hub. The second statement in the file is for installing the ASP.NET 4.5 feature and once that is finished it will create a folder named install in the container and then copies the installer package for Web Deploy which we downloaded earlier into it. After that msiexec process is called using Powershell to install Web Deploy inside the container
You can verify the images is successfully built or not by executing the docker images command as shown below
Connecting Azure Blob Storage account using Managed Identity
Posted 12/9/2022Securing Azure KeyVault connections using Managed Identity
Posted 11/26/2022Manage application settings with Azure KeyVault
Posted 11/9/2022Adding Serilog to Azure Functions created using .NET 5
Posted 4/3/2021Learn how to split log data into different tables using Serilog in ASP.NET Core
Posted 4/23/2020
