DotNet CLI
Bug : dotnet CLI Template Engine Produces Invalid Code if Name of the Directory is a Valid C# Keyword
With the release of .NET Core 1.0 tooling, dotnet new make use of the templating engine to generate various types of projects like Console App, Web App, WebAPI etc. If you are not aware of it, please read my earlier post on it here.
Add/Remove References Using dotnet CLI Tool
In the latest update made to the .NET Core tooling, dotnet new and add command has undergone significant changes in the usage and options available for the command. You can read more about the updates here in the official blog. In this current update it replaces the dotnet add p2p command with a new syntax.
Adding a Reference
Syntax
dotnet add reference <path to project file>
Usage
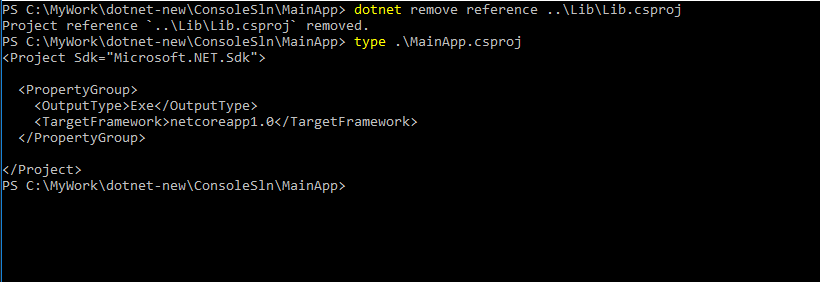
dotnet add reference ..\Lib\Lib.csproj
When you execute the following command it will get added to the project and if look at the csproj file of the project to which the reference is added you will see the entry for it

Remove a Reference
Syntax
dotnet remove reference <path to the proj file which needs to be removed>
Usage
dotnet remove reference ..\Lib\Lib.csproj
To remove the referernce we will use the dotnet remove reference as shown below.
Add/Remove Packages Using dotnet CLI Tool
With the release of .NET Core RC3, the tooling has undergone signinficant improvements in fixing bugs and stablilty. With this release the team has added the ability to add/remove NuGet packages to your project using the dotnet command. The .NET Core CLI tools were introduced to make it easier for developers who uses command line to create and manage projects and with this addition they will become more productive.
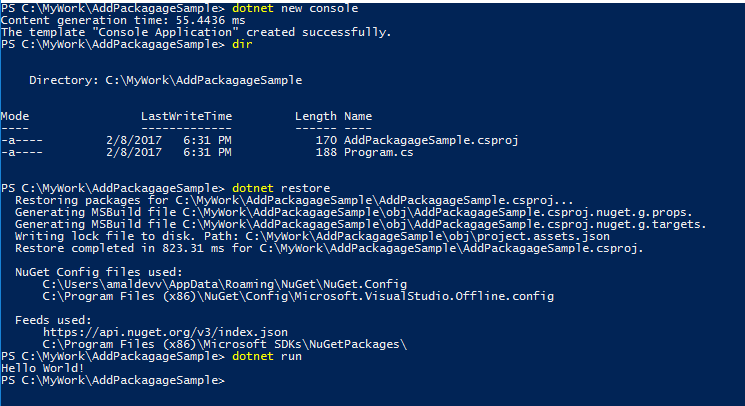
Let's create a sample console application project and see how we can add/remove NuGet packages to and from the project. To create the project execute the following command.
dotnet new console
When the command is executed, two files will be created. One is the source file and other one is the project file
Program.cs
namespace AddPackagageSample
{
    class Program
    {
        static void Main(string[] args)
        {
            Console.WriteLine("Hello World!");
        }
    }
}
csproj file
<Project Sdk="Microsoft.NET.Sdk">

  <PropertyGroup>
    <OutputType>Exe</OutputType>
    <TargetFramework>netcoreapp1.0</TargetFramework>
  </PropertyGroup>

</Project>
To see this project in action, let's restore the packages and build it as shown below
Let's modify the Program.cs file to do some Json Serialiazation as shown below
Templates Available for dotnet new command
Early this week Microsoft announced the release of updates to .NET Core Tooling included in the Visual Studio 2017 RC which brings some major changes in the toolset. You can refer this link to read about the official release of the update. One of the major change is in creating new projects using the dotnet new command which is widely used by novice and experienced hands in their day to day life as a developer. According to the release note, the updated dotnet command will be having the following characteristics.
- Powerful — expressive and scriptable command-line syntax.
- Helpful — an interactive mode helps users pick the templates they need (think Yeoman).
- Extensible — anyone can write templates for dotnet new!
- Updatable — templates can be updated outside of primary delivery vehicles (e.g. Visual Studio, .NET Core SDK).
- Platform — can be used by tools like Visual Studio and generator-aspnet (think yo aspnet).
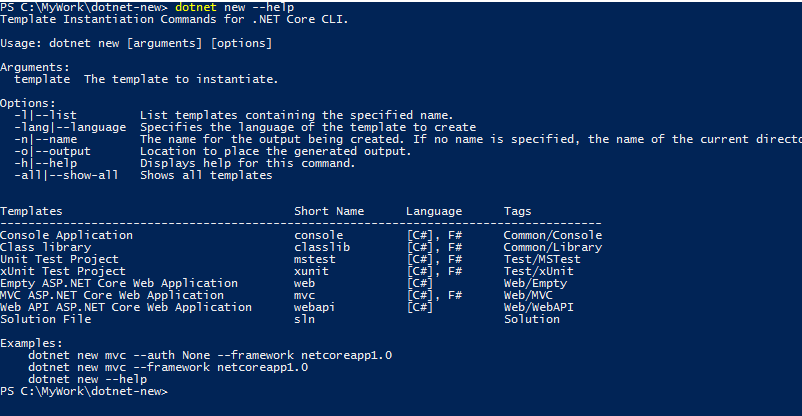
The major change in dotnet new is that it is based on a templating engine which will create the artifacts automatically depending upon the projects you chose to create. To view the options available in the command, just execute the following command in the prompt.
dotnet new --help
Compile a ASP.NET Core Web App on the fly using dotnet watch command
One of the mostly used feature in Visual Studio while developing ASP.NET web applications is the ablity to make changes on the fly in the source code and able to see the changes in the browser without doing a compilation process manually. Actually Visual Studio tracks the changes made in the code and when you save the modifications, VS will automatically compile the changes in the background and restrats the session.
In the .NET Core world, most of the development is happening with code editors such as Notepad, Visual Studio Code etc. These are vanilla text editors and lacks most of the features found in Visual Studio. So .NET Core team has created a command line tool called dotnet watch to achieve this ability for .NET Core. It's basically a file watcher which restarts the specified application whenever there is change is made in the source code. You can read more about it in the documentation hosted in GitHub.
To add this functionlity in your code, you need to add the reference in the tools section in the project.json file as shown below.
"tools": {
    "Microsoft.DotNet.Watcher.Tools": "1.0.0-preview2-final"
  }
After adding the entry in the tools, you needs to restore the package using the dotnet restore command to get all the required files for the watch tool.
Syntax
dotnet watch <dotnet arguments>
The watch tool can be used to compile, run application or test and publish whenever there is a change in the source code. So the <dotnet arugments> can be compile, run, publish etc. For the run command the usage is as shown below
Usage
dotnet watch run
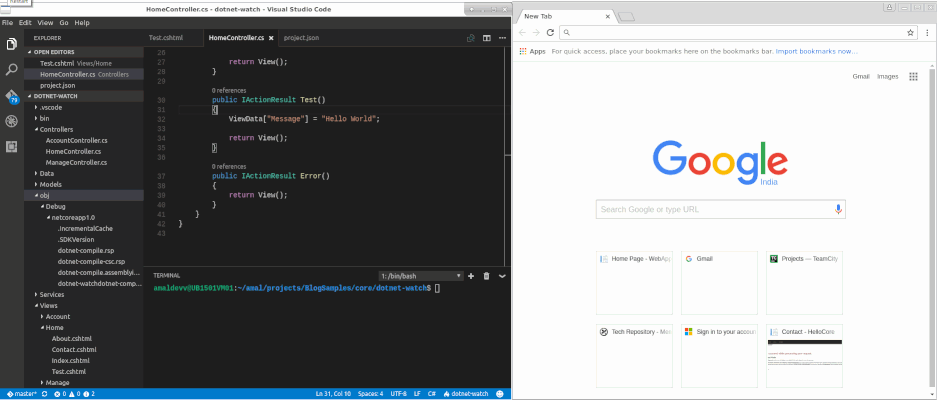
Now, if you make any changes in server side code, the application will be automatically compiled and the reflected changes can be seen by just refreshing the browser. In the following animation, if you look closely in the Terminal Window you can see that the application is stopped and compiled automatically when the source code is saved after making the changes.
So using this tool, whenever we need to make change in the source code there is no need to stop the running instance and executing the dotnet run command again. Similary it can be used along with any other dotnet command as discussed in the post here in the documentation.
Deploying an Optimized Image of your ASP.NET Core MVC Web App in Docker
In one of the posts I authored in the blog, I have shown you how to deploy an ASP.NET Core Web application in a Docker container, but the approach in the post has got a significant disadvantage. In that approach we always copied the entire contents of the directory which included all the static files, source code files etc, then restores all the packages inside the container and builds the application before it’s hosted in the container. This increases the boot up time of the container as well as the file size of the container.
In this post, I will show you how to publish a web application into the container rather than copying all the files into container and then build the application inside that. I am going to create an .NET Core MVC web application using the dotnet new command, you can read more about that my post here.
Step 1 : Create Project
dotnet new –t web
Step 2 : Restore Packages
dotnet restore //restores all the packages referenced in the project.json files
Step 3 : Publish Project
dotnet publish –c Release –o publish
Publishes the output of the project to the publish folder using the Release configuration. Before running the command make sure that node, bower and gulp is installed in your machine otherwise the publish command will fail
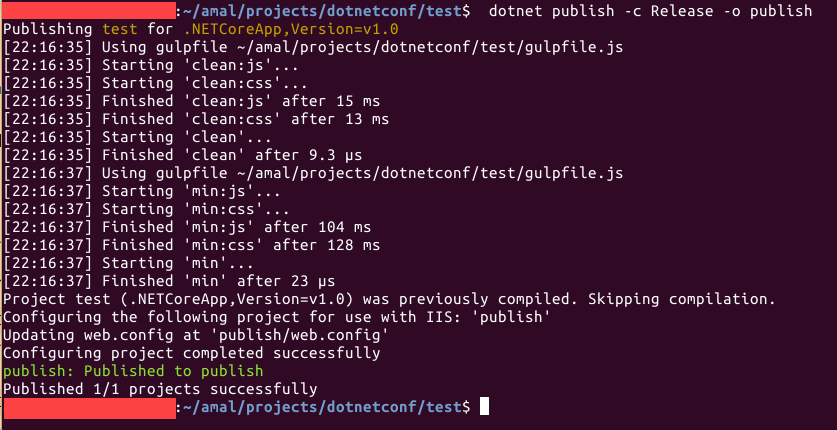
If you look inside the publish folder you will find that it has copied all our static files and resources along with the dlls of our application and the dependencies used in it
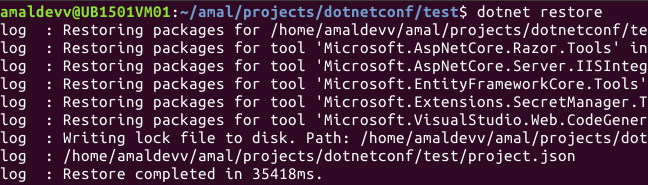
Scaffolding an ASP.NET Core MVC application using dotnet command
We all know that the dotnet new command will create a new console project containing a two files Program.cs and project.json out of the box for you
dotnet new

Output

It was of great help in getting started with a console application in .NET Core, but this command was missing a more important feature – the ability to create a ASP.NET Core Web project from the command line. So, we developers relied on scaffolding tools such as yeoman to generate Web/MVC/Web API projects targeting .NET Core. So whenever the .NET team made changes to the framework and tools, we faced some incompatibilities. Either we needed to wait till the template is upgraded to support the new changes or needed to manually update the files after the project is created.
This is now a thing of the past with the latest update to the .NET Core project implementing to facility to scaffold an MVC project targeting the Core framework.
Syntax
dotnet new –t web
Output


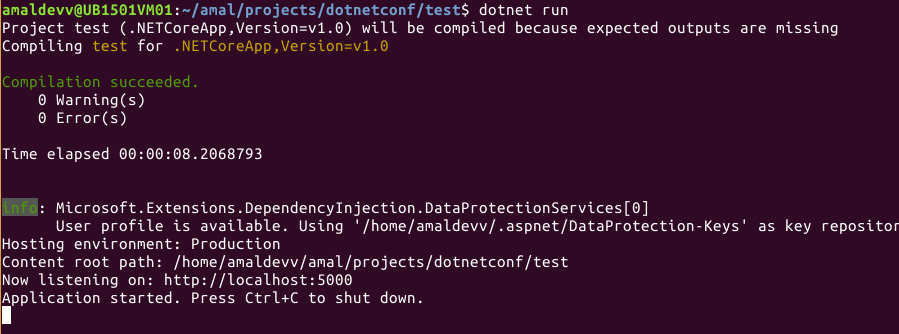
The process of building and running the web project remains the same by using the following statements
dotnet restore //restores the referenced packages
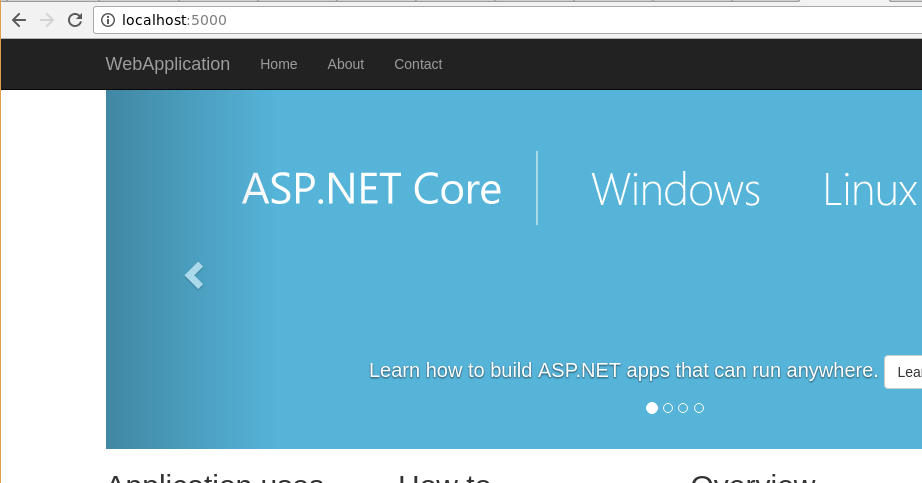
dotnet run //compiles the project if it’s not and then hosts the application in the default port 5000
Installing .NET Core in Ubuntu 15.10 in Azure
One of the benefits of being a Microsoft MVP is the credit you receive for using various services/resources like in Windows Azure which is now around 9.1K INR for each month. That credit is more than enough if you want to play with various options in Azure. So I went ahead and created a Linux VM in Azure using Ubuntu 15.10 distro, then subsequently installed Ubuntu Desktop, xrdp and xfce for connecting remotely into the VM using RDP from Windows machines. I am planning to write a post on the installation process and steps needed for configuring it and will share it as soon as it's available in the blog.
Many of you people may be knowing that Microsoft has released .NET Core 1.0 to the public last month. It's the new .NET framework completly built from scratch, modular and truely open source. In this post, I am going to show you the steps needed for installing .NET Core SDK in a Linux machine. .NET Core SDK consists of .NET Core CLR runtime and CLI tools which are needed for developing the applications in .NET core.
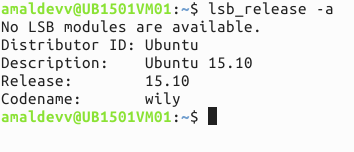
Step 1: Check Ubuntu version
Make sure that the installed version of Ubuntu is 15.10. The following steps were tried and tested in Ubuntu 15.10 and may not work in other versions. You can check the version from terminal by using the following command.
lsb_release -a
Step 2: Set up feed and update packages
Add the feed for downloading .NET Core SDK to dotnetdev.list by executing the following command.
sudo sh -c 'echo "deb [arch=amd64] https://apt-mo.trafficmanager.net/repos/dotnet-release/ trusty main" > /etc/apt/sources.list.d/dotnetdev.list'
Add the following key to the list so that packages authenticated with this key will always be considered as a trusted one.
sudo apt-key adv --keyserver apt-mo.trafficmanager.net --recv-keys 417A0893
Execute the apt-get update command to fetch the latest version and dependencies
sudo apt-get update
Bundling & Minification in ASP.NET Core MVC Application
Bundling is the process of concatnating a set of files into one single file and Minification is removing all the whitespaces and comments in the code, removing extra statements to make the file smaller in size. By doing bundling and minification in our application will reduced the request payloads as well as the number of requests to the server for downloading the assets such as CSS and JS files.
.NET Framework had an in-built bundling and minification feature for sometime and since the advent of .NET Core they moved to use Grunt and Gulp for doing the same in both the RC versions. These tools primarily used JavaScript for operations such as file manipulation, automation, bundling and minification. Using these tools, we can also schedule tasks to run during a build or a publish event and is very useful in setting up a workflow for these opertions. The only downfall of these were we need to have some knowledge of programming in JavaScript and if you are not a fan of JavaScript then you will have some difficulties playing with it.
So Mads Kristensen created an extension which automates these processes and the functionality can be achieved with no code. So when Microsoft released .NET Core 1.0 they integrated this into the ASP.NET Core Web project template and is now available for you out of the box, if you are using Visual Studio 2015 for your developement. Basically it supports
- Bundling your assets into a single file
- Minification of your assets
- Create triggers for doing re-bundling automatically
- Globbing patterns
- MSBuild support
Also the same is available as a NuGet package so that non Visual Studio users will also be able to use that in their projects. In this post, I am going to show how to do this a ASP.NET Core MVC project using Visual Studio Code and .NET CLI tools.
Adding Reference & Configuring BundlerMinifier
The first is to add the BundlerMinifier package in your json file as shown below
tools": {
    "BundlerMinifier.Core": "2.0.238",
    "Microsoft.AspNetCore.Razor.Tools": "1.0.0-preview2-final",
    "Microsoft.AspNetCore.Server.IISIntegration.Tools": "1.0.0-preview2-final"
  },
Now we need to add a configuration file in which we will specifiy the files that needs to be bundled and minified. The default name for the config file is bundleconfig.json, the advantage being that the tool will take it automatically by the bundle command. If we specify a different filename, then we need to set it explicitly while executing the command for bundling.
As you can see from the above snippet, we can specify multiple files that needed to be bundled into a single file as input and when the bundling operation is completed the unified file will be named using the value set in the outputFileName property. To minify the files, just set the value as true for the enabled property in the minify element.
Converting a .NET Core RC2 Web Application to RTM
After two years in the works, Microsoft has released .NET Core to the public in the last week of June. Prior to that they had released two RC version of the framework and many of the developers like us embraced it and started working with it. To make those projects work in .NET Core 1.0 we need to make some changes in the project so that it continues to work properly in the RTM version too.
About .NET Core 1.0
.NET Core 1.0 is available for Windows, Linux and MacOS and can be used to create web apps, microservices, libraries and console applications. Along with the release, they have also introduced a new site called dot.net which is a central location for all the information about .NET framework including .NET Core.
The easiest way to install .NET Core 1.0 in your machine is by installing the Visual Studio 2015 with Update 3. If you are not using Visual Studio, then you can go ahead and download the following which meets your requirements
.NET Core SDK - For developing apps with .NET Core and CLI tools
.NET Core - For running apps with .NET Core Runtime
Please refer here for more details for downloads
Upgrading to RTM
Unlike upgrading from RC1 to RC2, the process for RC2 to 1.0 is pretty straight forward and I was able to complete the whole process within 15 minutes for a simple .NET Core MVC application.
Step 1 : Replace all the references with 1.0.0-rc2-final to 1.0.0 in the project.json file
"Microsoft.AspNetCore.Diagnostics": "1.0.0-rc2-final",
"Microsoft.AspNetCore.Server.IISIntegration": "1.0.0-rc2-final",
"Microsoft.AspNetCore.Mvc": "1.0.0-rc2-final",
to
"Microsoft.AspNetCore.Diagnostics": "1.0.0",
"Microsoft.AspNetCore.Server.IISIntegration": "1.0.0",
"Microsoft.AspNetCore.Mvc": "1.0.0",
Logging into Console in ASP.NET Core MVC Application
One of the important upgrades happened in .NET Core is the complete rewrite of the diagnostic logging pipeline which emits different events for logging errors. .NET Core now supports logging framework out of the box and also supports extensibility to make use of third party logging frameworks such as Log4Net, NLog etc. Logging can be implemented in quick time with a minimal amount of code in your application.
Microsoft uses Microsoft.Extensions.Logging namespace for implement logging functionality and acts a wrapper for third party logging frameworks. This eradicates the need of writing our own logging framework to provide abstraction for third party frameworks such NLog, Log4Net etc. Also it has got inbuilt providers for supporting logging into Console, Event log, Trace Logging etc.
Console logging in ASP.NET Core MVC application.
As I said earlier logging has got inbuilt support provided by the ILogger class in .NET Core. For that, first we need to add a reference to the Microsoft.Extensions.Logging package in project.json file. Add the following entries under dependencies section in the json file for implementing providers for console and debug logging.
"Microsoft.Extensions.Logging": "1.0.0-rc2-final",
"Microsoft.Extensions.Logging.Console": "1.0.0-rc2-final",
"Microsoft.Extensions.Logging.Debug": "1.0.0-rc2-final",
Custom Error Pages in ASP.NET Core MVC Application Using StatusCodePages Middleware
While developing a web application, one of the best practice every developer should follow is to set up a custom error page for the site. Showing that dreaded yellow page to the user during the occurance of an exception is highly unprofessional and is prone to security risks. In one of the earlier post in the blog, I have explained the use of StatusCodePages middleware and various approaches for implementing it in a ASP.NET Core web application.
In this post, I am going to implement custom error handling in an ASP.NET Core MVC application using the StatusCodePages Middleware. I will use the UseStatusCodePagesWithReExecute method provided by the middleware for showing the error the page in the case of an error. So let's add the following line in the Configure method in the Startup.cs file as shown below
app.UseStatusCodePagesWithReExecute("/Error");This method is telling the web server to execute the action method name Index in the ErrorController. Since we are using the ReExecute method the redirection will happen in the server itself thereby avoiding a round trip between the server and the client.
Now, we need to create the controller and the action method in it. Create a file in the Controller folder, save it as ErrorController.cs and add the following lines in it
Creating and Running Unit Tests for a .NET Core Application
Unit testing has become a major part in the daily life of a developer these days and most of them are expected to write unit tests when they add a new functionality in the software that is under development. There are lot of third party tools like NUnit, xUnit as well as MS Test framework for writing unit tests for applications developed in .NET. In this post, I am going to detail the steps needed for adding unit test in .NET Core app using Microsoft Test Framework.
Creating Project
Let's create a simple .NET Core console application project and then a unit test project for running the tests. For that I have created two folders, src and test for each project and added these in the projects key in global.json file in the root directory.
{
 "projects":["src", "test"]
}
After that, I created the console application using the dotnet new command and the contents of the Program.cs file and project.json is given below.
Program.cs
Created a new class and added a new method which returns the sum of the values in the two variables passed into it.
Hosting ASP.NET Core Web App in Docker and Accessing it from outside
In one of the earlier posts here, I have explained the steps needed to deploy a console application created in your local machine into a docker container. Today, I am going to go through the various steps needed for deploying a .NET Core web app into a Docker container using a dockerfile.
Please refer the links given towards the bottom of the post to know more about Docker for Windows and .NET Core Apps.
Creating the Project.
In this post, I am going to use Yeoman for scaffolding a ASP.NET Core web app from the command prompt. You can read more about Yeoman and how to set it up in machine by referring the links given below.
Getting Started With Yeoman
Scaffolding Using Yeoman
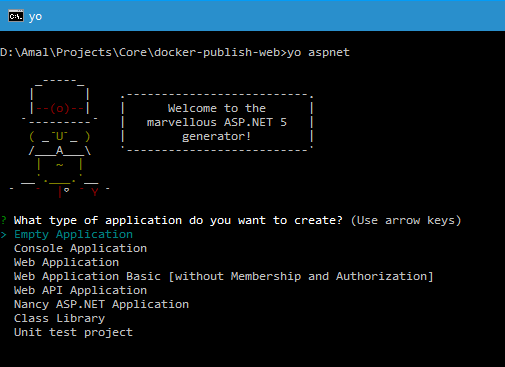
The command used for scaffolding a ASP.NET Core web app is
yo aspnet
When this command is executed, Yeoman will list the available options as shown in the image below.
Using StatusCodePages middleware in ASP.NET Core Application
In ASP.NET Web and MVC applications, we have a customErrors.Mode property in the web.config file to specify custom error pages for exceptions happening in the application.
In an ASP.NET Core web application we can make use of the UseStatusPages middleware to return a custom error page or a error message to the output stream. The middleware can be used to return a custom error message or page when there is an invlid response code between 400 and 600. Normally, the 4xx error is used for client errors where as 5xx is used for server errors.
To explain the various options available in the middleware, I am going to use a ASP.NET Core web application created using Visual Studio Code and .NET CLI tools to run the application. You can also do the same using Visual Studio IDE too.
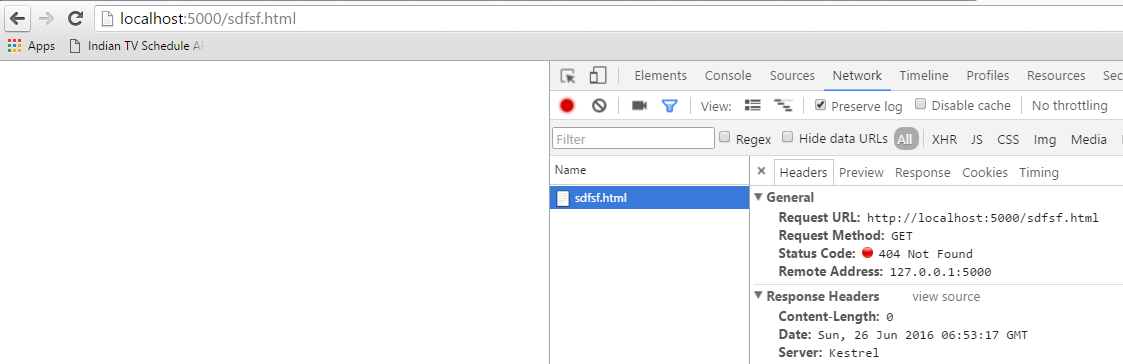
Let's create a empty MVC project and run the application using the dotnet run command. It will self host the application and exposes port# 5000 for accessing the site. Open the site in the default browser by typing in http://localhost:5000/ and if you try to access a page which doesn't exists in the project, the browser will show an empty page or a page with a message saying that Page not found. Given below is the screenshot of the page I got in Chrome. If you open up the developer tools by pressing F12, you can see that the response from the server has 404 as status code.
Pushing images to Docker Repository
Today, in this post I am going to explain the steps needed for publishing an image in your local Docker daemon to the Docker hub.
Docker hub is central registry of images maintained by Docker. We can use the images to build containers by downloading them into the local machine. For example, in of the previous post, I showed you how to build and deploy .NET core apps in Docker. This was done by downloading the .NET Core image from the Docker repository to my local machine and created the console application using the downloaded image and deployed it to a container.
You can access the public repository of Microsoft for Docker images @ https://hub.docker.com/u/microsoft/
The main difference between a registry and repository in Docker terms is that, Registry can be hosted by a third party like Docker hub, Google Container Registry where as a docker repository is collection of different images with same name but with different tags.
So let's see how can we push our image in the Docker repository.
Step 1 : Create an account in Docker Hub.
It's necessary that you should have an account with Docker for maintaining your repositories. So if you haven't created one yet, goto http://hub.docker.com and create if before proceeding to the next steps.
Step 2 : Create an Image locally.
Please refer my earlier post here to how to create a console application using .NET Core in Docker. I am going to reuse the image created in that post for pushing it into the public repository.
Publishing .NET Core Application in Docker Using DockerFile
In one of the earlier posts in the blog, I have showed you how to create and run a console application created in .NET Core from a docker container. Please refer the post here to know the details about it. In this post I am going to show you can publish an app created in the host machine to Docker container using a dockerfile.
A dockerfile is used by Docker to build automatically by reading the instructions inside it. The complete help file is available in Docker documentation site and you refer that for detailed information on the commands that can be used in the file.
You can go through my earlier posts on how to setup Docker for Windows Beta in your machine and how to troubleshoot issues you face while trying to get started with Docker in your Windows machine.
Also I will be using .NET Core for creating the console application and will be using the CLI commands and a normal editor for writing the source code for this example on a Windows 10 machine.
Creating Project
Let's create a new HelloWorld project in .NET Core using the following command.
dotnet new
The above command will create a boilerplate console application which will have a C# file named Program.cs and a project.json file which will have dependencies specified.
Publish a Web App Into Docker Container From Visual Studio
As most of you may know already that Docker has released a beta version of their Windows avataar some time ago. Unlike the stable version, this one is using native components like Powershell and Hyper-V to leverage it's capabilities in the local machine. You can read more about the beta program and the installation procedure in the links given below.
Docker for Windows Beta announced
Installing Docker For Windows Beta
Native Docker comes to Windows and Mac
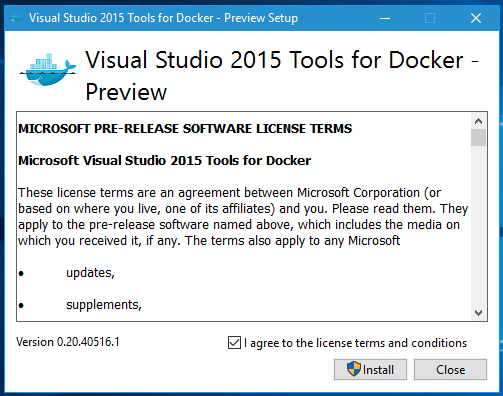
Installing Visual Studio Tools For Docker
The Visual Studio team also released some tooling for creating containers directly from VS as well as for debugging application hosted in Docker. These are called Visual Studio Tools for Docker and is available for download from the following link.
Download Visual Studio 2015 Tools for Docker
The installer is around 30 Megs in size and the installation process is pretty straightforward. You just need to double click on the downloaded installer to start the installation. The first screen will be as shown below, and to start the installation you will need to agree the license terms by clicking on the checkbox.
Create and Run a Sample C# Program Using .NET Core RC2 Image in Docker
You all may be knowing that Microsoft is in the process of rebuilding the .NET framework from the scratch to embrace the rapid advancements happening in the technology world. Last week they released the RC2 version on .NET Core which is vastly imporved from the last release with more APIs and performance improvements. You can read more details about the changes in one of the posts I have blogged earlier here.
In this post I am going to show you how to make use of the Docker container images for .NET Core to create and execute a C# program in Docker. Meaning I am not going to install the framework in my machine, rather host the runtime in a docker container and use it for compiling and running the program.
So one of the pre-requisite for this procedure to work is to have Docker installed in your machine. I am going to use a Windows 10 machine for this example and I have the latest Docker for Windows Beta installed in it. Please read my earlier posts on how to install Docker for Windows Beta in your machine and to troubleshoot the issues which may come up during the installation.
1. Installing Docker For Windows Beta
2. Docker : Troubleshooting Installation Issues
Downloading the Image and Running the Container
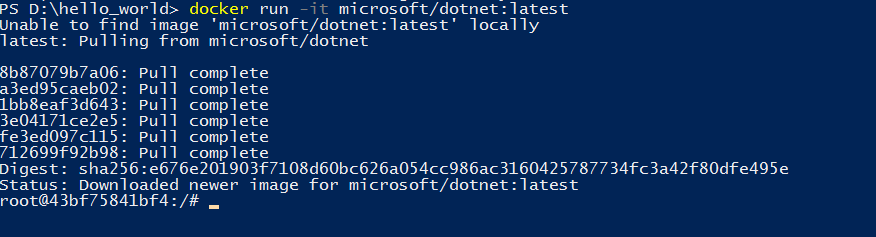
The first step is to download the RC2 version of the image from the Docker Repository. You can use the following command in the powershell window for that. It will download the image and runs the container when the download is completed.
docker run -it microsoft/dotnet:latest
It will pull the latest version, that is RC2 in our case from the repository and once it completes the download you will get a bash shell prompt, from where you can execute the CLI commands. You can refer the Microsoft repoository in Docker to know about more options such as downloading a specific version etc.
.NET Core RC2 Released with Some Major Changes
Early this week Microsoft has released the .NET Core RC2 which includes some significant changes to the core framework and is a major update from RC1 which was released in November. RC2 includes a new set of APIs and tools along with performance and reliablity improvements.
RC2 contains updates to the following components
You can read more about the RC2 release of .NET Core here.
One of the major change is with the Dotnet Execution Environment(DNX), which is now termed as .NET Core SDK in RC2. DNX was released with RC1 which included a runtime and a toolset to build ASP.NET Core 1.0 applications. It consisted mainly of three parts.
DNVM - install script for obtaining DNX
DNX - DotNet Execution runtime for executing the code
DNU - DotNet developer utility, for managing dependencies, building and deploying applications.
In RC2, all these three are now part of a single toolset called .NET CLI(Command Line Interface) and features provided by these tools are now available out of the box.
DNVM & CLI
DNVM or DotNet Version Manager was used to install DNX on your machine. It was used by users to download specific versions from the specified feed as well as to make a runtime active etc.
.NET CLI doesn't have an equivalent command for this, instead it comes in two types of packaging
- Native installers for each platform
- Install Scripts
With Native installers, CLI is distributed as installers such as DEB packages for Ubunutu, MSI bundles for Windows etc. These will install the CLI and setup the environment so that the users will be able to get started with CLI immediately after the install. One disadvantage of this approcah is that the user will require administrative privileges for installation.
Install scripts doesn't need eleveted privileges, but the user will need to manually install the pre-requisites before installing the CLI.
You can refer the here for more on the .NET CLI installation process.
Command List
In DNX, we were using dnx or dnu before the commands, but in CLI, we will have only one prefix called dotnet. So to run our program from the command line, we are going to use dotnet run instead of dnx run command. Given below is the list of common commands used in DNX and it's corresponding ones in CLI
DNX Commands CLI Commands dnx run dotnet run To run the compiled file dnu build dotnet build Build the source code into IL dnu pack dotnet pack To build your source as a NuGet Package dnu restore dotnet restore To restore the dependencies/packages defined in your project.json dnu publish dotnet publish Publishes your application for deployment Some of the commands omitted from CLI are
- dnx [command] , for eg dnx web
- dnu install
- dnu wrap
- dnu commands
Development Workflow
The simplest form of workflow for developing apps using .NET core is to create a new project, restore the dependencies and then build and run the app using the following commands
dotnet new

dotnet resore

dotnet run
Please read the post Announcing .NET Core RC2 and .NET Core SDK Preview 1 from .NET blog to know more about the changes and features in .NET Core RC2
Connecting Azure Blob Storage account using Managed Identity
Posted 12/9/2022Securing Azure KeyVault connections using Managed Identity
Posted 11/26/2022Manage application settings with Azure KeyVault
Posted 11/9/2022Adding Serilog to Azure Functions created using .NET 5
Posted 4/3/2021Learn how to split log data into different tables using Serilog in ASP.NET Core
Posted 4/23/2020