C#
Adding Serilog to Azure Functions created using .NET 5
The post is based on .NET 5.0Before the release of .NET 5, all functions developed using .NET ran as a class library in Azure and it was running inside the same process as the host. But with .NET 5, a function app built with .NET 5 runs in an isolated worker process which lets you decouple your function code from the runtime. A .NET isolated function is basically a console application targeting .NET 5 and requires the following files
- host.json file
- local.settings.json file
- C# project file which defines the project and dependencies
- Program.cs file(entry point of the app)
In this post, I will go through the steps that are needed for creating a .NET 5 Azure function, integrating Serilog for file logging, debugging, and running it locally, and then move on to publishing the function to Azure. You may already know that Azure functions already support some form of logging out of the box, but you may need to implement custom logging mechanisms depending on your need or for satisfying organizational requirements. I am going to use Serilog, which is a third-party logging provider which supports .NET and is also one of the most widely used in the ecosystem
Pre-requisites
There are some things you need before you start implementing this one. Azure Subscription is needed for hosting the functions in Azure, .NET 5 SDK, and Azure Functions Core Tools. Azure CLI is needed for developing, debugging, and publishing the app to Azure and VS Code for writing code.
Azure Subscription
.NET 5 SDK
Azure Function Core Tools version 3.0.3381 or greater
Visual Studio Code
Azure CLI
Step 1
The first step is to create a new Functions project, we will be using the func command to create a new one from the command line. Even though you can edit and debug the project in Visual Studio, full support is not yet available as the project templates for creating the project and all. The following command will create a new Azure Function project and specifying the runtime as dotnetisolated enables you to run the app on .NET 5
func init FunctionLogger --worker-runtime dotnetisolated
When this command is executed, it will create all the necessary files including the host.json and local.settings.json files. The host.json file contains the configuration options affecting all the functions in your app whereas the other file can be used for storing options such as connection strings, secrets, and other settings used by your app. Since this file can have sensitive data, it is excluded when you check in the code to source control
Step 2
Next, we will move on to create a new function in the project which is triggered by an HTTP request. The below statement creates a function named HttpExample using the HttpTrigger template and enables anonymous authentication
func new --name HttpExample --template "HTTP trigger" --authlevel "anonymous"
Learn how to split log data into different tables using Serilog in ASP.NET Core
For most of the application developers, file systems are the primary choice for storing the information generated by the logging providers. One of the main drawbacks of using the files is that it's very difficult for the search for information or to do an analysis of the information written to it over time. Third-party logging providers such as Serilog have facilities to persist the data in database tables instead of the file system. Even then, if you use a single table to write all you errors and other debug information, the size of the table will grow considerably over time which can affect the performance of the whole operation itself.
So, in this post, I will explore the possibility of using multiple tables for storing the logging information using Serilog. If you are new to Serilog, please refer to my previous articles on the same here using the links given below.
- Implementing Logging in a .NET Core Web Application using Serilog
- Rollover log files automatically in an ASP.NET Core Web Application using Serilog
- Write your logs into database in an ASP.NET Core application using Serilog
Code snippets in this post are based on .NET Core 5.0 Preview 5
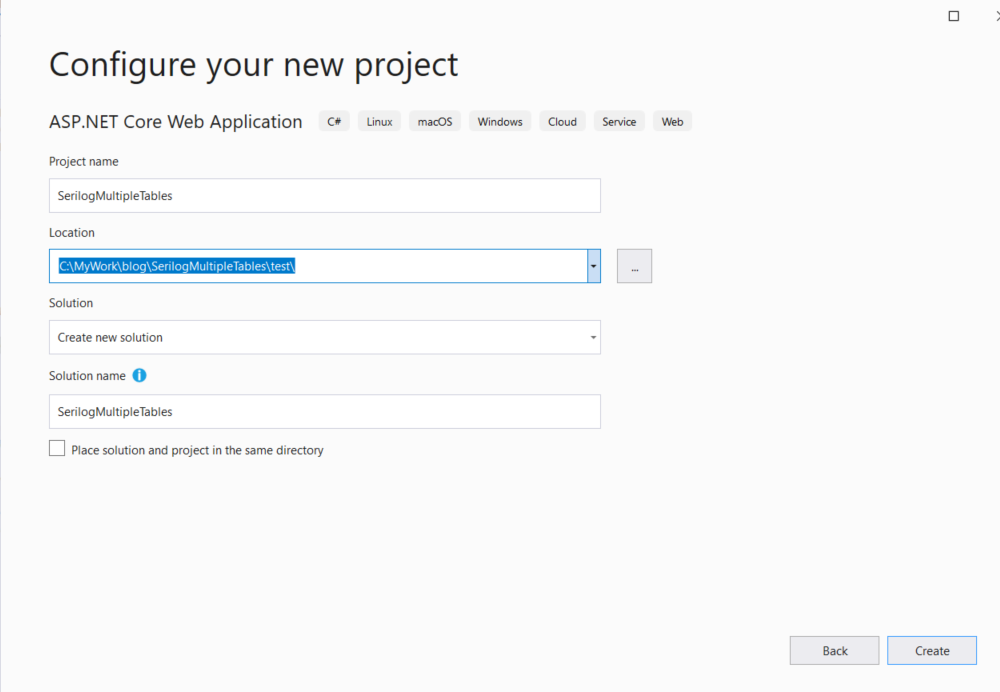
Step 1: Create a Web Application in .NET Core
To get started we will create a new empty web application using the default template available in Visual Studio. Goto File -> New Project -> ASP.NET Core Web Application
Give a name for the application, leave the rest of the fields with default values and click Create
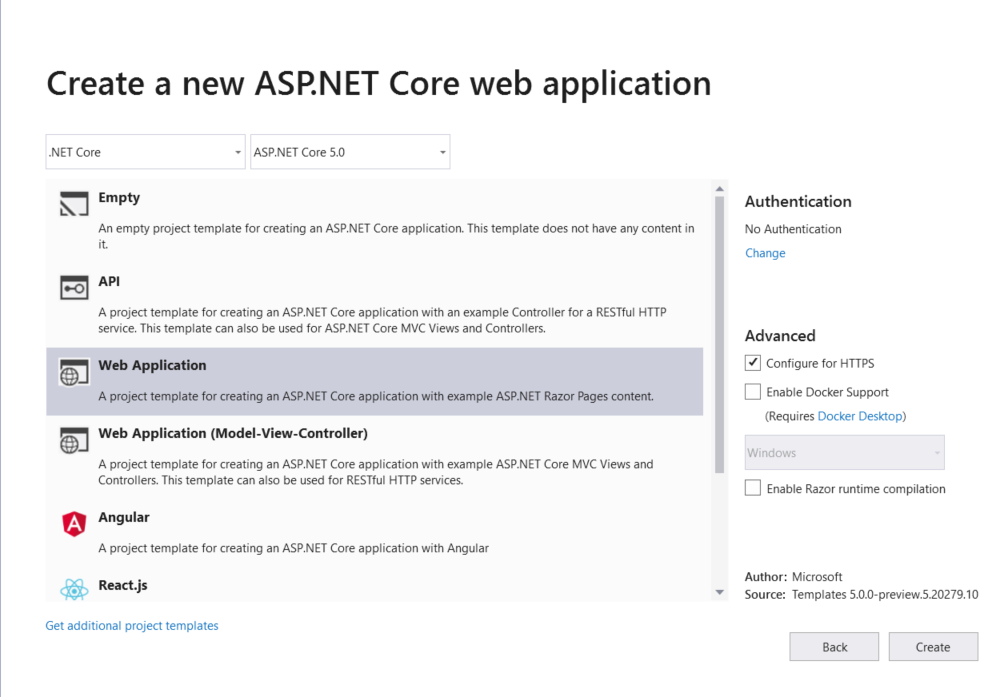
In the next window, select Web Application as a project template. Before you click on the Create button, make sure that you have selected the desired version of .NET Core in the dropdown shown at the top. Here, for this one, I selected .NET 5.0
You can also do this from .NET CLI using the following command
dotnet new web --name SerilogMultipleTablesWhen the command is executed it will scaffold a new application using the MVC structure and then restores the necessary packages needed for the default template.
Writing logs to different files using Serilog in ASP.NET Core Web Application
Application log files play an important role in analyzing the bugs and for troubleshooting issues in an application. It’s worth noting that the log files are also used for writing information about events and other information that occurs when the application is running or serving requests in the case of a web application. Most application developers use a single file to log everything from errors, warnings, debug information, etc. There is no harm in following this approach, but the downside is that it will be harder for you to segregate information from the file easily. We can easily overcome this by maintaining multiple log files depending on the need. In this post, I am going to show how we can achieve this with Serilog
Serilog is a popular third party diagnostic logging library for .NET applications, I have already written some post about it and it’s usage already. If you are new to Serilog, please refer to those posts using the links given below.
- Implementing Logging in a .NET Core Web Application using Serilog
- Rollover log files automatically in an ASP.NET Core Web Application using Serilog
- Write your logs into database in an ASP.NET Core application using Serilog
Code snippets in this post are based on .NET Core 5.0 Preview 5
Step 1 : Create a Web Application in .NET Core
Create a new ASP.NET Core MVC application using the below command
dotnet new mvc --name MultiLogFileSampleYou can also do this from Visual Studio by going into File -> New Project -> ASP .NET Core Web Application
When the command is executed it will scaffold a new application using the MVC structure and then restores the necessary packages needed for the default template.
By default, it will create two
jsonfiles named,appsettings.jsonandappsettings.development.json. These are the configuration files for the application and are chosen based on the environment where your application is running. These files will have a default configuration as shown below basically sets the default level for logging.{ "Logging":{ "LogLevel":{ "Default":Information", "Microsoft":Warning", "Microsoft.Hosting.Lifetime":Information" } } }By default, it is set as
Information, which writes a lot of data to the logs. This setting is very useful while we are developing the application, but we should set it higher severity levels when the application is deployed to higher environments. Since Serilog is not going to reference this section, we can safely remove this from the configuration filesWrite your logs into database in an ASP.NET Core application using Serilog
In most scenarios, we normally use a flat-files for writing your logs or exception messages. But what if you write that information into the table in a database instead of a file. To implement this functionality, we can make use of third-party providers such as Serilog to log information in a SQL server database. Even though it's not a recommended approach, one can easily search the logs by executing SQL queries against the table.
Installing Packages
Serilog provides the functionality to write logs to different sources such as files, trace logs, database and the providers for these are called Serilog Sinks. To write logs to a table in a SQL Server database, you will need to add the following NuGet packages
Install-Package Serilog
Install-Package Serilog.Settings.Configuration
Install-Package Serilog.Sinks.MSSqlServer
The first package contains the core runtime, the second package can read the key under the "Serilog" section from a valid IConfiguration source and the last one is responsible for making the connection to the database and writing information into the log table.
Configuring Serilog
Modify the
appsettings.jsonfile to add a new section called "Serilog". We will set up the connection string to the database, provide the name of the table and instruct Serilog to create the table if not found in the DB"Serilog": { "MinimumLevel": "Error", "WriteTo": [ { "Name": "MSSqlServer", "Args": { "connectionString": "Server=(localdb)\\MSSQLLocalDB;Database=Employee;Trusted_Connection=True;MultipleActiveResultSets=true", "tableName": "Logs", "autoCreateSqlTable": true } } ] },Serializing enums as strings using System.Text.Json library in .NET Core 3.0
.NET Core 3.0 uses the System.Text.Json API by default for JSON serialization operations. Prior versions of .NET Core relied on JSON.NET, a third party library developed by Newtonsoft and the framework team decided to create a brand new library that can make use of the latest features in the language and the framework.
The new library has got support for all the new features that got introduced in the latest version of C#. And this was one of the main reasons behind the development of the new library because implementing these changes in JSON.NET meant a significant rewrite.
While serializing an object into JSON using the new library we can control various options such as casing, indentation, etc, but one notable omission is the support for enums by default. If you try to serialize an enum in .NET Core 3.0 with the default library, it will convert it into an integer value instead of the name of the enum.
For example, let consider the following model and see if what happens when we serialize it using the System.Text.Json librarypublic enum AddressType { HomeAddress, OfficeAddress, CommunicationAddress } public class Employee { public string FirstName { get; set; } public string LastName { get; set; } public AddressType CommunicationPreference { get; set; } }and when you serialize it using the serialize method
List
employees = new List { new Employee{ FirstName = "Amal", LastName ="Dev", CommunicationPreference = AddressType.HomeAddress }, new Employee{ FirstName = "Dev", LastName ="D", CommunicationPreference = AddressType.CommunicationAddress }, new Employee{ FirstName = "Tris", LastName ="Tru", CommunicationPreference = AddressType.OfficeAddress } } JsonSerializer.Serialize(employees); it will produce an output like the one given below
[ { "FirstName":"Amal", "LastName":"Dev", "CommunicationPreference":0 }, { "FirstName":"Dev", "LastName":"D", "CommunicationPreference":2 }, { "FirstName":"Tris", "LastName":"Tru", "CommunicationPreference":1 } ]Avoid conversion errors by using Custom Converters in System.Text.Json API(.NET Core 3.0)
The post is based on .NET Core 3.0
SDK used : 3.0.100One of the most common error encountered while doing JSON serialization and deserialization is the data type conversion errors. Till now, we were using the Json.NET library from Newtonsoft for performing the serialization and deserialization in .NET/ASP.NET/.NET Core, but in the latest iteration of .NET Core which is currently under preview, they have removed the dependency on Json.NET and introduced a new built-in library for doing the same. Along with that, the all new library that is going to be introduced with .NET Core 3.0 provides you to define custom converters that can be implemented to get rid of this kind of errors. If you are not aware of it, I have already written a couple of posts about it which you can refer to using the following links.
Serializing and Deserializing Json in .NET Core 3.0 using System.Text.Json API
Step-By-Step Guide to Serialize and Deserialize JSON Using System.Text.Json
The new API is included with the System namespace and you don't need to add any NuGet package to get started with it. Along with the normally used methods for serializing/deserializing JSON, it also includes methods for supporting asynchronous programming. One of the known limitation in the v1 of the API is the limited support for the data types, given below is the list of currently supported types. For more detail, please refer this link Serializer API Document
- Array
- Boolean
- Byte
- Char (as a JSON string of length 1)
- DateTime
- DateTimeOffset
- Dictionary<string, TValue> (currently just primitives in Preview 5)
- Double
- Enum (as integer for now)
- Int16
- Int32
- Int64
- IEnumerable
- IList
- Object (polymorhic mode for serialization only)
- Nullable < T >
- SByte
- Single
- String
- UInt16
- UInt32
- UInt64
Step-By-Step Guide to Serialize and Deserialize JSON Using System.Text.Json
The post is based on .NET Core 3.0 version.Update : In preview 7 few changes were made to the API. For serialization use Serialize method instead of ToString and Deserialize method instead of Parse. Post updated to reflect these changes. SDK version : 3.0.100-preview7-012821
In the last post, I have already given an overview of the System.Text.Json API that is going to be introduced with the release with .NET Core 3.0. This API will replace the Json.NET library by Newtonsoft which is baked into the framework for doing serialization and deserialization of JSON. You can read more about it using this link.
Step 1: Refer the namespaces
Add the following lines in your code. If you are working .NET Core 3 project, then there is no need to add any NuGet packages to your project. For .NET Standard and .NET Framework project, install the System.Text.Json NuGet package. Make sure that Preview is enabled and select install version 4.6.0-preview6.19303.8 or higher
using System.Text.Json;
using System.Text.Json.Serialization;
Step 2: Serializing an object into
JSON stringSerialization is the process of converting an object into a format that can be saved. JSON is one of the most preferred format for encoding object into strings. You will be able to do this conversion by calling the ToString method in the JsonSerializer class available in the System.Text.Json API
For example, to convert a Dictionary object to a JSON string we can use the following statement
JsonSerializer.ToString<Dictionary<string,object>>(dictObj)
Resilient Connections in Entity Framework Core
When you work with databases in your application, you may face connection issues from time to time which is beyond our control. When this happens normally the application will raise a connection timeout or server not available exception. In Entity Framework core you can overcome this kind of scenario by setting up resilient connections with exponential retries.
The code snippet given below will retry to connect up to 10 times in case of a failure with a delay of 30 seconds in-between each try.
services.AddDbContext
(o => { o.UseSqlServer(connectionString, sqlServerOptionsAction: options => { options.EnableRetryOnFailure(maxRetryCount: 10, maxRetryDelay: TimeSpan.FromSeconds(30), errorNumbersToAdd: null); }); }); Also, when you enable retries in EF Core connections, each operation you perform will become its own retriable operation. So that means whenever we perform a query or a call to the SaveChanges method, it will be retried as a unit during a transient failure scenario. But when you initiate a transaction block in your code using BeginTransaction, then you are defining your own group that needs to treated as a single unit.
So, in this case, you will need to manually invoke an execution strategy with a delegate method that contains all that
need to be executed as a block. So, when a transient failure occurs, the execution strategy will invoke the delegate again as part of the retry operation.var strategy = blogContext.Database.CreateExecutionStrategy(); await strategy.ExecuteAsync(async () => { using (var transaction = blogContext.Database.BeginTransaction()) { blogContext.PostItems.Update(postItem); await blogContext.SaveChangesAsync(); if (raisePostChangedEvent) await eventLogService.SaveEventAsync(postChangedEvent); transaction.Commit(); }Creating NuGet Package using .NET Core CLI
NuGet is a great tool in managing your third-party dependencies as well as in distributing your own libraries. The dotnet pack command available in .NET Core CLI toolset will help you to build the project and creates a NuGet package. The output of this command will be a .nupkg file which can be used to push to a public registry like nuget.org or to any other private registries.
Let's start with a .NET Core class library project and see how we can pack that using the CLI toolchain
dotnet new class --name SampleLib
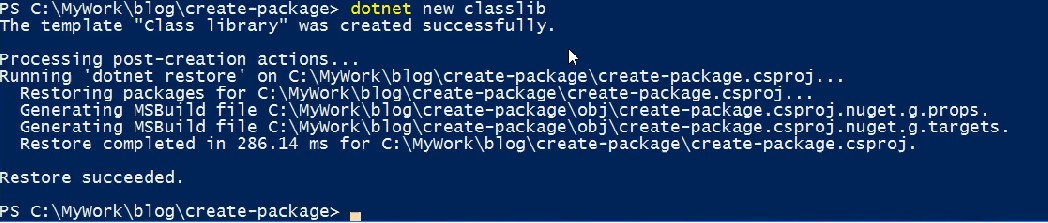
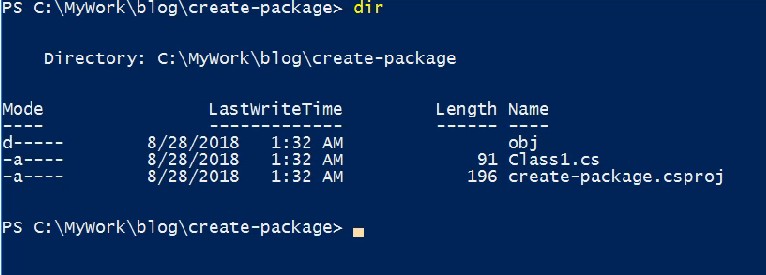
It will create a new project with one file in C# inside it. Let's create a package using the below command
Generate C# Classes from a JSON String Easily Using Visual Studio
As developers, we are often faced with certain tasks that are very repetitive in nature, which can also be time consuming to solve it. For example, whenever we need to reserialize a complex JSON string to classes we may need to write a lot of code. Until recently, whenever I needed to do such task I invariably create the classes manually and if it's a complex string, I was spending way too much time on that.
When the instances like these began to happen every now and then, I decided to search for online options which can spit out classes from a JSON string. After some googling, I found out this site json2csharp.com which can do what I was looking for. You only need to paste the JSON in the input box and click on the Generate button to get the classes in C#.

Bug : dotnet CLI Template Engine Produces Invalid Code if Name of the Directory is a Valid C# Keyword
With the release of .NET Core 1.0 tooling, dotnet new make use of the templating engine to generate various types of projects like Console App, Web App, WebAPI etc. If you are not aware of it, please read my earlier post on it here.
Executing a Task in the Background in ASP.NET MVC
In some cases we want to execute some long running task in the background without affecting the main thread. One classic example is sending mails when we are implementing a sign in module. Mostly people will either go for a scheduled job independent of the application or do it in the main thread itself.
.NET Framework 4.5.2 has got a new API called QueueBackgroundWorkItem which can execute short-lived resource intense tasks in an effective and reliable manner. As per the documentation
QBWI schedules a task which can run in the background, independent of any request. This differs from a normal ThreadPool work item in that ASP.NET automatically keeps track of how many work items registered through this API are currently running, and the ASP.NET runtime will try to delay AppDomain shutdown until these work items have finished executing.
One of the advantages of using the QBWI(QueueBackgroundWorkItem) is that it can keep track of the items that are registered through this API is currently running and the runtime will be able to delay the shutdown of the App Domain upto 90 seconds so that the running tasks can be completed.
Let's see an example of file upload in ASP.NET MVC. In this example, I will chose file from the local machine using the file upload control and when you click the Upload button, the file will be saved inside a folder in the server which will be handled by the QBWI.
View
@{ ViewBag.Title = "Index"; } @model List<string> <h2>Index</h2> @using (Html.BeginForm("UploadFile", "Home", FormMethod.Post, new { id = "frmImageGallery", enctype = "multipart/form-data" })) { <input type="file" name="file" /> <input type="submit" value="Upload" id="btnUpload" /> } <h2>Images</h2> @foreach (var item in Model) { <p><img src="@String.Concat("Images/Uploaded/",item)" style="height:200px" /></p><br /> } <script> $(function () { $(document).on("click", "#btnUpload", function (event) { event.preventDefault(); var fileOptions = { success: res, dataType: "json" } $("#frmImageGallery").ajaxSubmit(fileOptions); }); }); </script>Add/Remove References Using dotnet CLI Tool
In the latest update made to the .NET Core tooling, dotnet new and add command has undergone significant changes in the usage and options available for the command. You can read more about the updates here in the official blog. In this current update it replaces the dotnet add p2p command with a new syntax.
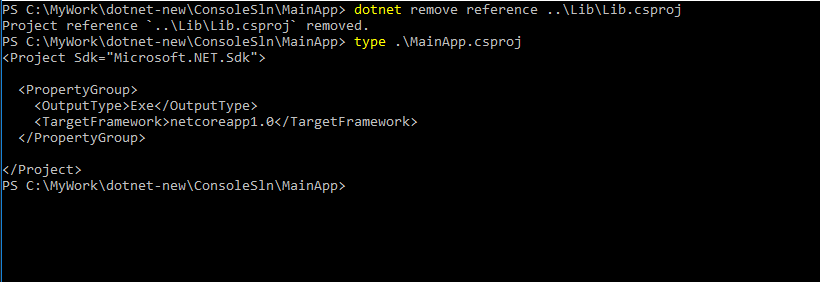
Adding a Reference
Syntax
dotnet add reference <path to project file>
Usage
dotnet add reference ..\Lib\Lib.csproj
When you execute the following command it will get added to the project and if look at the csproj file of the project to which the reference is added you will see the entry for it

Remove a Reference
Syntax
dotnet remove reference <path to the proj file which needs to be removed>
Usage
dotnet remove reference ..\Lib\Lib.csproj
To remove the referernce we will use the dotnet remove reference as shown below.
Add/Remove Packages Using dotnet CLI Tool
With the release of .NET Core RC3, the tooling has undergone signinficant improvements in fixing bugs and stablilty. With this release the team has added the ability to add/remove NuGet packages to your project using the dotnet command. The .NET Core CLI tools were introduced to make it easier for developers who uses command line to create and manage projects and with this addition they will become more productive.
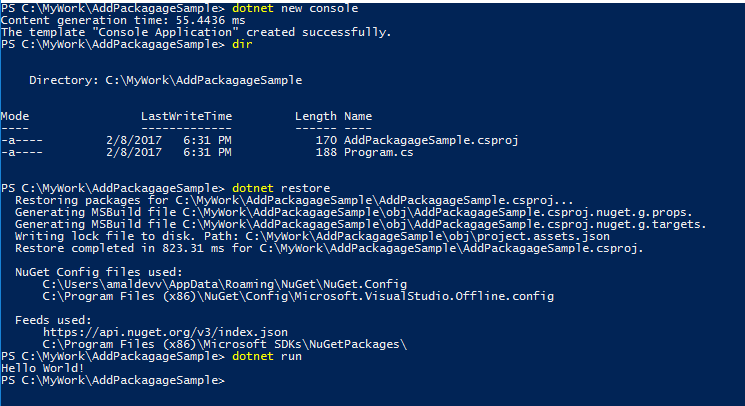
Let's create a sample console application project and see how we can add/remove NuGet packages to and from the project. To create the project execute the following command.
dotnet new console
When the command is executed, two files will be created. One is the source file and other one is the project file
Program.cs
namespace AddPackagageSample
{
    class Program
    {
        static void Main(string[] args)
        {
            Console.WriteLine("Hello World!");
        }
    }
}
csproj file
<Project Sdk="Microsoft.NET.Sdk">

  <PropertyGroup>
    <OutputType>Exe</OutputType>
    <TargetFramework>netcoreapp1.0</TargetFramework>
  </PropertyGroup>

</Project>
To see this project in action, let's restore the packages and build it as shown below
Let's modify the Program.cs file to do some Json Serialiazation as shown below
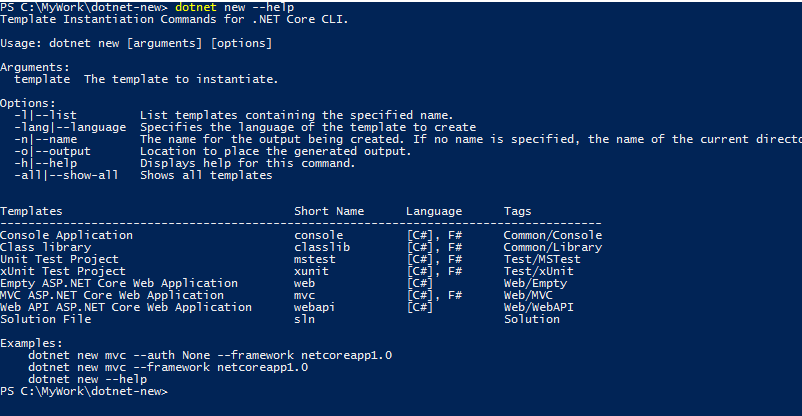
Templates Available for dotnet new command
Early this week Microsoft announced the release of updates to .NET Core Tooling included in the Visual Studio 2017 RC which brings some major changes in the toolset. You can refer this link to read about the official release of the update. One of the major change is in creating new projects using the dotnet new command which is widely used by novice and experienced hands in their day to day life as a developer. According to the release note, the updated dotnet command will be having the following characteristics.
- Powerful — expressive and scriptable command-line syntax.
- Helpful — an interactive mode helps users pick the templates they need (think Yeoman).
- Extensible — anyone can write templates for dotnet new!
- Updatable — templates can be updated outside of primary delivery vehicles (e.g. Visual Studio, .NET Core SDK).
- Platform — can be used by tools like Visual Studio and generator-aspnet (think yo aspnet).
The major change in dotnet new is that it is based on a templating engine which will create the artifacts automatically depending upon the projects you chose to create. To view the options available in the command, just execute the following command in the prompt.
dotnet new --help
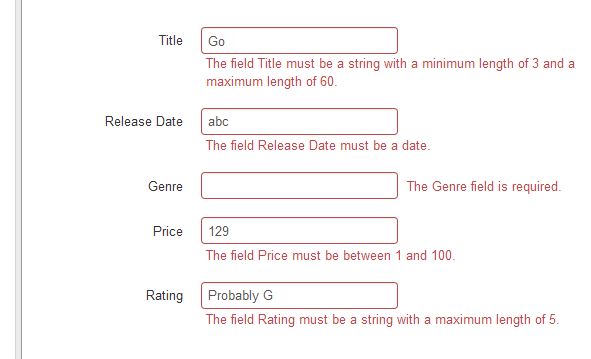
Consolidate Model Validation Errors as a Single String in ASP.NET Web API
As we all know that we can do validation in ASP.NET MVC by decorating the model with validation attributes and when the page is generated by the framework it will automatically generate the client side validation scripts. You can read more about it in the Microsoft Documentation here. Normally the output will be like in the figure given below.
Let's see how we can use the same mechanism in ASP.NET WebAPI to do the validation. I have created a model class as shown below
public class Employee
    {
        [Required]
        [MaxLength(50, ErrorMessage="First name should not exceed 50 characters")]
        public string FirstName { get; set; }
        [Required]
        [MaxLength(50, ErrorMessage="Last name should not exceed 50 characters")]
        public string LastName { get; set; }
        [Required]
        [MaxLength(200, ErrorMessage="Address should not exceed 200 characters")]
        public string Address { get; set; }
        [Required]
        [EmailAddress(ErrorMessage="Email is invalid")]
        [MaxLength(50, ErrorMessage="EmailAddress should not exceed 50 characters")]
        public string EmailAddress { get; set; }
    }
And created a POST method as given below which basically validates the model and if any errors are found then returns an error as response.
public HttpResponseMessage Post([FromBody] Employee emp) { if (!ModelState.IsValid) return Request.CreateErrorResponse(HttpStatusCode.InternalServerError, ModelState); return Request.CreateResponse(HttpStatusCode.Created, emp); }Compile a ASP.NET Core Web App on the fly using dotnet watch command
One of the mostly used feature in Visual Studio while developing ASP.NET web applications is the ablity to make changes on the fly in the source code and able to see the changes in the browser without doing a compilation process manually. Actually Visual Studio tracks the changes made in the code and when you save the modifications, VS will automatically compile the changes in the background and restrats the session.
In the .NET Core world, most of the development is happening with code editors such as Notepad, Visual Studio Code etc. These are vanilla text editors and lacks most of the features found in Visual Studio. So .NET Core team has created a command line tool called dotnet watch to achieve this ability for .NET Core. It's basically a file watcher which restarts the specified application whenever there is change is made in the source code. You can read more about it in the documentation hosted in GitHub.
To add this functionlity in your code, you need to add the reference in the tools section in the project.json file as shown below.
"tools": {
    "Microsoft.DotNet.Watcher.Tools": "1.0.0-preview2-final"
  }
After adding the entry in the tools, you needs to restore the package using the dotnet restore command to get all the required files for the watch tool.
Syntax
dotnet watch <dotnet arguments>
The watch tool can be used to compile, run application or test and publish whenever there is a change in the source code. So the <dotnet arugments> can be compile, run, publish etc. For the run command the usage is as shown below
Usage
dotnet watch run
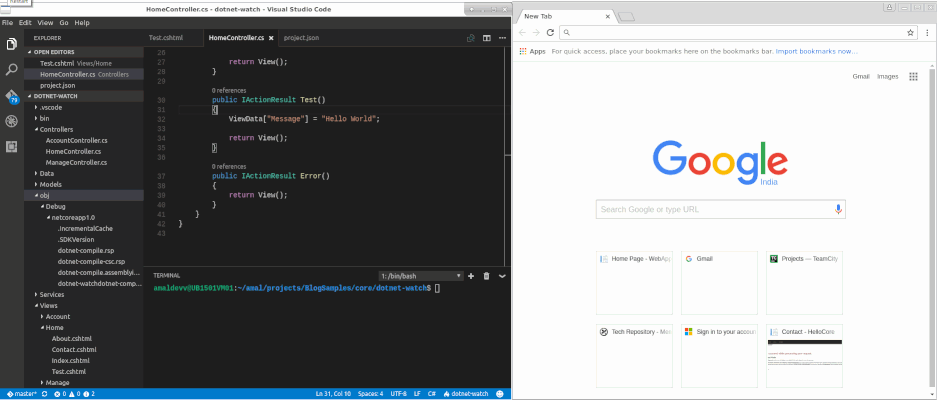
Now, if you make any changes in server side code, the application will be automatically compiled and the reflected changes can be seen by just refreshing the browser. In the following animation, if you look closely in the Terminal Window you can see that the application is stopped and compiled automatically when the source code is saved after making the changes.
So using this tool, whenever we need to make change in the source code there is no need to stop the running instance and executing the dotnet run command again. Similary it can be used along with any other dotnet command as discussed in the post here in the documentation.
Deploying an Optimized Image of your ASP.NET Core MVC Web App in Docker
In one of the posts I authored in the blog, I have shown you how to deploy an ASP.NET Core Web application in a Docker container, but the approach in the post has got a significant disadvantage. In that approach we always copied the entire contents of the directory which included all the static files, source code files etc, then restores all the packages inside the container and builds the application before it’s hosted in the container. This increases the boot up time of the container as well as the file size of the container.
In this post, I will show you how to publish a web application into the container rather than copying all the files into container and then build the application inside that. I am going to create an .NET Core MVC web application using the dotnet new command, you can read more about that my post here.
Step 1 : Create Project
dotnet new –t web
Step 2 : Restore Packages
dotnet restore //restores all the packages referenced in the project.json files
Step 3 : Publish Project
dotnet publish –c Release –o publish
Publishes the output of the project to the publish folder using the Release configuration. Before running the command make sure that node, bower and gulp is installed in your machine otherwise the publish command will fail
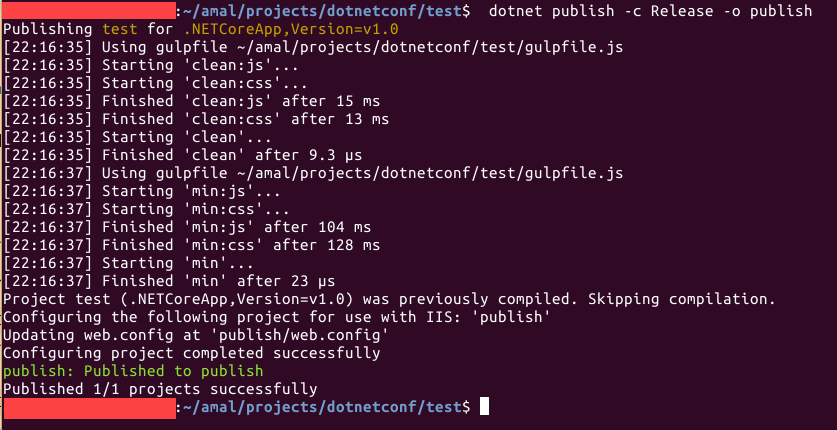
If you look inside the publish folder you will find that it has copied all our static files and resources along with the dlls of our application and the dependencies used in it
Scaffolding an ASP.NET Core MVC application using dotnet command
We all know that the dotnet new command will create a new console project containing a two files Program.cs and project.json out of the box for you
dotnet new

Output

It was of great help in getting started with a console application in .NET Core, but this command was missing a more important feature – the ability to create a ASP.NET Core Web project from the command line. So, we developers relied on scaffolding tools such as yeoman to generate Web/MVC/Web API projects targeting .NET Core. So whenever the .NET team made changes to the framework and tools, we faced some incompatibilities. Either we needed to wait till the template is upgraded to support the new changes or needed to manually update the files after the project is created.
This is now a thing of the past with the latest update to the .NET Core project implementing to facility to scaffold an MVC project targeting the Core framework.
Syntax
dotnet new –t web
Output


The process of building and running the web project remains the same by using the following statements
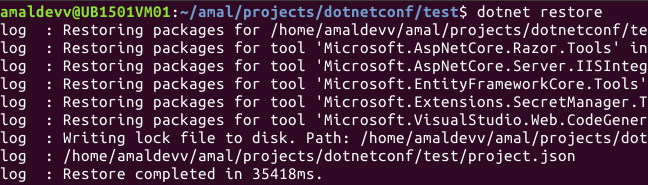
dotnet restore //restores the referenced packages
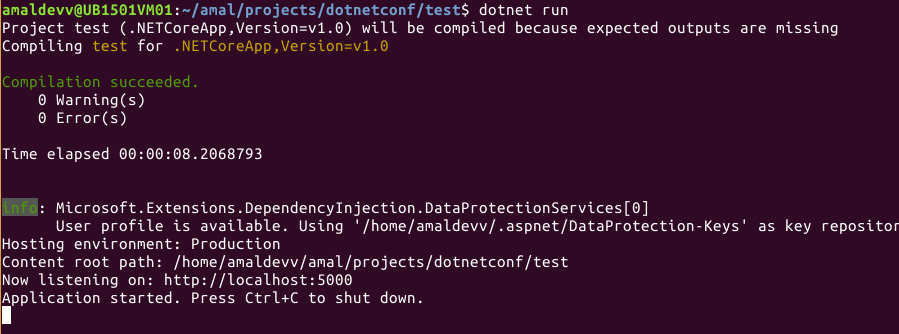
dotnet run //compiles the project if it’s not and then hosts the application in the default port 5000
Installing .NET Core in Ubuntu 15.10 in Azure
One of the benefits of being a Microsoft MVP is the credit you receive for using various services/resources like in Windows Azure which is now around 9.1K INR for each month. That credit is more than enough if you want to play with various options in Azure. So I went ahead and created a Linux VM in Azure using Ubuntu 15.10 distro, then subsequently installed Ubuntu Desktop, xrdp and xfce for connecting remotely into the VM using RDP from Windows machines. I am planning to write a post on the installation process and steps needed for configuring it and will share it as soon as it's available in the blog.
Many of you people may be knowing that Microsoft has released .NET Core 1.0 to the public last month. It's the new .NET framework completly built from scratch, modular and truely open source. In this post, I am going to show you the steps needed for installing .NET Core SDK in a Linux machine. .NET Core SDK consists of .NET Core CLR runtime and CLI tools which are needed for developing the applications in .NET core.
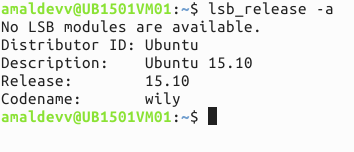
Step 1: Check Ubuntu version
Make sure that the installed version of Ubuntu is 15.10. The following steps were tried and tested in Ubuntu 15.10 and may not work in other versions. You can check the version from terminal by using the following command.
lsb_release -a
Step 2: Set up feed and update packages
Add the feed for downloading .NET Core SDK to dotnetdev.list by executing the following command.
sudo sh -c 'echo "deb [arch=amd64] https://apt-mo.trafficmanager.net/repos/dotnet-release/ trusty main" > /etc/apt/sources.list.d/dotnetdev.list'
Add the following key to the list so that packages authenticated with this key will always be considered as a trusted one.
sudo apt-key adv --keyserver apt-mo.trafficmanager.net --recv-keys 417A0893
Execute the apt-get update command to fetch the latest version and dependencies
sudo apt-get update
Connecting Azure Blob Storage account using Managed Identity
Posted 12/9/2022Securing Azure KeyVault connections using Managed Identity
Posted 11/26/2022Manage application settings with Azure KeyVault
Posted 11/9/2022Adding Serilog to Azure Functions created using .NET 5
Posted 4/3/2021Learn how to split log data into different tables using Serilog in ASP.NET Core
Posted 4/23/2020