Bower
Installing packages using Bower From Visual Studio
In one of the earlier post, I have explained the procedure for installing Bower in your Windows machine using command line tools. Now, it's possible to install packages using Bower from Visual Studio too, if you are wondering what actually Bower is then please go through this post which I have published earlier.
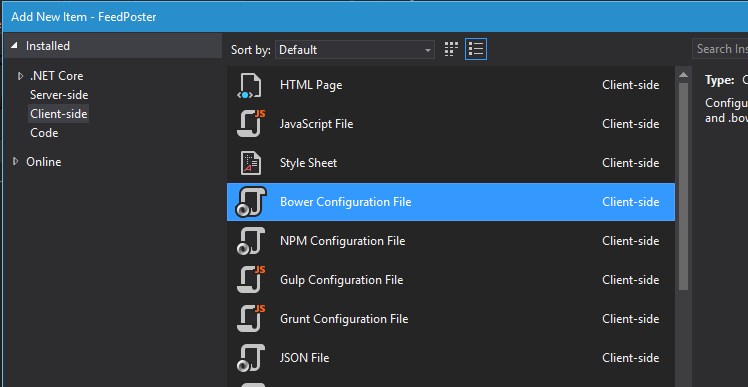
The first step in installing the package is to create the Bower Configuration File which will be used to save all the information about dependencies and metadata like name of the project, description entry point.
To create the configuration file, select the Bower Configuration File option from the Add New Item dialog box which can be brought up from the context menu by right clicking on the project.
I have saved the file as bower.json and if you open it now, the contents will be,
Installing packages using Bower in your Windows machine
In the last post, I have detailed the steps needs for installing Bower in your Windows machine and in this one I will be showing how to use Bower to install packages in your projects. If you have missed my earlier one on installation, you can read it here.
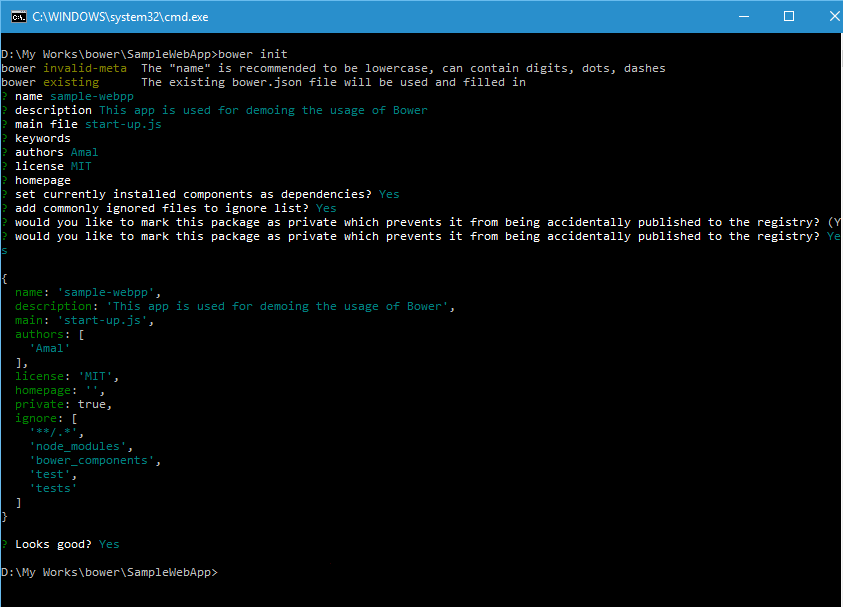
If you want to use bower in your project, you need to initialize it first. You can do that using the bower init command to create bower.json file in the root folder and you can create one manually using any text editor.
When you execute init command, it will ask some questions and it's not mandatory to give answers for that. Once it's with collecting data it will ask for a confirmation to save the changes and creates the json file.
bower init
Output
So we have the environment setup for the project and let's add jQuery. Since I am not sure about the locations of the packages, I will search for it in the registry and will then install it. For searching the registry, we have got two options, one option is using the Bower website and other is from the command line.
Syntax for searching from CLI
bower search <query>
Installing Bower on your Windows machine
Managing dependencies is one of the hardest job in the life of a web developer. For example, Whenever we installs a new library, we may need to add other libraries which our newly added library depends upon for working correctly. Some times adding incorrect versions also will give undesired results. This problem was solved by package manager applications like NuGet for server side frameworks.
For client side frameworks, it's even a bigger issue. A web site will normally contain a lot of client side frameworks such as jQuery, AngularJS, MomentJS etc and keeping track of updates and making sure that specific versions are used by libraries is a tedious job. That's where tools like Bower comes in handy
Bower makes sure that it installs the right versions of the packages and dependencies we need. It can manage components that can have HTML, Javascript, fonts, css, image files etc. What Bower basically does is that searches for the web for the package and dependencies all over the web, downloads and saves it for your use. It creates a file called bower.json which it uses for tracking the saved ones.
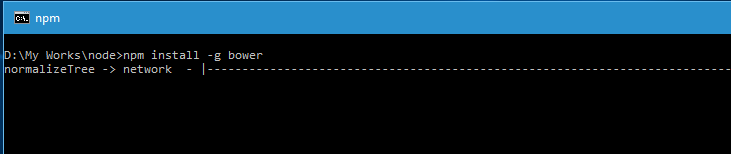
Let's now proceed with installation of Bower. You will need Node.js in the machine as we are using Node Package Manager or npm for installing Bower. If your machine doesn't have one, head over to this post to know more about installing Node.js.
So the command used for installing bower is
npm install -g bower
This statement will install bower globally in your system, meaning it's avaliable for all of the projects you are going create from now.
Connecting Azure Blob Storage account using Managed Identity
Posted 12/9/2022Securing Azure KeyVault connections using Managed Identity
Posted 11/26/2022Manage application settings with Azure KeyVault
Posted 11/9/2022Adding Serilog to Azure Functions created using .NET 5
Posted 4/3/2021Learn how to split log data into different tables using Serilog in ASP.NET Core
Posted 4/23/2020