Memory dumps of a developer
Articles and tutorials on .NET Core, ASP.NET MVC, Kendo UI, Windows 10, Windows Mobile, Orchard
Installing node.js in Windows 10
Node.js is an open-source, cross-platfrom runtime built using V8 engine, the same one powers Chrome's javascript engine. It helps you to create robust and scalable server-side and networking applications. Applications targeting node.js or node are created using Javascript and can be run within the runtime on Windows, Mac or Linux.
According to the official documentation
Node.js uses an event-driven, non-blocking I/O model that makes it lightweight and efficient, perfect for data-intensive real-time applications that run across distributed devices.Let's see how can we install node.js on your machine. First you to download the desired package from the node site. Since I am using Windows 10, am going to download the Windows flavor and will proceed with version 5.10.1 from stable line branch
The installer size is around 10 MB and won't much time to download. Once it's finished downloading, go to the downloads folder and double click on the installer to start the installation.
Installing Git Client in Windows 10
Git is a distributed version control system initially developed by Linux Kernel Developers for Linux development in 2005. It's free software and is distributed under GNU GPL Version 2. Every working directory in Git is a repository with full history and version tracking which can run without a central server or even network access. Even though it was developed primarily for Linux, today it's now supported on all the major operating systems such as Windows, Mac, Solaris etc.
Git for Windows can be downloaded from here and the installation is pretty straightforward. The size of the installer is around 31 MB and will take around 200 MB of disk space.
Let's start the installation by double clicking on the downloaded installer. The first page will display the GNU GPL license and click on the next buttont to contiune with the installation.
In this screen, we need to give the location for Git. By default, it will show the path in the Windows drive and you can override it by typing in the box or clicking on the browse window and selecting the folder from there. Here I chose to install in a different location and gave the new path in the box
Installing Visual Studio Code in Windows 10
Visual Studio Code or VS Code is modern light weight editor from Microsoft for developing apps in a variety of languages. It's cross platform and can be run on Windows, Linux and Mac natively. Also it's free for all to use and the source is hosted publicly at GitHub.
You can download the installer from code.visualstudio.com which is around 29 MB in size and will take around 115 MB in your disk when the installation is completed
The full system requirements are here. Please make sure that you go through it before doing the installation on your machine.
Let's begin the install by double clicking on installer
Specify the location where VS Code needs to be installed. Will default the path in the drive where Windows is installed. If you want you change it to another location by typing in the box or using the browse button select the folder you want
In this page , we will specify the caption for the text needs to be displayed in the Start menu. If you don't it to show up in the menu, tick the checkbox in the bottom
What is Visual Studio Code
Visual Studio Code is new light weight free editor from Microsoft initially launched as a beta version around a year ago. Since then it has come by leaps and bounds and evolved into a truly cross-platform editor with loads of features.
Since it's introduction more than 2 millions developers have installed the code and these days there are around 500,000 active users for the application. And in April 2016, Code came out of beta and version 1.0 was released worldwide. It's available for download from code.visualstudio.com and supports upto 9 langugages. As I mentioned earlier Visual Studio is cross-platform tool and native versions are available for Linux and Mac.
Visual Studio Code was initially targeted developers who were working on TypeScipt and Javascript. But when the product was made extensible and delivered to the community, they quickly created a lot of extentions that supports most of the languages and runtimes.VS Code is fully accesible, with full keyboard navigation, screen reading and accesible navigation for visually impared developers.
Difference between DNVM Install and Upgrade Commands
In the last post I have explained the use of install and upgrade commands for managing the runtimes in DNVM. If you have missed that post or wants to recap it, refer it here
The install and upgrade commands are mainly used for installing the runtimes, but there are some difference between those and let's examine what are those in this post.
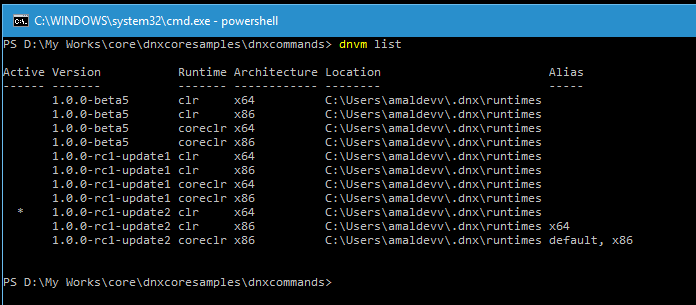
Let's first list all the environments in the machine using the command dnvm list and will try to install a new runtime.
Install Command
From the list we can see that we are missing the Release Candidate Update 2 based on 64-bit version for the clr framework. So let's install it using the following command.
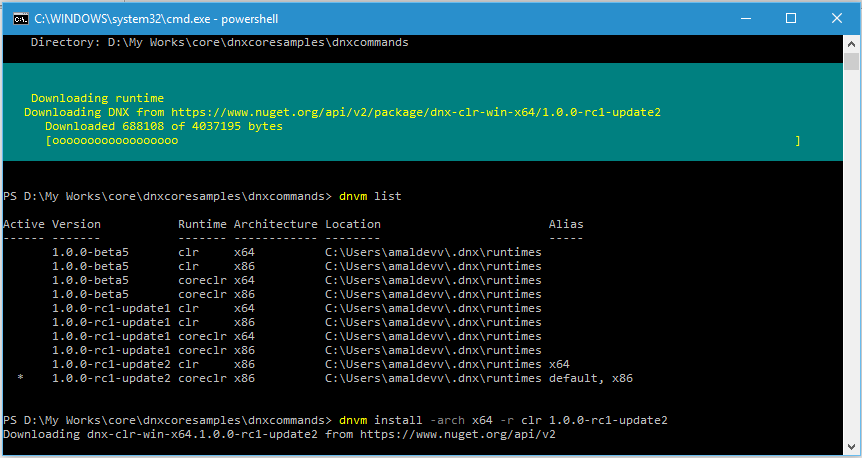
dnvm install -arch x64 -r clr 1.0.0-rc1-update2
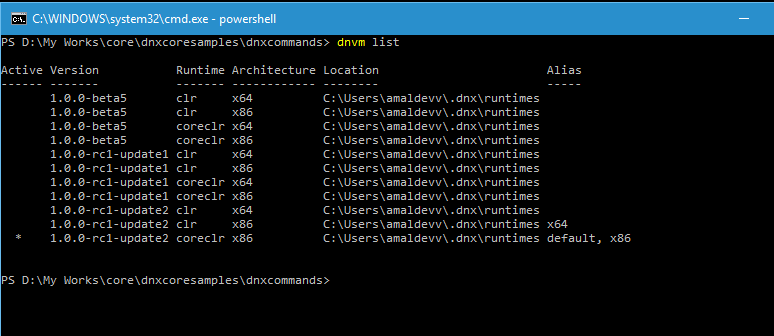
When you run the command, it will download the packgage from the feed and installs it to the runtimes folder in your user profiles. Then it will add the path to the process path variable and also makes it as the active one which is indicated by the * sign in the below screenshot.
But the one disadavantage is that the selected runtime is active only for the duration of the current session in the command prompt. Meaning it will revert to none or an earlier one if I close the window and open it again.
If you compare the screenshots for the output of dnvm list commands, you can see that before installing it, the active version was 1.0.0-rc1-update 2 targeting coreclr based on x86. But after installing it's now 1.0.0.-rc1-update2 targeting clr based on x64. But if I close and reopen the terminal window, the active one will be the former one
Upgrade Command
The upgrade command also installs the runtime, but the difference is that it downloads and installs the runtime version which is the latest one.
dnvm upgrade -arch x64 -r clr
It will download and install the latest 64-bit version of clr framework.
The difference is that it will add to the user path as well as process variables as active version, so that the selection will be persisted and won't revert back when we close and open the command window. It will also add an alias for the runtime.
Manage Runtimes Using DNVM Install and Upgrade Commands
DNVM Install and Upgrade commands can be used to install a new version of the runtime or to upgrade an existing version to a newer version of the runtime.
Install command can be used to download a particular version of the runtime.
Syntax
dnvm install –arch <architecture name=""> –r<runtime name="">
Example
dnvm install –arch x64 –r coreclr 1.0.0-rc1-update2
The above command will install the version 1.0.0-rc1-update2 targeting the Core CLR runtime for 64-bit. It installs into runtimes folder located in the user profiles folder and modifies the path variable too.
DNX - Using Commands option
In DNX environment we are using dnx run command to run the program from the command line. I have already authored a post on this and you refer that from here.
In this post I am going to cover the custom command option avaliable in .NET core using which we can do named execution of our program. We can define commands in the project.json file in your project folder and is recognized by editors like Visual Studio and Visual Studio Code. The commands defined in the project folder is available in that project only. If you want you can have commands defined at a global level, then it is available for everthing that runs under a user profile.
Sample program
using System;
using static System.Console;
using System.Collections.Generic;
namespace DnxCoreSample.Commands
{
    public class Program
    {
        public void Main(string[] args)
        {
            var items = new List<string>() { "Red", "Blue", "White", "Green" };
            foreach (var item in items)
            {
                WriteLine($"Color : {item}");
            }
        }


    }
}
Let's see how can we configure that in project.json file
{ "frameworks": { "dnx451": { }, "dnxcore50": { "dependencies": { "System.Console": "4.0.0-beta-23516", "System.Collections": "4.0.11-beta-23516" } } }, "commands": { "RunSample" : "dnxcommands" } }The dnx run Command
As we have seen in the earlier post, we can use the dnx run command to compile and immediately execute the program. To recap, when you execute the below command in the command prompt, it will execute the program which has an entry point defined in the current folder.
dnx run
I have created a sample program which outputs a message to the console.
using System;
using static System.Console;
namespace DnxCoreSample.Commands
{
 public class Program
    {
        public  void Main(string[] args)
        {
            WriteLine("Getting started with dnx commands");

        }
    }
}
So if we try to execute the dnx run command, will get an error as shown below.
That's because we haven't created the configuration file yet, which is used by the DNX environment for managing the dependencies and other project settings. So let's create one with the needed dependencies and run the dnu restore command to download the packages.
So after downloading, run the program using dnx run in the command prompt and will get the result as shown below.
Hello From DNX
In the earlier post, I have gone through in detail about setting up dnx environment in your machine without installing Visual Studio. Also I have gone though some of the commands which will help you to the bare necessities in DNVM(.NET Version Manager). If you haven't seen that post yet, please read it from here.
So we have set up the dnx environment in our system, now let's see how can we compile and run programs using this.
Let's create a sample C# program using any text editors like Notepad or Sublime or Visual Studio Code.
using System;
namespace DnxCoreSample
{
 public class Program
    {
        public static void Main(string[] args)
        {
		Console.WriteLine("Hello World from DNX!");
        }
    }
}
Our program when executed will print a message on to the console. So before compiling an running the code we need to do one more thing. That's setting up the configurations needed for DNX will use to compile and run this program. In .NET Core we have the project.json file where all the project related settings. So create a file named project.json file in your folder and add the following entries
{ "frameworks": { "dnx451": { }, "dnxcore50": { "dependencies": { "System.Console": "4.0.0-beta-23516" } } }, "commands": { "HelloDnx": "dnxcoresamples" } }ASP.MVC 6 - Using dnu restore command
Recently I was playing around with the new MVC 6 web application templates to create some sample websites for learning the new features in the latest version. And suddenly out of the blue got the following error while try to start a debugging session and won't allow you the run the application without resolving this issue.
So I had no clue at first about, so I googled about the error and learned how this error came about and the ways to fix it too.
Visual Studio has got a project.json file as well as project.lock.json file inside the project. The project.json file can contain ranged versions or with specific versions like the one below
    "Microsoft.AspNet.Mvc": "6.0.0-beta6-*",
    "Newtonsoft.Json": "7.0.1"
The project.lock.json file will contain the specific version that is being used by the project. If we doesn't specified ranged versions in the project.json file, then both the files will be identical. The project.lock.json is used by dnx enviroment for loading the references for your project because using project.json file may cause to resolve the versions every time the application is run.
The lock file contians a key the very top called locked and when it's set to true then dnu or nuget will always restore and use the specific versions of every dependency specified in the lock file.
Connecting Azure Blob Storage account using Managed Identity
Posted 12/9/2022Securing Azure KeyVault connections using Managed Identity
Posted 11/26/2022Manage application settings with Azure KeyVault
Posted 11/9/2022Adding Serilog to Azure Functions created using .NET 5
Posted 4/3/2021Learn how to split log data into different tables using Serilog in ASP.NET Core
Posted 4/23/2020


